• Trang Chủ
  • Chụp Ảnh Resort Cam Lâm
  • Makeup cô dâu resort Cam Lâm
  • Dịch vụ makeup Cam Ranh
  • Cẩm Nang & Kinh Nghiệm
  • Dịch Vụ Nhiếp Ảnh Cam Ranh
  • Review Địa Điểm Chụp Ảnh
NHIẾP ẢNH CAM RANH
Category:

Makeup cô dâu resort Cam Lâm

Makeup cô dâu resort Cam Lâm

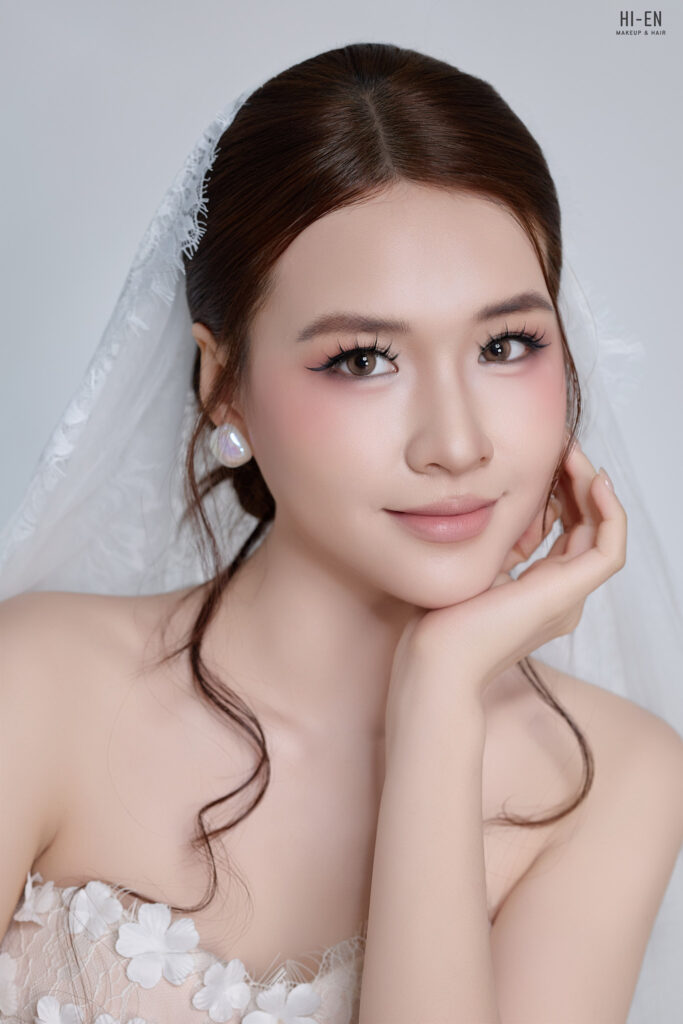
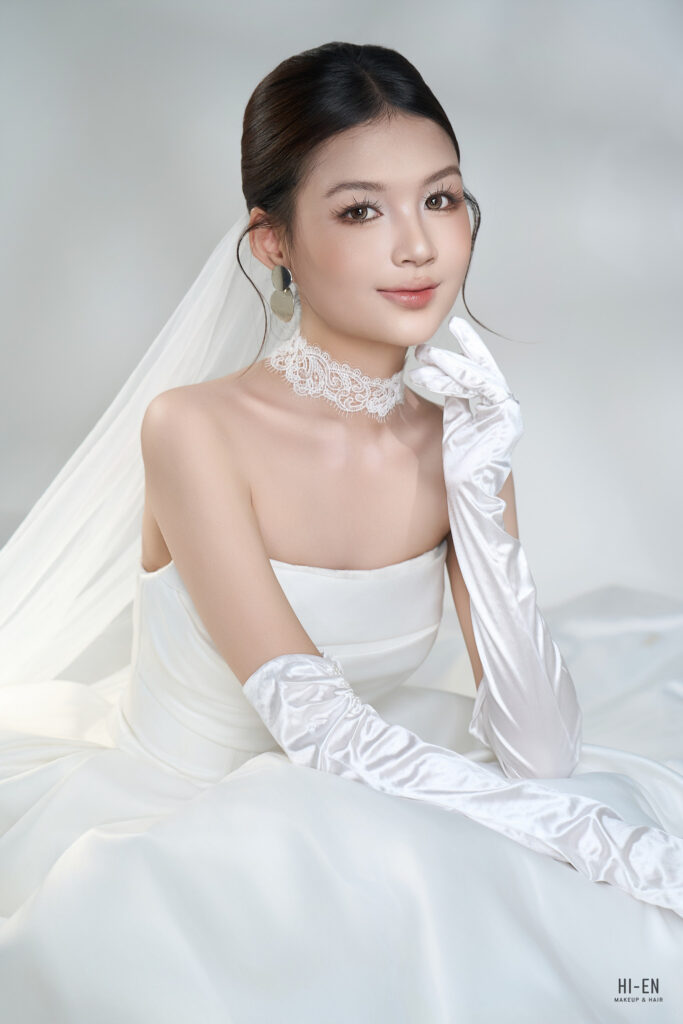
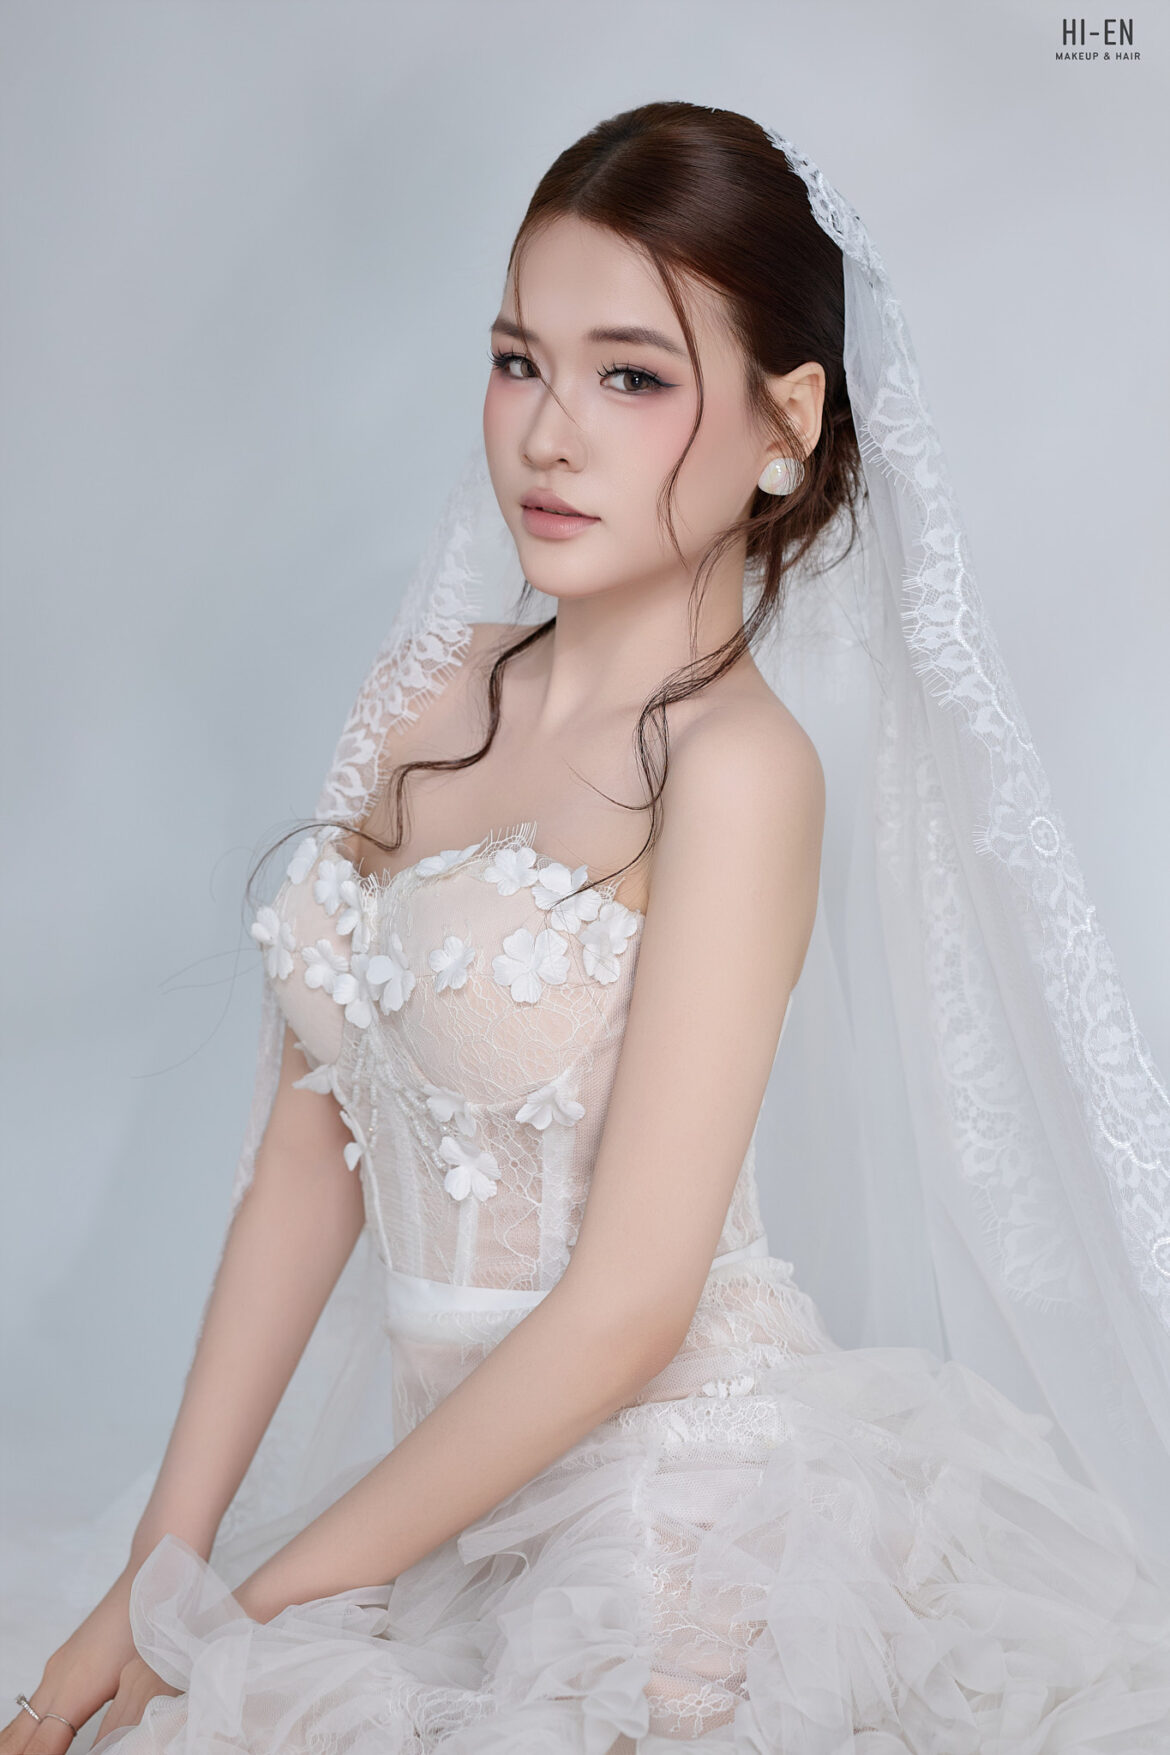
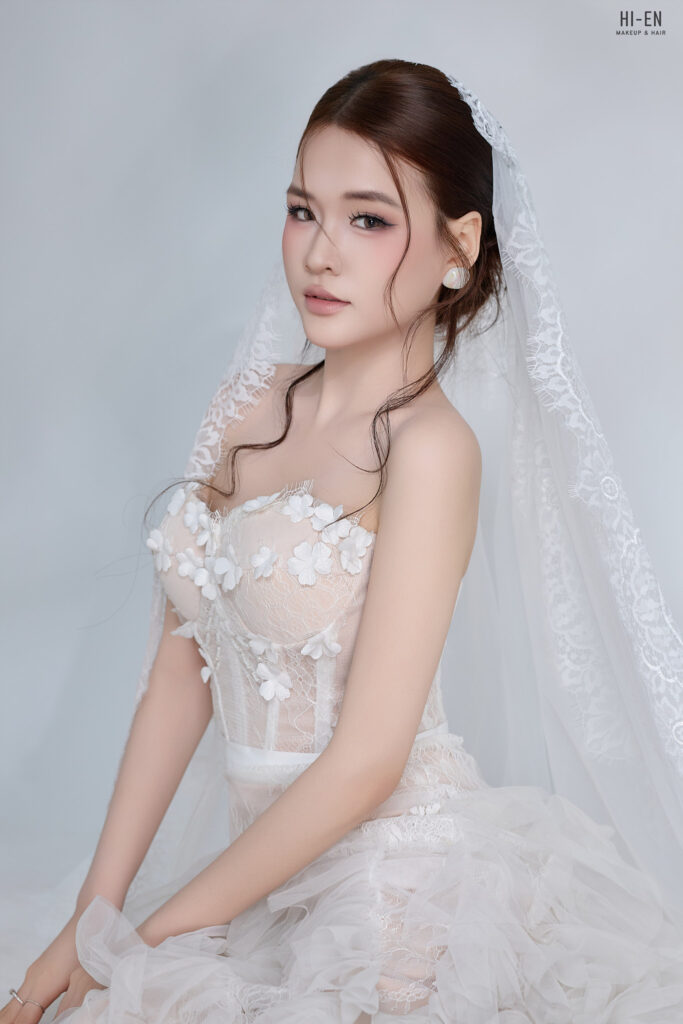
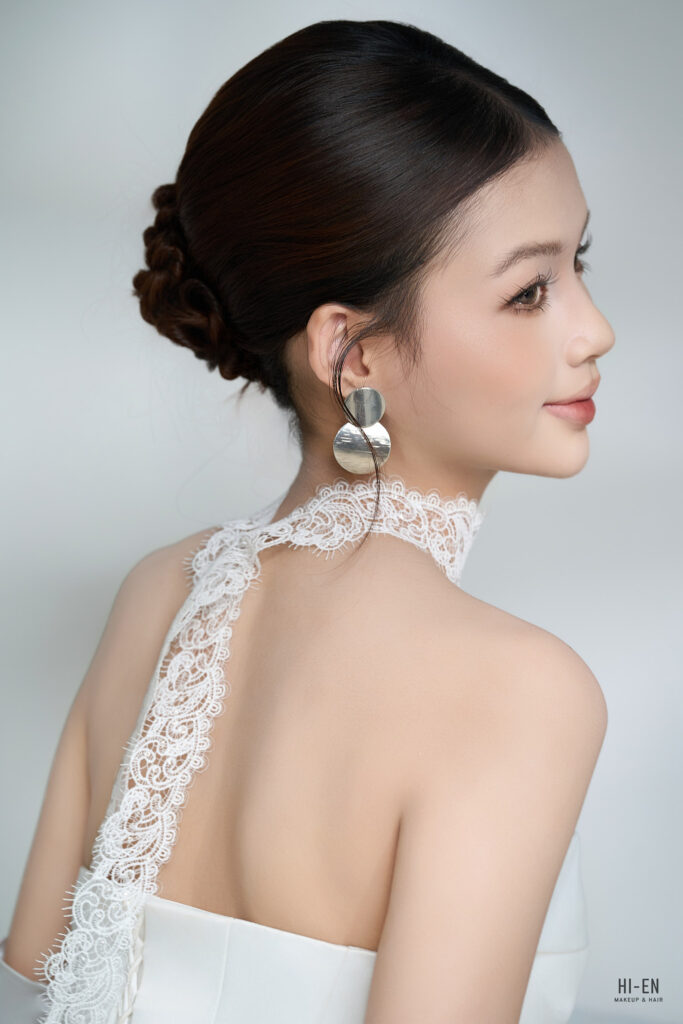
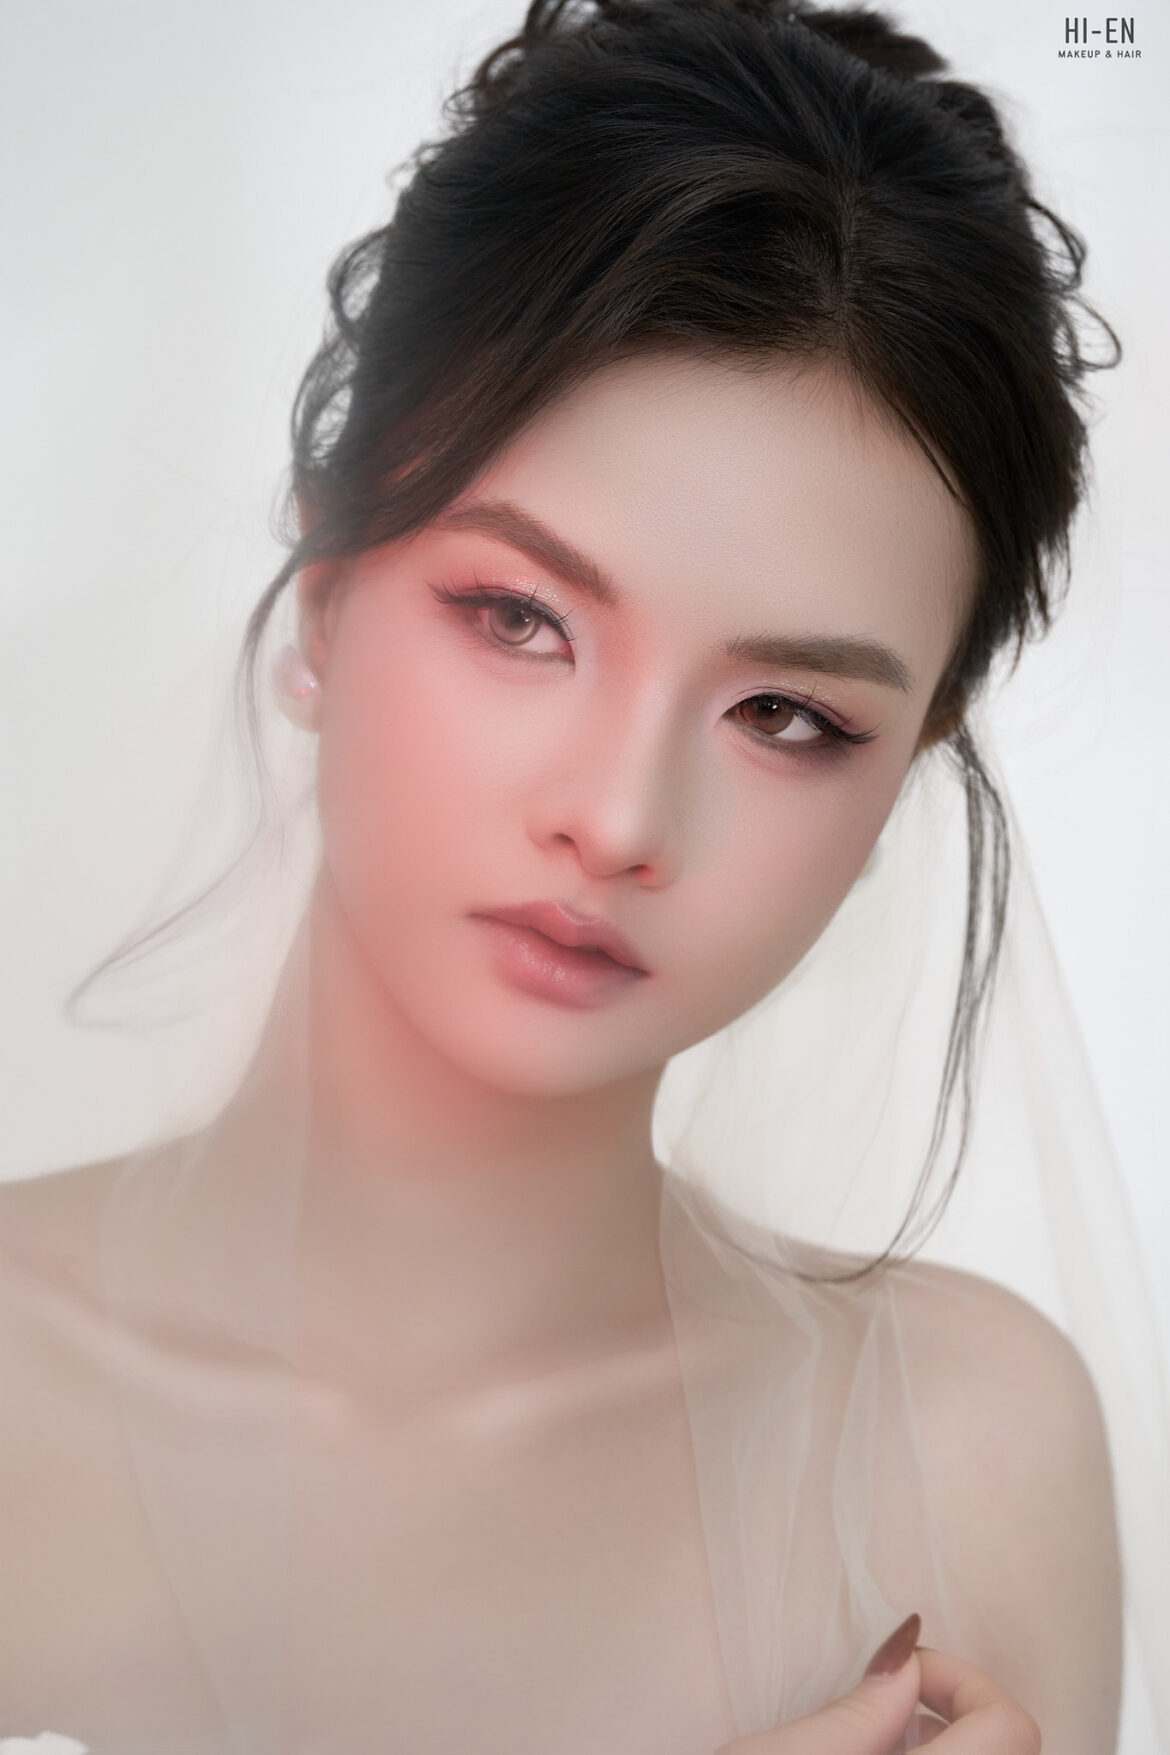
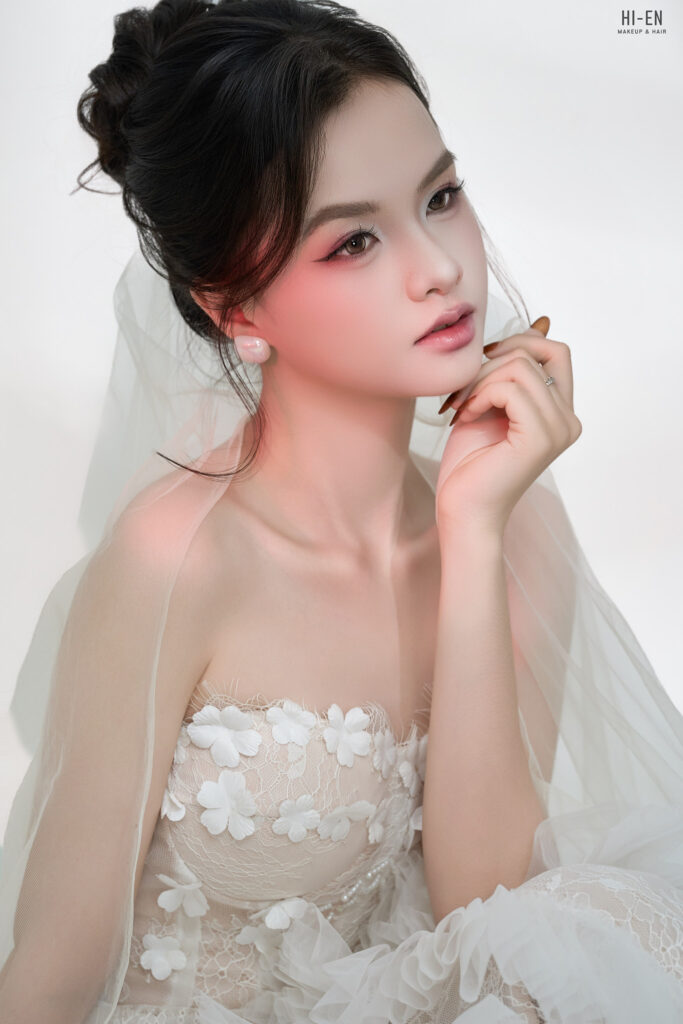
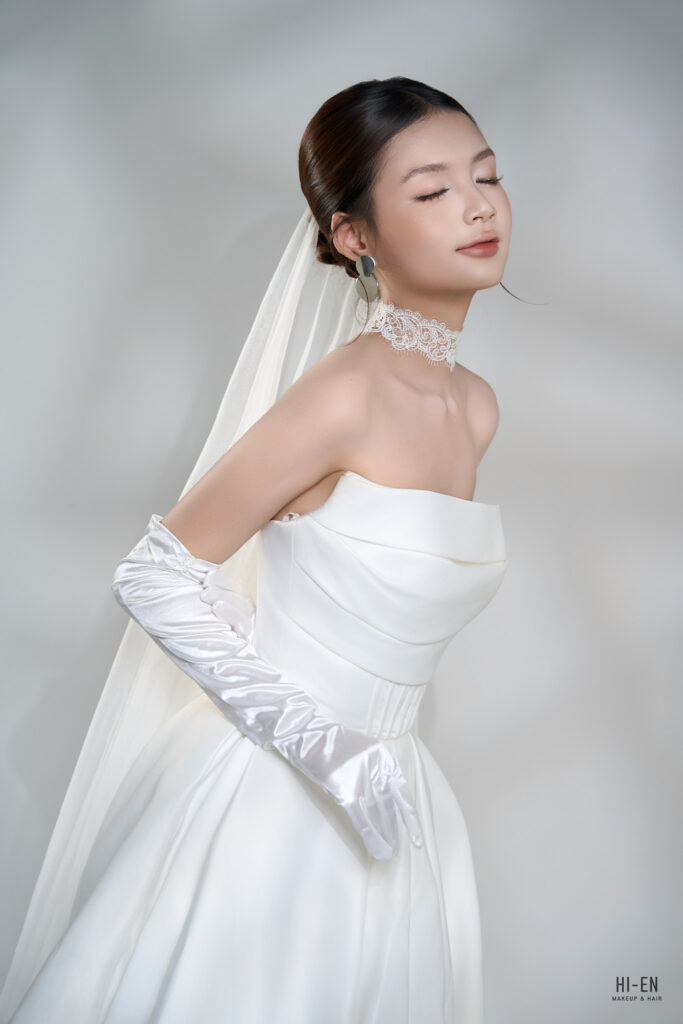
Makeup Cô Dâu Tone Thái Sắc Sảo Tại Duyen Ha Resort Cam Ranh – Lộng LẫY Đêm Tiệc

by nhiepanhcamranh 23/07/2026
written by nhiepanhcamranh

Sở hữu không gian kiến trúc Đông Dương kết hợp hiện đại đẳng cấp, Duyen Ha Resort Cam Ranh là một trong những địa điểm tổ chức tiệc cưới ngoài trời và trong đại sảnh tiệc vô cùng lộng lẫy tại khu vực Bãi Dài. Đối với các buổi đại tiệc cưới tối tại đây, một layout trang điểm kiêu kỳ, cuốn hút sẽ giúp cô dâu hoàn toàn làm chủ sân khấu dưới hệ thống ánh sáng lung linh.

Nếu bạn đang tìm kiếm một dịch vụ makeup cô dâu tone Thái sắc sảo tại Duyen Ha Resort Cam Ranh tận phòng nghỉ villa, Hi-en Makeup Artist chính là người đồng hành hoàn hảo dành cho bạn. Khám phá ngay các bộ ảnh cô dâu thực tế của tụi mình tại website hienmakeup.com!

Mê Mẩn Với Layout Trang Điểm Cô Dâu Tone Thái Sắc Sảo Tại Duyen Ha Resort

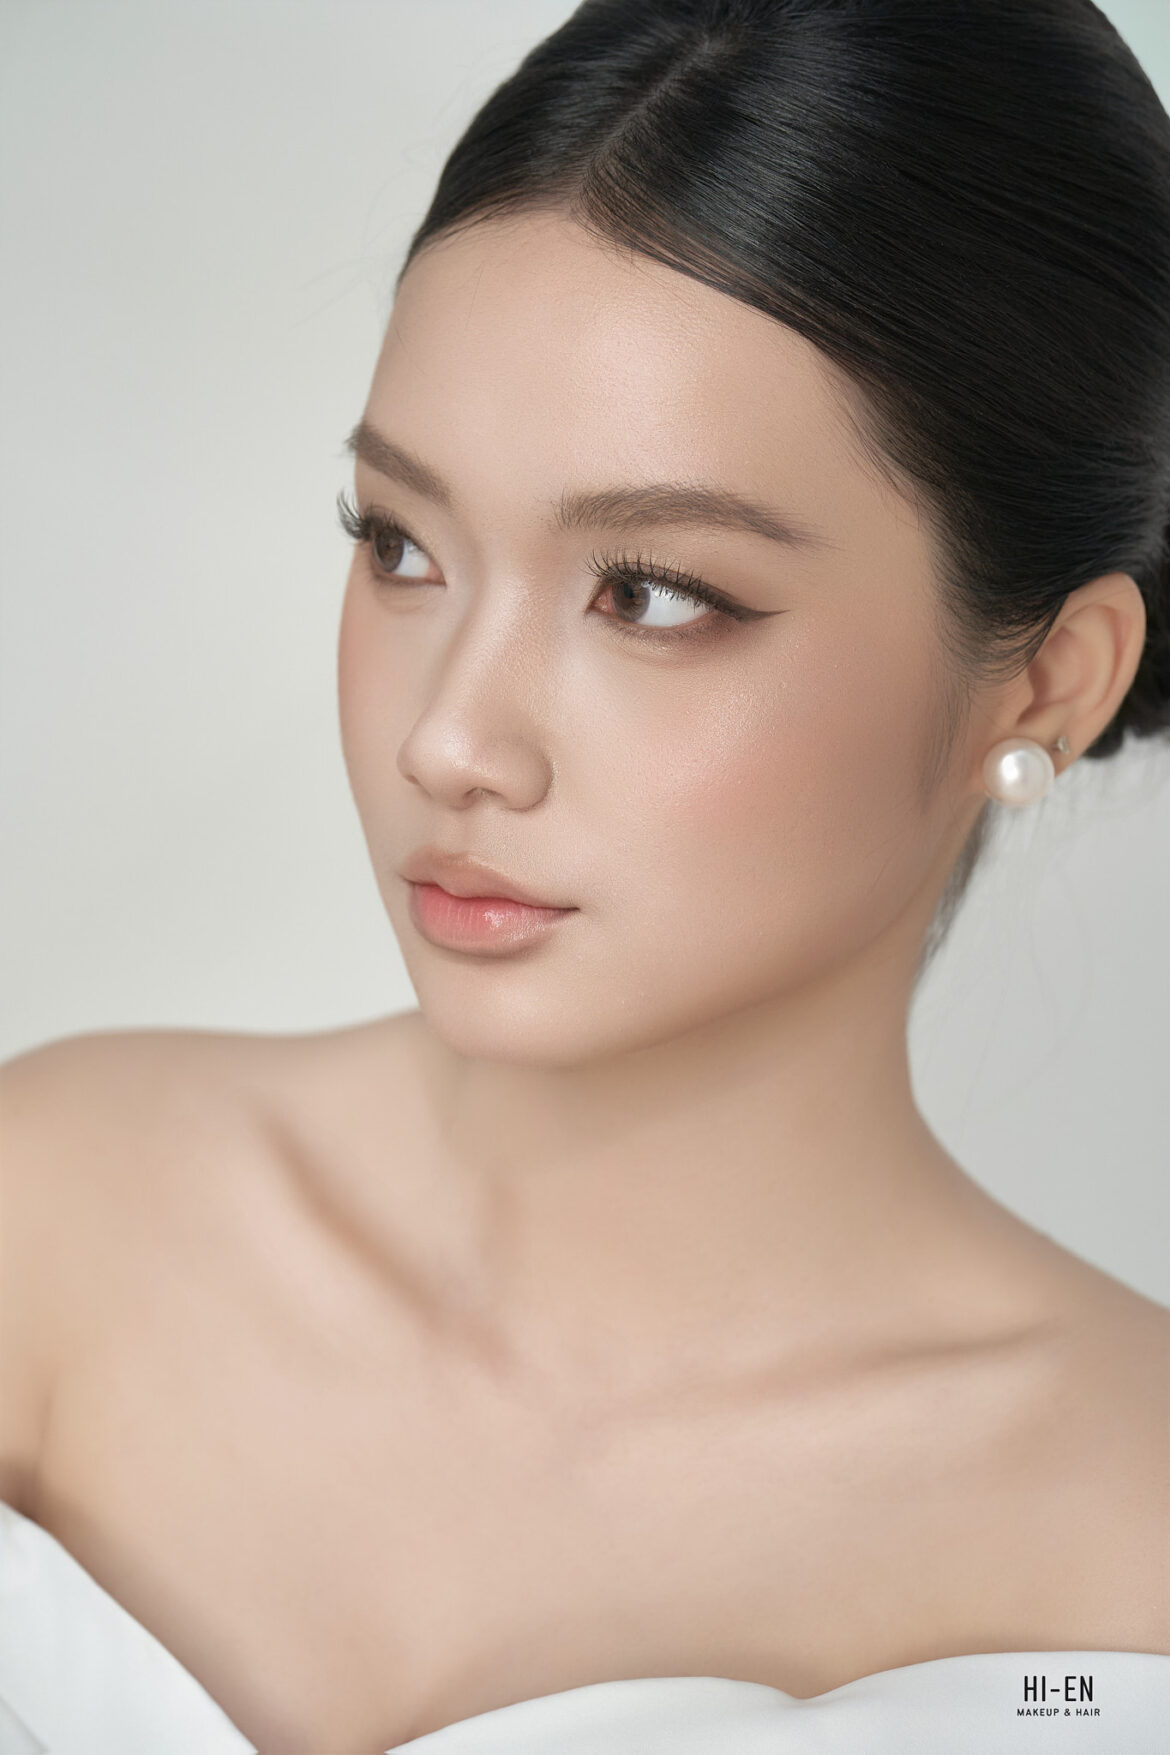
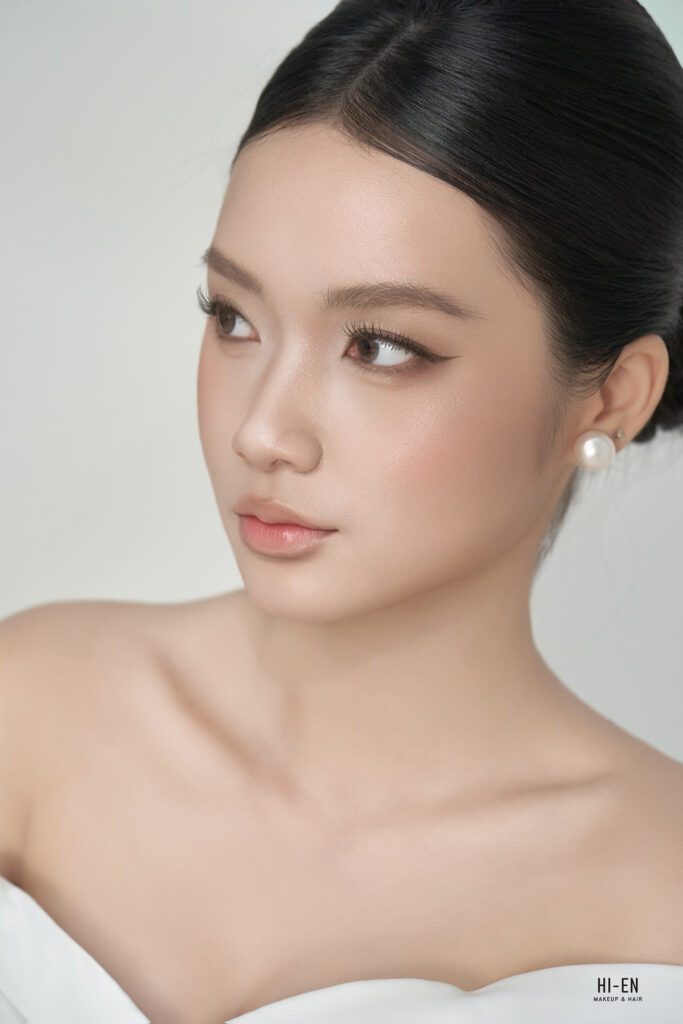
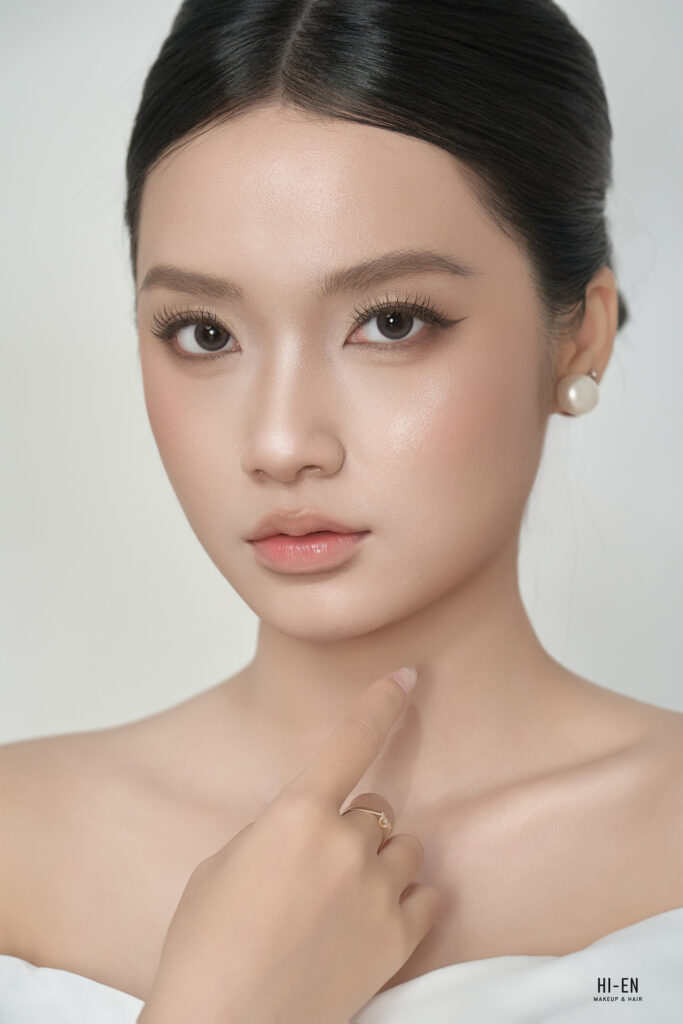
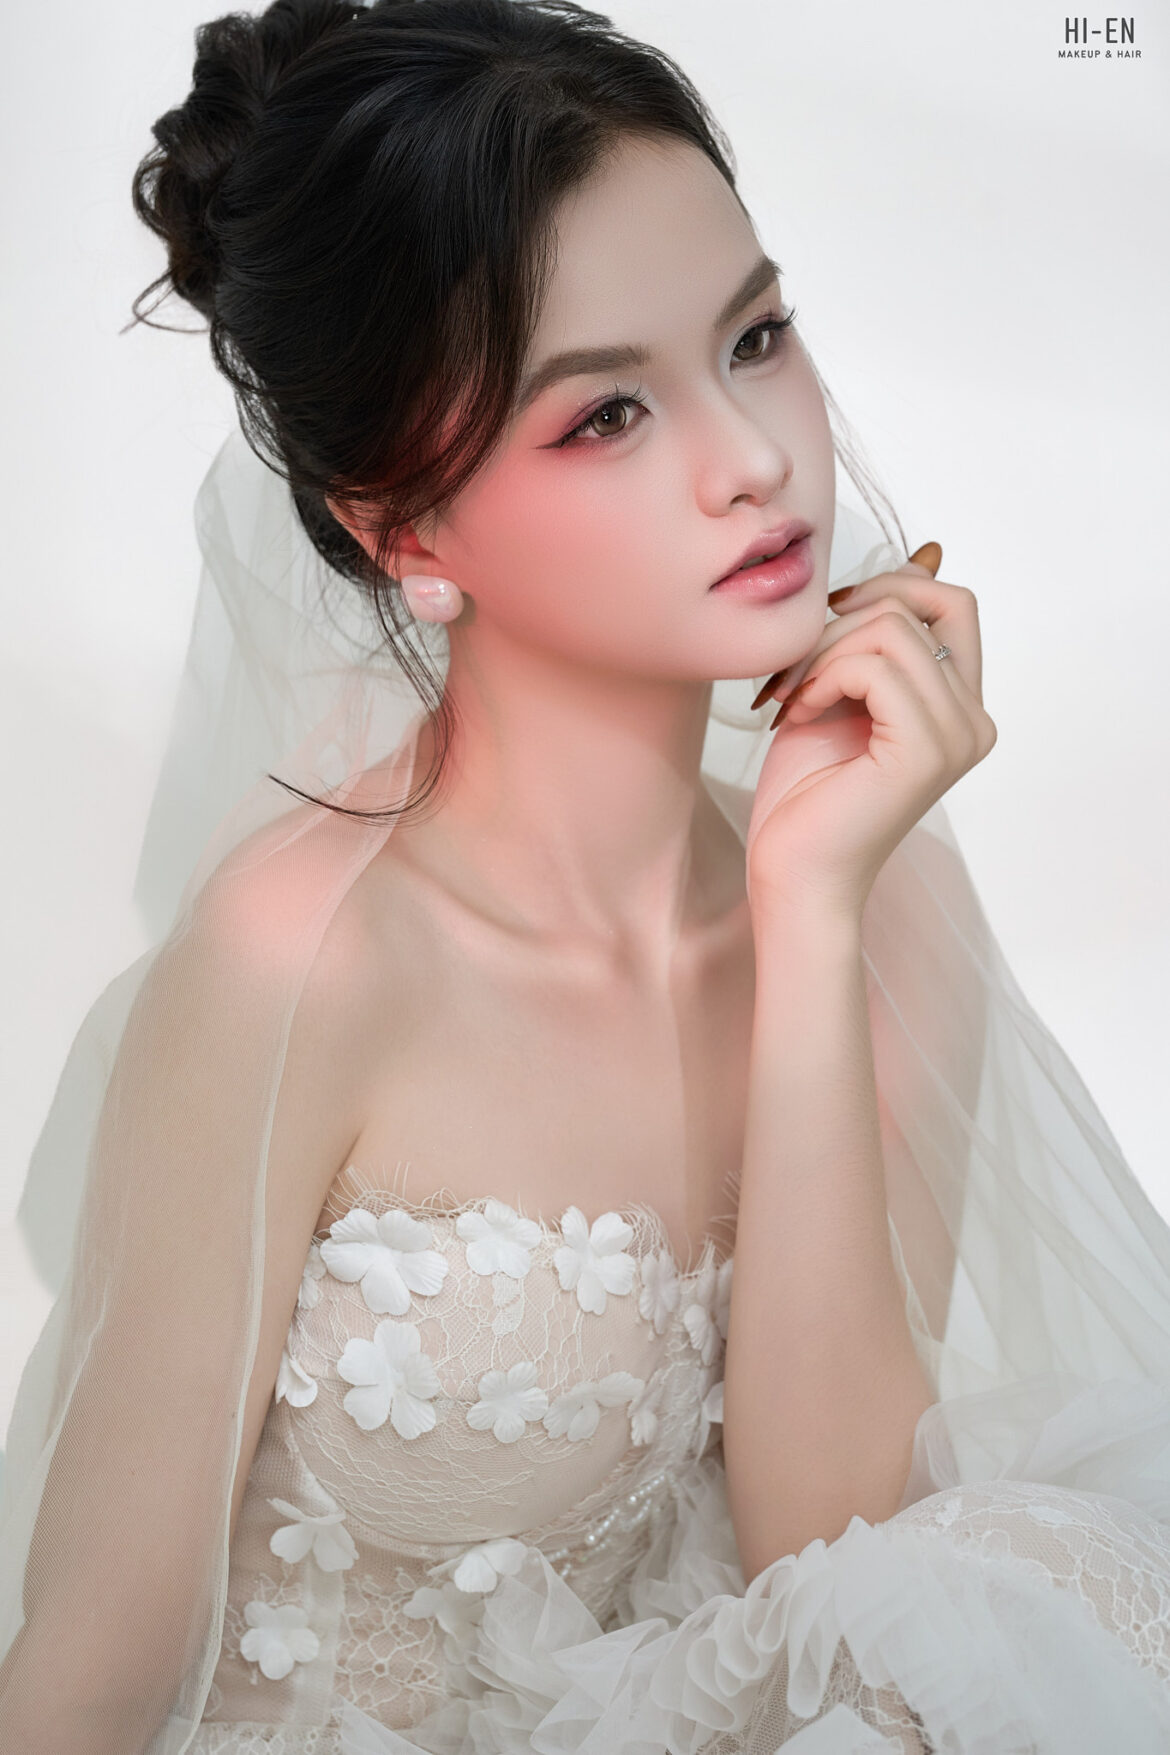
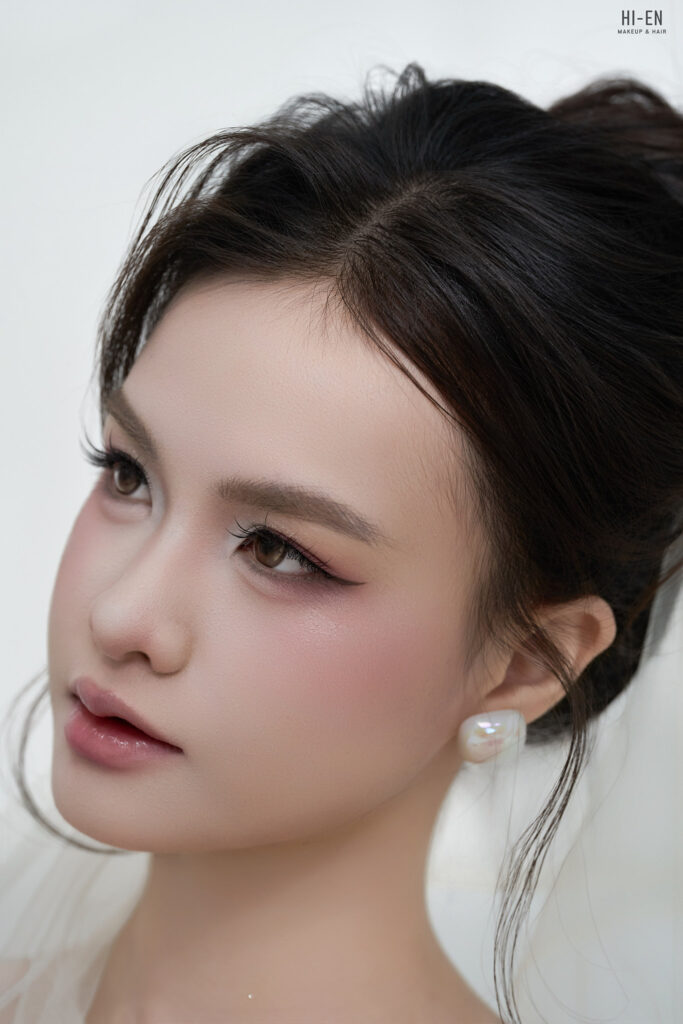
Khác với vẻ trong trẻo nhẹ nhàng của tone Hàn Quốc, makeup cô dâu tone Thái mang đến một diện mạo vô cùng cá tính, quyến rũ và quyền lực. Đây là sự lựa chọn số 1 cho các nàng dâu muốn mình trở thành tâm điểm tuyệt đối trong đêm tiệc cưới tại Duyên Hà Resort:

  • Đôi mắt biết nói cuốn hút: Điểm đặc trưng của tone Thái là đôi mắt được nhấn sâu, đường eyeliner sắc nét kết hợp cùng hàng mi tơi cong vút và dáng chân mày phẩy sợi tự nhiên, giúp đôi mắt cô dâu trở nên cực kỳ bắt sáng dưới ống kính máy ảnh.
  • Lớp nền mịn lì chuẩn sương (Velvet Matte): Kỹ thuật tạo nền tiệp màu da, che khuyết điểm tuyệt đối nhưng vẫn có độ mịn mướt tự nhiên. Lớp nền này có khả năng kiềm dầu vượt trội, giúp cô dâu thoải mái khi di chuyển giữa không gian tiệc ngoài trời và phòng tiệc lạnh mà không lo bị bóng dầu hay chảy nền.
  • Tạo khối chuẩn xác & Đôi môi mọng quyến rũ: Kỹ thuật đánh khối chuẩn tỷ lệ vàng tôn lên phần xương gò má và góc mặt thanh tú, kết hợp cùng các tone màu son xu hướng như cam đất, hồng đât, đỏ gạch được viền môi kĩ lưỡng.

Dịch Vụ Makeup Cô Dâu Tận Phòng Tiện Lợi Tại Duyen Ha Resort Cam Ranh

Để cô dâu giữ được tinh thần thoải mái nhất trước giờ G, Hi-en Makeup Artist nhận lịch phục vụ trang điểm tận phòng nghỉ/villa tại Duyen Ha Resort Cam Ranh:

  • Ekip sẽ di chuyển đến tận nơi với đầy đủ hệ thống đèn led ánh sáng studio chuyên nghiệp và cốp đồ nghề 100% mỹ phẩm High-end chính hãng (Dior, NARS, MAC, Charlotte Tilbury…).
  • Cô dâu không cần tốn thời gian di chuyển ra ngoài resort giữa thời tiết nắng nóng, thoải mái sửa soạn và chụp ảnh kỉ niệm cùng dâu phụ ngay tại phòng riêng.
  • Hi-en có nhận làm trọn gói cho chú rể, mẹ cô dâu và dàn dâu phụ (bridesmaids) cùng lúc với chi phí cực kỳ tối ưu.

Đừng để một diện mạo mờ nhạt làm giảm đi sự lộng lẫy của bạn trong đêm tiệc cưới mơ ước. Hãy liên hệ ngay với Hi-en Makeup Artist để sở hữu layout tone Thái sắc sảo chuẩn gu nhất!

23/07/2026 0 comments
0 FacebookTwitterPinterestEmail
Makeup cô dâu resort Cam Lâm

Dịch Vụ Makeup Cô Dâu Tận Phòng Cao Cấp Tại Fusion Resort Cam Ranh

by nhiepanhcamranh 21/07/2026
written by nhiepanhcamranh

Với không gian kiến trúc tối giản hiện đại, những căn villa hướng biển tuyệt đẹp cùng bờ cát trắng mịn Bãi Dài, Fusion Resort Cam Ranh luôn là một trong những lựa chọn hàng đầu của các cặp đôi khi tổ chức đám cưới bãi biển (Destination Wedding) lãng mạn.

Giữa không gian thiên nhiên ngập tràn nắng gió ấy, một layout trang điểm cô dâu tinh tế, mỏng nhẹ nhưng có khả năng bền màu suốt 12 tiếng là yếu tố quyết định giúp nàng dâu tỏa sáng rạng rỡ. Nếu bạn đang tìm kiếm một dịch vụ makeup cô dâu tại Fusion Resort Cam Ranh tận phòng uy tín, Hi-en Makeup Artist chính là sự lựa chọn hoàn hảo dành cho bạn. Khám phá ngay các bộ ảnh thực tế của tụi mình tại website hienmakeup.com!

Giải Pháp Trang Điểm Cô Dâu Chuyên Nghiệp Cho Đám Cưới Bãi Biển

Tổ chức tiệc cưới tại không gian mở như Fusion Resort mang lại khung cảnh vô cùng thơ mộng, nhưng cũng đặt ra những thách thức không nhỏ cho lớp trang điểm ngày cưới:

  • Lớp nền “Glass Skin” mỏng nhẹ, kháng nước tuyệt đối: Thời tiết nắng và gió biển Cam Ranh rất dễ khiến lớp nền bị chảy hoặc mốc phấn. Hi-en ứng dụng kỹ thuật tạo nền mỏng nhẹ như sương, kiềm dầu và kháng nước vượt trội, giúp cô dâu tự tin làm lễ dưới hoàng hôn biển mà không lo xuống tone.
  • Gu thẩm mỹ tinh tế, tôn nét đẹp tự nhiên: Tiệc cưới bãi biển thường ưu tiên sự phóng khoáng, nhẹ nhàng. Hi-en tập trung nhấn nhá vào đôi mắt long lanh, làn môi mọng nước tone hồng trà/cam đào và mái tóc đánh rối tự nhiên vừa giữ phom tốt trước gió, vừa mang lại vẻ đẹp bay bổng như một nàng thơ.
  • 100% Mỹ phẩm High-end chính hãng: Toàn bộ sản phẩm sử dụng lên da cô dâu (Dior, Chanel, NARS, Charlotte Tilbury…) đều là dòng cao cấp nhất, nhẹ dịu cho làn da và giữ màu bền bỉ suốt cả ngày dài.

Dịch Vụ Makeup Tận Phòng Villa Tại Fusion Resort Cam Ranh

Để ngày cưới diễn ra thong thả và thư thái nhất đúng tinh thần nghỉ dưỡng của Fusion Resort, Hi-en Makeup Artist cung cấp dịch vụ trang điểm tận phòng villa (Home Service):

  • Ekip sẽ di chuyển trực tiếp đến tận villa của bạn tại Fusion Resort từ sớm, mang theo đầy đủ hệ thống ánh sáng chuẩn studio và trang thiết bị chuyên nghiệp.
  • Cô dâu hoàn toàn không phải tốn thời gian di chuyển ra ngoài resort, có thể thoải mái nghỉ ngơi, chuẩn bị trang phục trong không gian riêng tư của mình.
  • Hi-en nhận làm trọn gói cho cả cô dâu, chú rể, mẹ cô dâu và dàn dâu phụ (bridesmaids) trong cùng một buổi sáng.

Đừng để nỗi lo về lớp nền chảy mốc làm giảm đi niềm vui trọn vẹn trong ngày trọng đại. Hãy liên hệ ngay với Hi-en Makeup Artist để được tư vấn kịch bản trang điểm phù hợp nhất cho đám cưới bãi biển của bạn!

21/07/2026 0 comments
0 FacebookTwitterPinterestEmail
Dịch vụ makeup Cam RanhMakeup cô dâu resort Cam Lâm

Top 5 Tiệm Makeup Phục Vụ Tận Phòng Uy Tín Nhất Tại Các Resort Cam Ranh

by nhiepanhcamranh 21/07/2026
written by nhiepanhcamranh

Cam Ranh và khu vực Bãi Dài (Cam Lâm) từ lâu đã trở thành “thiên đường nghỉ dưỡng” với hàng loạt resort 5 sao đẳng cấp như Selectum Noa, Alma, Riviera, Fusion, Mövenpick… Đây cũng là nơi diễn ra vô số sự kiện Gala Dinner, tiệc mừng, bộ ảnh du lịch kỷ niệm và đặc biệt là các đám cưới bãi biển (Destination Wedding) trong mơ.

Để có một diện mạo rạng rỡ, chỉn chu mà không phải di chuyển xa xôi ra khỏi khu nghỉ dưỡng dưới thời tiết nắng gió miền Trung, dịch vụ Makeup tận phòng (Home Service) là lựa chọn hàng đầu. Hãy cùng điểm qua Top 5 tiệm makeup chuyên phục vụ tại các resort Cam Ranh được đánh giá cao nhất hiện nay!

1. Hi-en Makeup Artist – Chuyên Gia Layout Biển & Makeup Cô Dâu Resort

Đứng đầu danh sách chuyên trị các dịch vụ trang điểm tại khu vực Resort Cam Ranh – Bãi Dài chính là Hi-en Makeup Artist. Với ưu thế sở hữu cơ sở trực tiếp tại địa phương kết hợp cùng gu thẩm mỹ hiện đại từ TP.HCM, Hi-en là cái tên quen thuộc của nhiều du khách và nàng dâu khi đến Cam Ranh.

  • Thế mạnh nổi bật:
    • Công nghệ nền Glass Skin chống trôi: Kỹ thuật xử lý nền mỏng nhẹ như sương nhưng có độ kiềm dầu và kháng nước cực cao, giúp lớp trang điểm bền bỉ suốt 12 tiếng dưới nắng gió biển.
    • Layout đa dạng: Tinh thông từ các phong cách dự tiệc/Gala Dinner sang trọng, chụp ảnh ngoại cảnh tự nhiên cho đến trang điểm cô dâu cưới bãi biển (Destination Wedding) phóng khoáng.
    • 100% Mỹ phẩm High-end: Sử dụng hoàn toàn mỹ phẩm cao cấp (Dior, Chanel, NARS, Charlotte Tilbury…), đảm bảo an toàn cho làn da khi tiếp xúc với nắng biển.
  • Dịch vụ tận phòng (Home Service): Ekip cơ động, mang đầy đủ hệ thống đèn led studio chuyên nghiệp đến tận phòng nghỉ/villa của du khách tại tất cả các resort khu vực Bãi Dài – Cam Lâm từ sáng sớm.
  • Hotline/Zalo tư vấn: 0938 568 254
  • Website chính thức: hienmakeup.com

2. Tiệm ảnh Chú Hồng (Photography & Makeup)

Là một trong những đơn vị cưới hỏi quen thuộc tại thành phố Cam Ranh, Tiệm ảnh chú Hồng cung cấp trọn gói từ trang điểm cô dâu, cho thuê trang phục cưới đến chụp ảnh tiệc.

  • Thế mạnh dịch vụ: Đội ngũ đông đảo, có khả năng phục vụ cùng lúc nhiều khách hàng trong các đoàn tiệc lớn hoặc làm mặt cho cả ê-kíp dâu phụ, người nhà trong ngày cưới.
  • Phong cách: Kết hợp giữa nét trang điểm truyền thống và hiện đại, tạo nên vẻ đẹp đậm đà, nổi bật dưới ánh đèn sân khấu tiệc tối.
  • Khu vực phục vụ: Nhận lịch di chuyển tận nơi đến các resort khu vực Cam Ranh và Cam Lâm.
  • Zalo liên hệ: 0354726773

3. Mây Makeup Cam Ranh

Mây Makeup là cái tên được nhiều bạn trẻ và du khách yêu thích khi tìm kiếm dịch vụ trang điểm cá nhân, chụp ảnh tiệc nhẹ nhàng tại địa phương.

  • Thế mạnh dịch vụ: Gu trang điểm ngọt ngào, trẻ trung với tone màu cam đào, hồng trà xinh xắn. Rất phù hợp cho các quý cô muốn trang điểm nhẹ nhàng đi dạo biển, chụp ảnh check-in resort.
  • Điểm cộng: Thái độ phục vụ nhẹ nhàng, chu đáo và chi phí dịch vụ vô cùng hợp lý.
  • Khu vực phục vụ: Hỗ trợ di chuyển tận nơi theo yêu cầu của khách hàng.

4. Trinh Nguyễn Makeup Artist

Trinh Nguyễn Makeup gây ấn tượng với kỹ thuật tạo khối và nhấn mắt sắc sảo, giúp khách hàng tỏa sáng rực rỡ trong các buổi đại tiệc Gala Dinner hoặc tiệc tối tại resort.

  • Thế mạnh dịch vụ: Chuyên trị các layout phong cách Tây/Thái sang trọng, giúp tháo gỡ nỗi lo gương mặt bị nhạt nhòa dưới ánh sáng đèn tiệc lớn.
  • Điểm cộng: Làm tóc cưới và tóc tiệc chỉn chu, giữ phom tốt trước gió biển.
  • Khu vực phục vụ: Nhận lịch makeup tận phòng resort tại Cam Ranh.

5. Tạ Lộc Makeup (Cam Lâm)

Nằm ngay khu vực huyện Cam Lâm (gần trục đường Bãi Dài), Tạ Lộc Makeup có lợi thế di chuyển cực nhanh đến chuỗi các resort cao cấp lân cận.

  • Thế mạnh dịch vụ: Cung cấp linh hoạt các gói trang điểm từ đi tiệc, chụp ảnh ngoại cảnh cho đến trang điểm cô dâu ngày cưới.
  • Điểm cộng: Nhiệt tình, đúng giờ – yếu tố cực kỳ quan trọng đối với các khách hàng book lịch makeup sáng sớm để kịp đón bình minh trên biển.
  • Khu vực phục vụ: Chuyên nhận các show makeup tại khu vực resort Bãi Dài – Cam Lâm.

💡 Mẹo Nhỏ Khi Book Dịch Vụ Makeup Tận Phòng Tại Resort Cam Ranh

  1. Đặt lịch trước 1 – 2 tuần: Các resort tại Bãi Dài thường nằm xa trung tâm thành phố, việc đặt lịch sớm giúp ekip chủ động sắp xếp thời gian di chuyển và chuẩn bị dụng cụ tốt nhất.
  2. Thông báo với Ban quản lý Resort: Hãy báo trước với lễ tân resort về việc có ekip makeup bên ngoài vào phòng phục vụ để thủ tục qua cổng bảo vệ diễn ra nhanh chóng, không làm trễ giờ của bạn.
  3. Bày tỏ rõ nhu cầu trang điểm: Hãy gửi trước hình ảnh trang phục và không gian tiệc (ngoài trời hay trong phòng lạnh) để chuyên viên tư vấn lớp nền và tone màu phù hợp nhất với điều kiện thời tiết tại Cam Ranh.

Nếu bạn đang lên kế hoạch cho một chuyến nghỉ dưỡng, buổi chụp ảnh hay lễ cưới lãng mạn tại các Resort Cam Ranh, hãy trải nghiệm ngay dịch vụ tận phòng đẳng cấp của Hi-en Makeup Artist tại hienmakeup.com hoặc Hotline 0938 568 254 nhé!

21/07/2026 0 comments
0 FacebookTwitterPinterestEmail
Makeup cô dâu resort Cam Lâm

Bí Quyết Makeup Cô Dâu Tỏa Sáng Trong Đêm Tiệc Sang Chảnh Tại Khu Nghỉ Dưỡng Radisson Blu Cam Ranh

by nhiepanhcamranh 10/07/2026
written by nhiepanhcamranh

Một đám cưới trong mơ bên bờ biển xanh cát trắng luôn là niềm khao khát của mọi cặp đôi. Trong số các địa điểm đẳng cấp tại Khánh Hòa, Khu nghỉ dưỡng Radisson Blu Cam Ranh nổi lên như một thiên đường tổ chức tiệc cưới nhờ kiến trúc sang trọng mang đậm hơi thở đại dương. Tuy nhiên, để có được những bức ảnh để đời giữa không gian đẳng cấp ấy, việc lựa chọn phong cách makeup cô dâu phù hợp với một đêm tiệc sang chảnh là điều vô cùng quan trọng. Hãy cùng nhiepanhcamranh.com khám phá bí quyết sở hữu diện mạo hoàn hảo nhất cho ngày trọng đại của bạn.
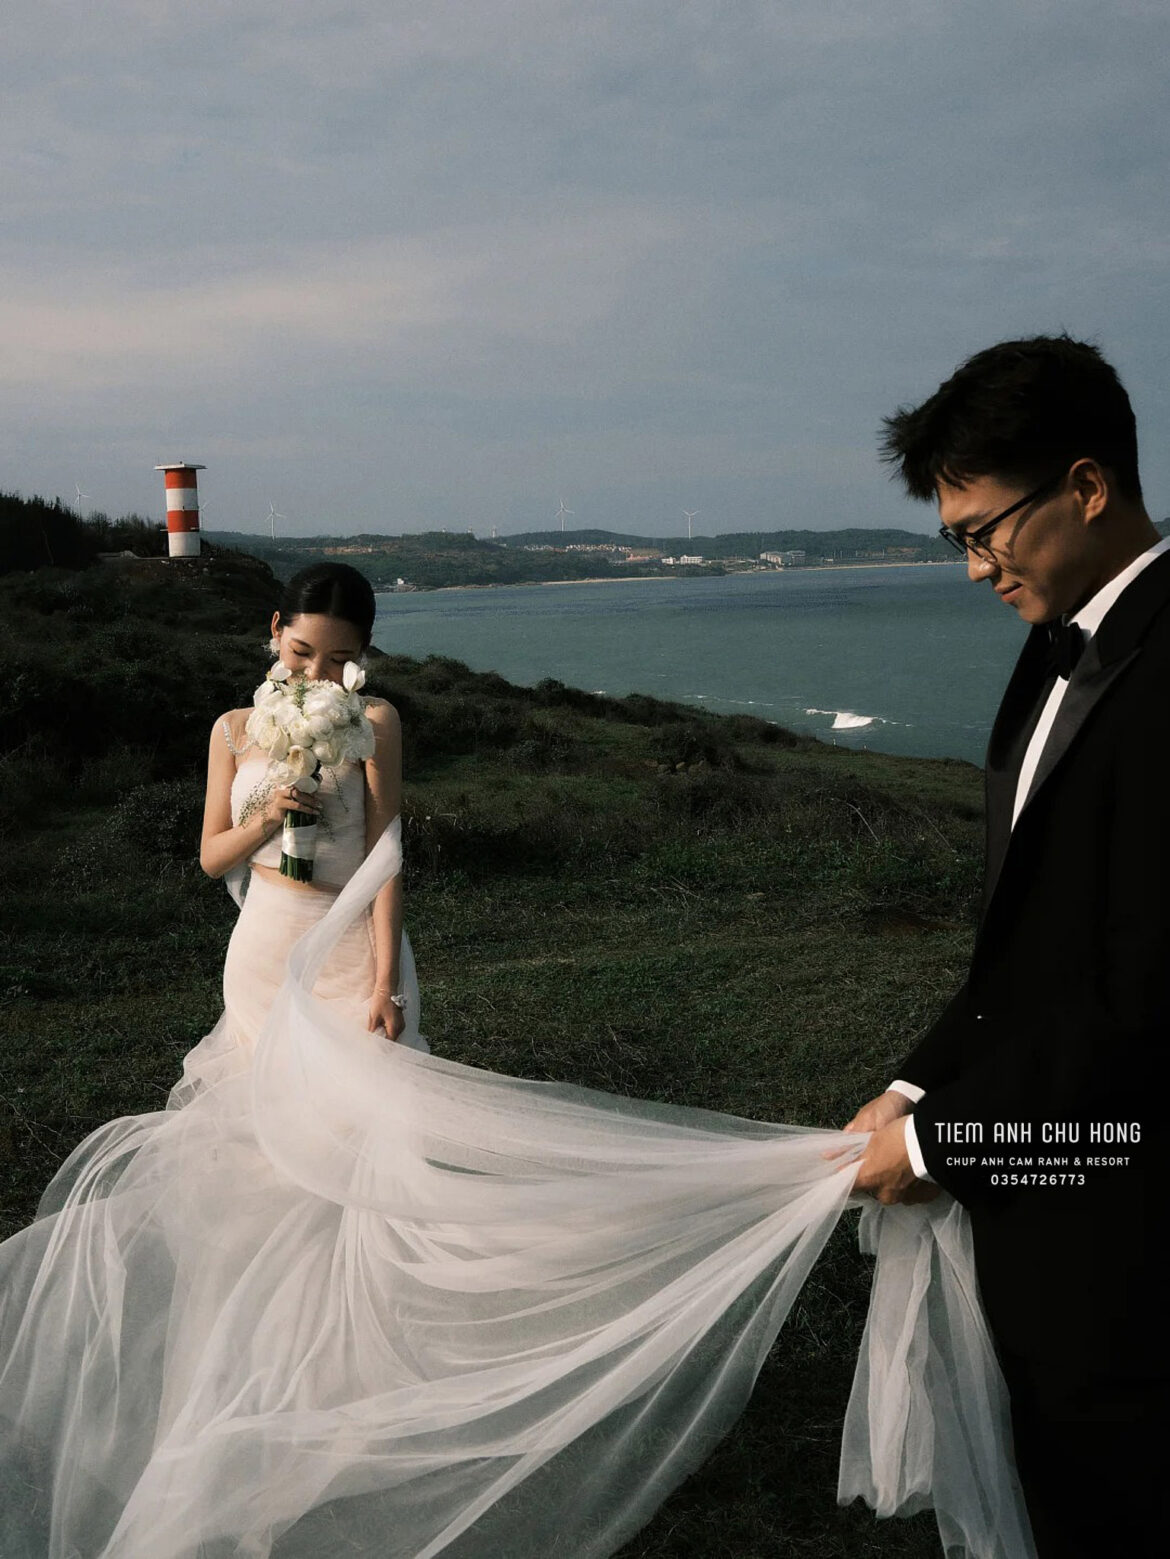
1. Xu hướng makeup cô dâu chuẩn “Premium” cho đám cưới bãi biển

Không gian biển lộng gió kết hợp với ánh sáng tự nhiên đòi hỏi một lớp nền bền bỉ nhưng vẫn phải giữ được nét trong trẻo. Đối với những bữa tiệc sang chảnh ngoài trời hay trong khán phòng lộng lẫy của Radisson Blu, xu hướng trang điểm của năm nay hướng tới sự tối giản tinh tế nhưng tôn lên đường nét quý phái.

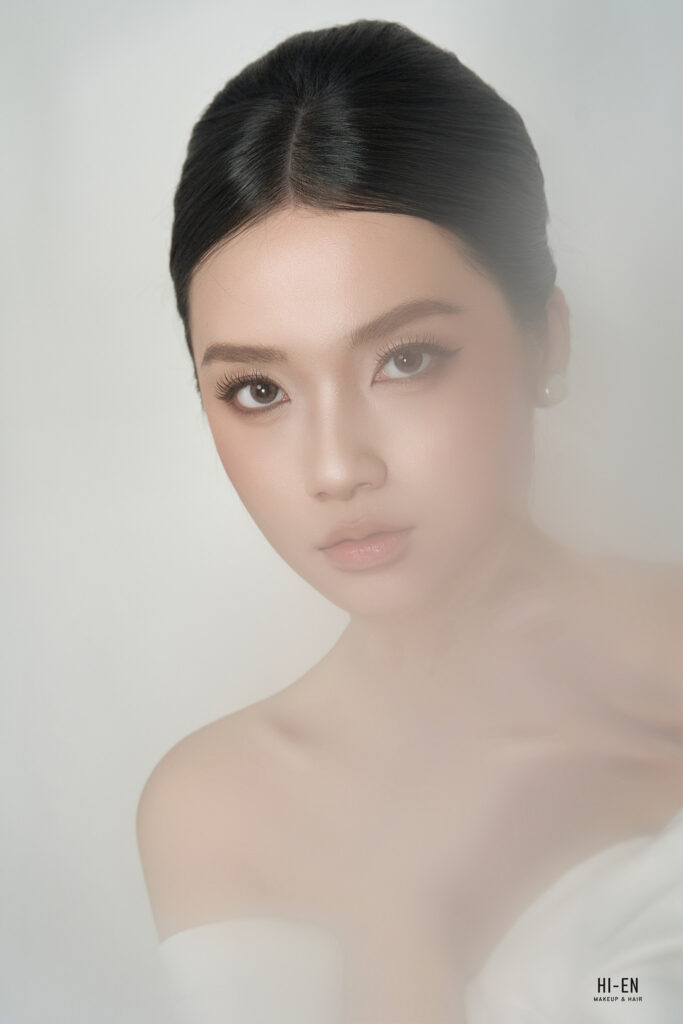
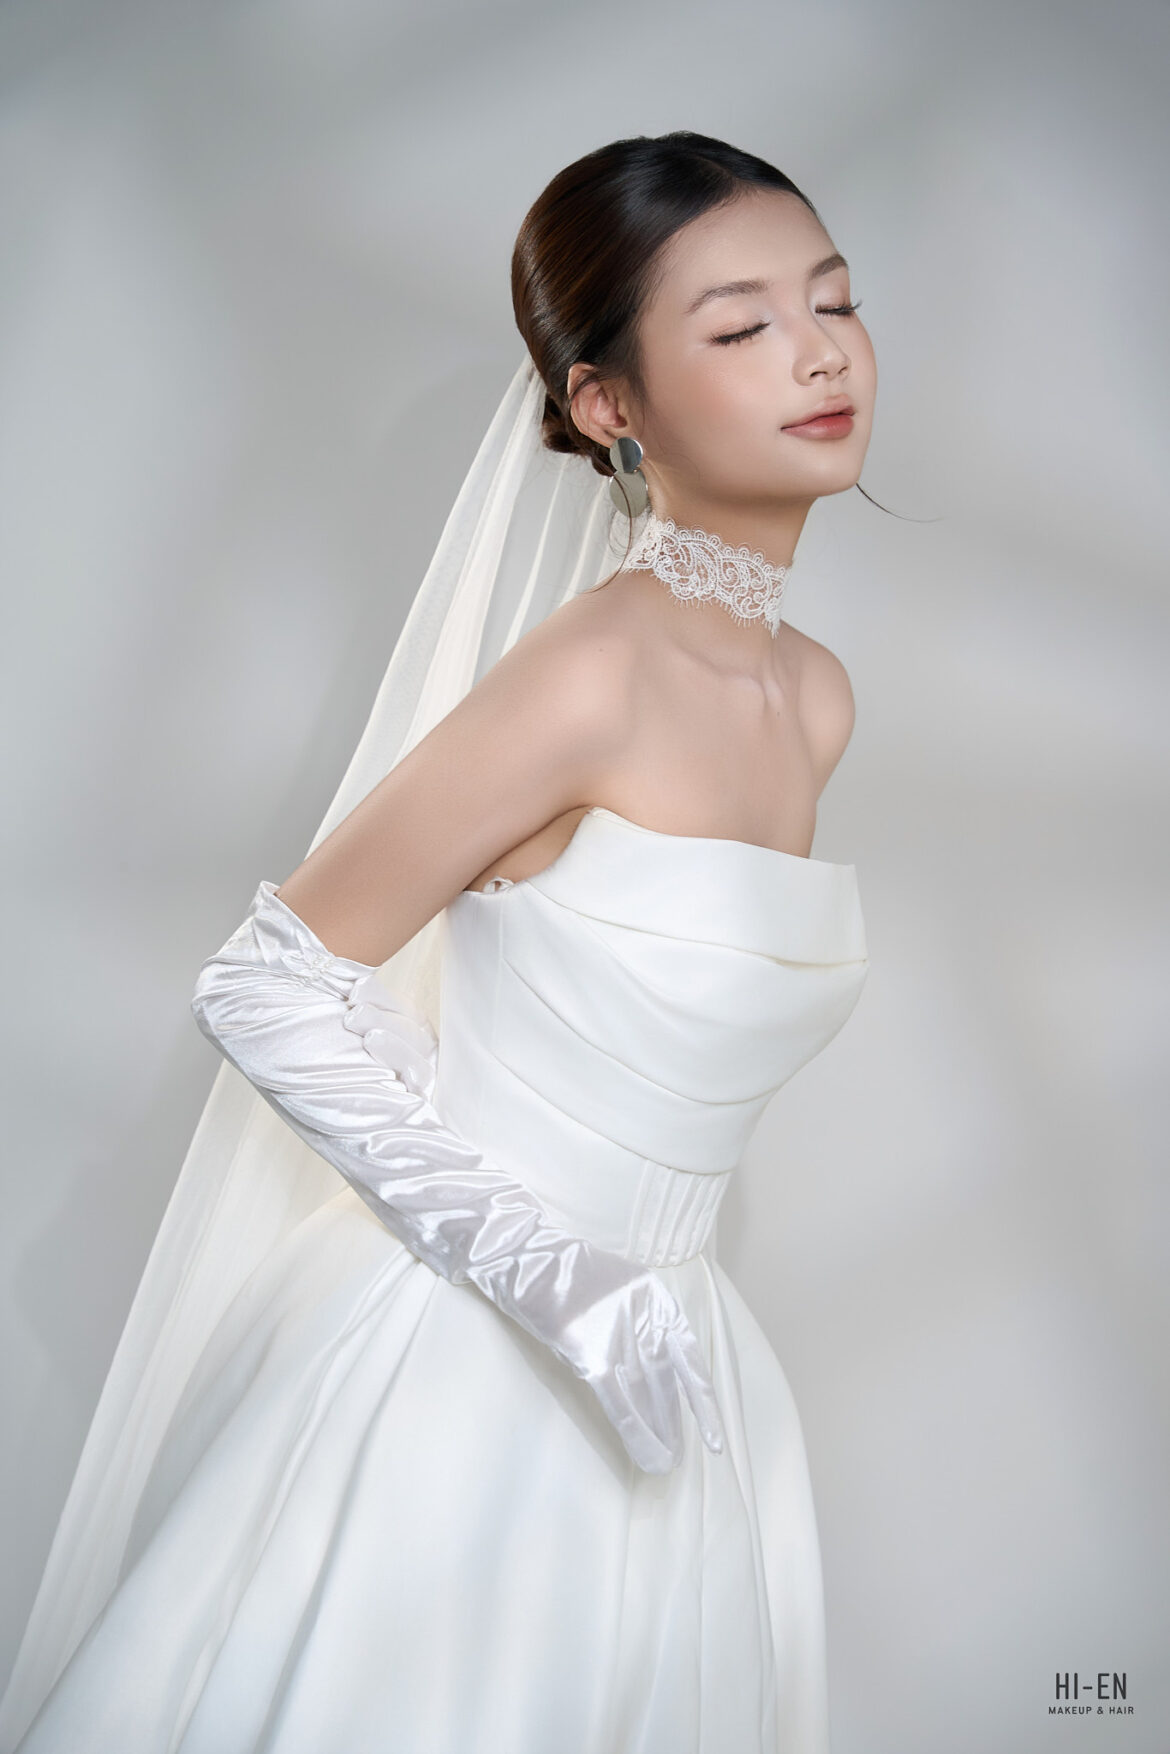
  • Lớp nền “Glowy” mỏng nhẹ như sương: Thay vì lớp nền dày cộm dễ bị mốc do gió biển, các layout makeup cô dâu hiện đại ưu tiên kỹ thuật tạo lớp nền căng bóng tự nhiên, có khả năng bắt sáng tốt dưới ánh đèn tiệc.
  • Điểm nhấn ở đôi mắt có chiều sâu: Sử dụng các tông màu trung tính như cam đất, hồng cam kết hợp một chút nhũ mịn giúp đôi mắt cô dâu hút hồn hơn trong từng thước phim phóng sự cưới.
  • Đôi môi căng mọng quyến rũ: Những tông màu son satin hoặc son bóng nhẹ như đỏ hồng gạch, cam đào sẽ là lựa chọn hoàn hảo để hòa hợp với không gian tiệc xa hoa.

2. Radisson Blu Cam Ranh – Thánh đường của những bữa tiệc sang chảnh

Nằm dọc theo bờ biển Bãi Dài hoang sơ, Khu nghỉ dưỡng Radisson Blu Cam Ranh sở hữu những không gian tổ chức tiệc cưới đỉnh cao, từ bãi biển lãng mạn dưới hoàng hôn đến sảnh tiệc Grand Ballroom không cột với sức chứa lớn. Kiến trúc ở đây là sự pha trộn tinh tế giữa nét hiện đại và văn hóa chài lưới Việt Nam, mang lại phông nền hoàn hảo cho mọi góc máy.

Một đêm tiệc sang chảnh tại đây không chỉ dừng lại ở menu ẩm thực cao cấp, cách bài trí hoa tươi lộng lẫy mà còn là sự kết hợp của âm thanh, ánh sáng hoàng hôn buông xuống vịnh Cam Ranh. Để bắt trọn khoảnh khắc quý giá này, lớp makeup cô dâu cần có sự biến chuyển khéo léo từ ban ngày (chụp ngoại cảnh bãi biển) sang ban đêm (nhập tiệc tối ấm cúng và lung linh).

3. Bí quyết để có bộ ảnh cưới để đời tại Radisson Blu Cam Ranh

Là đơn vị nhiếp ảnh bản địa hiểu rõ từng góc sáng và dòng chảy thời gian tại Bãi Dài, nhiepanhcamranh.com xin chia sẻ một vài lưu ý nhỏ cho các cô dâu chú rể:

Chọn thời gian “Vàng” để bấm máy

Khoảng thời gian từ 16:00 đến 17:30 là thời điểm hoàng hôn đẹp nhất tại Cam Ranh. Ánh sáng lúc này cực kỳ nịnh da, kết hợp với lớp makeup cô dâu tone ấm sẽ tạo nên những khung hình lãng mạn, nghệ thuật tuyệt đối trước khi bước vào phần tiệc sang chảnh buổi tối.

Dặm lại phấn và chuẩn bị giấy thấm dầu

Gió biển và độ ẩm cao tại các resort có thể làm lớp trang điểm xuống tone nhanh hơn bình thường. Hãy chắc chắn rằng chuyên viên trang điểm của bạn luôn túc trực để dặm lại son, phấn và kiểm tra độ hoàn hảo của layout trước mỗi phần hành lễ tại Khu nghỉ dưỡng Radisson Blu Cam Ranh.

4. Đồng hành cùng nhiepanhcamranh.com – Lưu giữ trọn vẹn cảm xúc

Chúng tôi hiểu rằng, mỗi chi tiết trong đám cưới từ lớp makeup cô dâu, chiếc váy cưới thướt tha, cho đến không gian tiệc sang chảnh tại Khu nghỉ dưỡng Radisson Blu Cam Ranh đều là tâm huyết của bạn. Với đội ngũ nhiếp ảnh gia chuyên nghiệp, trang thiết bị hiện đại và gu thẩm mỹ tinh tế, nhiepanhcamranh.com cam kết mang đến những album ảnh cưới mang tính biểu tượng, giàu cảm xúc và trường tồn với thời gian.
BẠN ĐANG LÊN KẾ HOẠCH CHO MỘT ĐÁM CƯỚI TRONG MƠ TẠI RADISSON BLU CAM RANH? Liên hệ ngay với nhiepanhcamranh.com để nhận tư vấn về các gói chụp ảnh cưới, phóng sự cưới phóng khoáng và đẳng cấp nhất!

Hotline: 0932020411

Website: hienmakeup.com

10/07/2026 0 comments
0 FacebookTwitterPinterestEmail
Makeup cô dâu resort Cam Lâm

Dịch Vụ Makeup Tiệc, Chụp Ảnh & Cô Dâu Đẹp Tại Selectum Noa Resort Cam Ranh

by nhiepanhcamranh 10/07/2026
written by nhiepanhcamranh

Tọa lạc bên bờ biển Bãi Dài thơ mộng, Selectum Noa Resort Cam Ranh là một trong những thiên đường nghỉ dưỡng đẳng cấp bậc nhất, nơi thường xuyên diễn ra các buổi đại tiệc Gala Dinner hoành tráng, các bộ ảnh thời trang/kỷ niệm gia đình lãng mạn và đặc biệt là những siêu đám cưới bãi biển (Destination Wedding) trong mơ.

Trong không gian sang trọng và lộng gió ấy, một diện mạo rạng ngời, một layout trang điểm chuẩn gu chính là vũ khí bí mật giúp các quý cô, các nàng dâu tự tin tỏa sáng rực rỡ. Nếu bạn đang lưu trú tại Selectum Noa và tìm kiếm một dịch vụ trang điểm chuyên nghiệp tận phòng, Hi-en Makeup Artist chính là người đồng hành hoàn hảo dành cho bạn. Khám phá ngay các layout bắt trend nhất của tụi mình tại website chính thức hienmakeup.com!

1. Dịch Vụ Makeup Dự Tiệc, Party & Gala Dinner Thượng Lưu

Các buổi tiệc tối, đêm nhạc hay sự kiện doanh nghiệp tại Selectum Noa Resort luôn đòi hỏi các quý cô một phong cách chỉn chu, quý phái. Đừng để bản thân bị lu mờ dưới ánh đèn sân khấu lớn.

  • Phong cách đa dạng, chuẩn gu: Dù bạn yêu thích nét đẹp sắc sảo, quyến rũ kiểu Tây (Tone nâu mút, mắt khói) hay sự kiêu sa, trẻ trung kiểu Thái, Hi-en đều có thể “may đo” layout phù hợp nhất với trang phục dạ hội của bạn.
  • Bắt sáng hoàn hảo: Kỹ thuật nhấn highlight vùng xương quai xanh, gò má giúp bạn luôn nổi bật và thu hút mọi ánh nhìn trong đêm tiệc.

2. Makeup Chụp Ảnh Ngoại Cảnh, Ảnh Cưới Kỷ Niệm Tại Resort

Sở hữu bãi cát trắng mịn và kiến trúc uốn lượn hiện đại, Selectum Noa là background hoàn hảo cho các bộ ảnh cưới, ảnh gia đình hay ảnh profile cá nhân. Tuy nhiên, nắng và gió biển Cam Ranh là “kẻ thù” lớn của lớp trang điểm nếu không được xử lý đúng cách.

  • Kỹ thuật nền “Glass Skin” mỏng nhẹ, chống trôi: Hi-en ứng dụng công nghệ nền mỏng nhẹ như sương nhưng lại có độ kiềm dầu và kháng nước cực cao, giúp bạn thoải mái tạo dáng chụp ảnh suốt nhiều giờ liền dưới cái nắng miền Trung mà không lo bị chảy nền, mốc phấn hay xuống tone.
  • Tóc rối tự nhiên hợp gió biển: Không chỉ makeup, Hi-en còn thiết kế các kiểu tóc uốn sóng lơi, tóc tết lãng mạn được định hình khéo léo để vừa giữ được phom dáng vừa bay bổng tự nhiên trước gió biển.

3. Makeup Cô Dâu Đám Cưới Bãi Biển (Destination Wedding)

Một lễ đường ngập tràn hoa tươi bên bờ biển Selectum Noa là ước mơ của mọi cô gái. Đối với dâu tiệc biển, quy tắc tối thượng là “Trang điểm như không trang điểm” – tôn vinh nét đẹp hạnh phúc tự nhiên nhất.

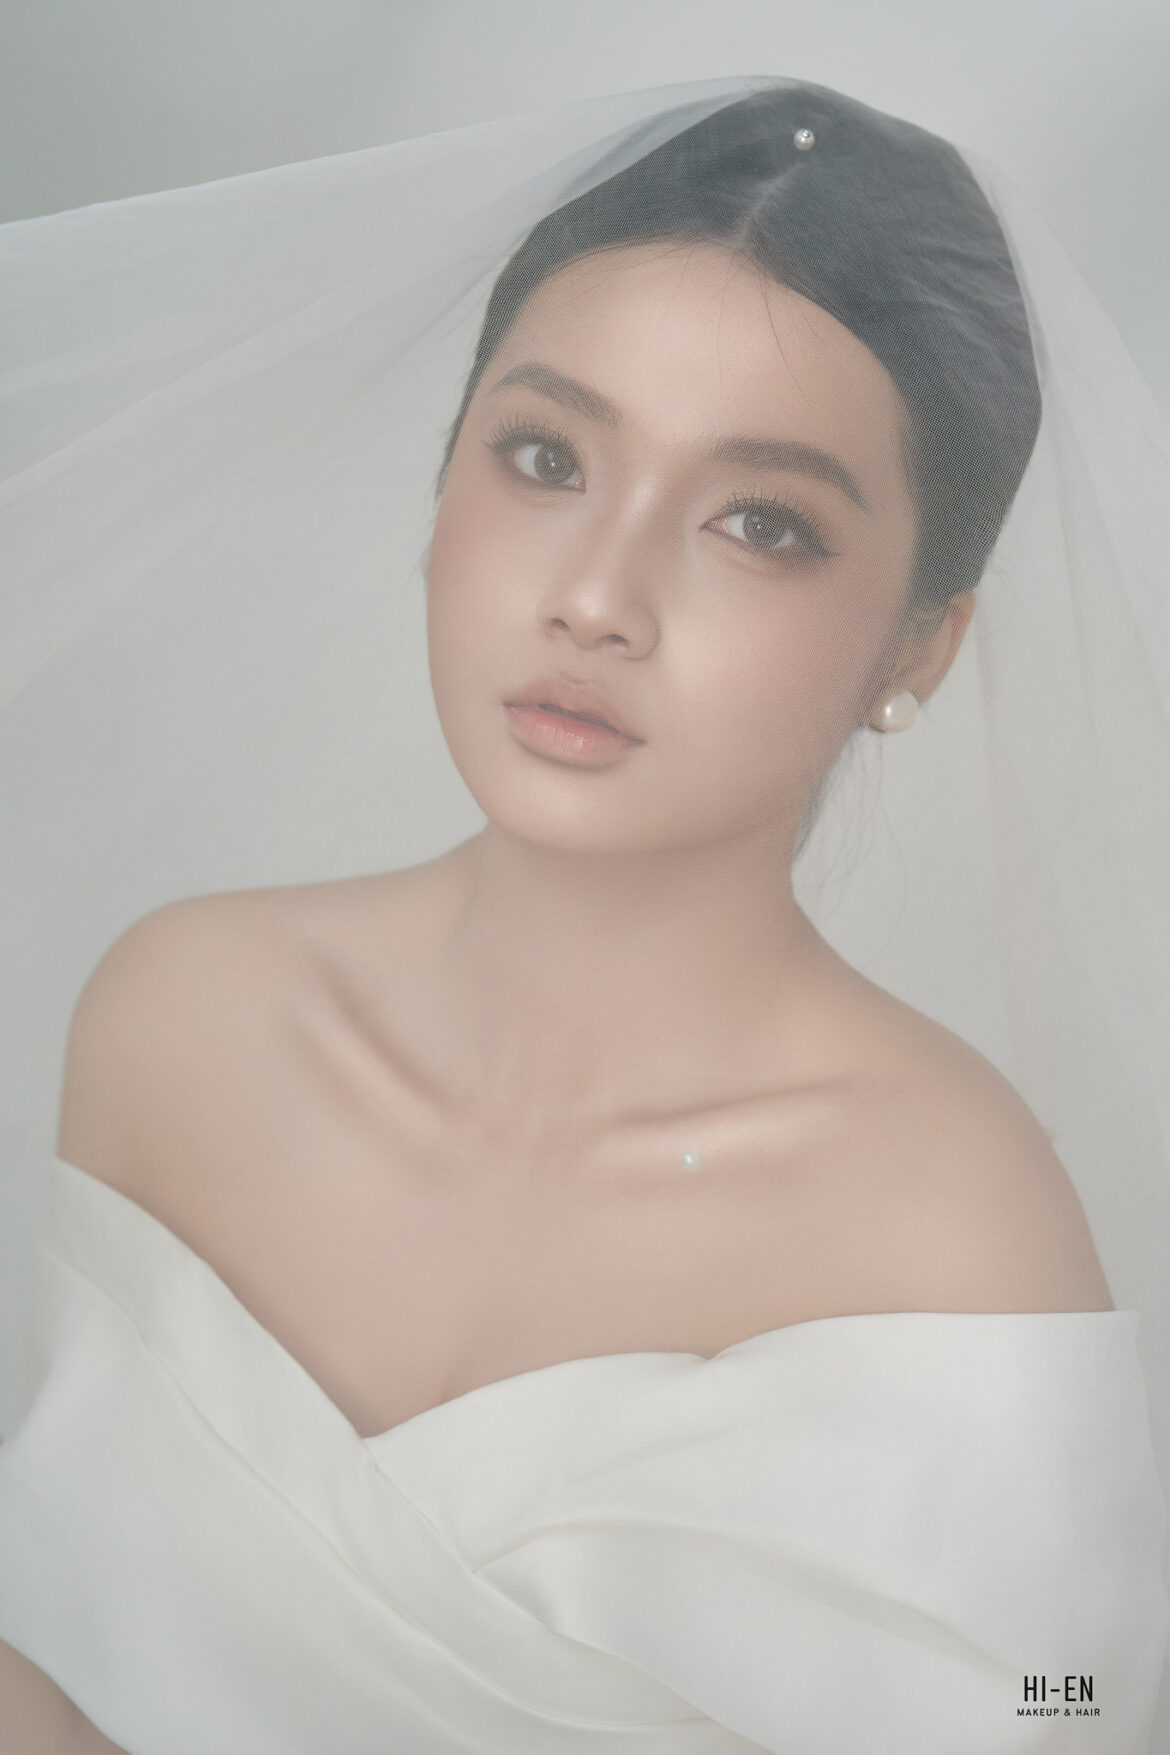
  • Vẻ đẹp trong trẻo, tinh tế: Hi-en tập trung vào đôi mắt long lanh biết nói, làn môi mọng nước tone cam đào/hồng trà và hàng mi tơi nhẹ nhàng. Layout này giúp cô dâu trông thanh thoát, dịu dàng khi đứng trước hoàng hôn biển.
  • 100% Mỹ phẩm High-end cao cấp: Toàn bộ mỹ phẩm sử dụng (Chanel, Dior, NARS, Charlotte Tilbury…) đều là hàng chính hãng cao cấp, đảm bảo an toàn tuyệt đối cho làn da nhạy cảm dưới ánh nắng mặt trời và bền màu suốt 12 tiếng từ lúc làm lễ đến khi kết thúc tiệc After-party.

Dịch Vụ Phục Vụ Tận Phòng (Home Service) Tại Selectum Noa Resort

Bạn lo lắng vì không thông thuộc đường xá Cam Ranh hoặc không muốn mất thời gian di chuyển ra ngoài tiệm giữa thời tiết nắng nóng?

Đừng lo lắng, dịch vụ Makeup tận nơi của Hi-en ra đời là để phục vụ bạn. Chỉ cần đặt lịch trước, đội ngũ của Hi-en (Hotline chuyên môn: 0938 568 254) sẽ di chuyển đến tận phòng nghỉ hoặc villa của bạn tại Selectum Noa Resort từ sớm. Chúng mình mang theo đầy đủ hệ thống đèn led ánh sáng chuẩn studio và cốp đồ nghề chuyên nghiệp, giúp bạn thong thả sửa soạn diện mạo đẹp nhất ngay trong không gian riêng tư của mình.

website makeup tham khảo: https://hienmakeup.com/

10/07/2026 0 comments
0 FacebookTwitterPinterestEmail
Makeup cô dâu resort Cam Lâm

Dịch Vụ Makeup Cô Dâu Đẹp Tại Phước Long A Quận 9

by nhiepanhcamranh 08/07/2026
written by nhiepanhcamranh

Ngày cưới, ngày dạm ngõ hay lễ ăn hỏi là những cột mốc trọng đại nhất trong cuộc đời của mỗi cô gái. Trong những ngày này, bất kỳ nàng dâu nào cũng mong muốn mình xuất hiện với một diện mạo rạng rỡ, xinh đẹp và kiêu sa nhất. Nếu bạn đang tìm kiếm một địa chỉ trang điểm ngày cưới uy tín, có gu hiện đại ngay tại khu vực Phường Phước Long A (Quận 9 cũ, nay thuộc TP. Thủ Đức), Hi-en Makeup Artist chính là sự lựa chọn hoàn hảo giúp bạn hiện thực hóa giấc mơ về một diện mạo nàng dâu chạm đỉnh nhan sắc.

Để giúp bạn yên tâm tuyệt đối trước khi trao gửi niềm tin trong ngày trọng đại, toàn bộ những bộ ảnh cô dâu thực tế, những layout bắt trend nhất đều được tụi mình cập nhật minh bạch tại hệ thống website chính thức hienmakeup.com.

3 Lợi Thế Khi Chọn Dịch Vụ Makeup Cô Dâu Sát Vách Phước Long A

Phường Phước Long A với các trục đường huyết mạch như Tây Hòa, Đỗ Xuân Hợp, Nam Hòa… có mật độ dân cư vô cùng đông đúc. Vào những ngày cuối tuần – thời điểm thường diễn ra các buổi lễ cưới hỏi, tình trạng kẹt xe hay lu bu chuẩn bị là điều không thể tránh khỏi. Việc lựa chọn một tiệm trang điểm cô dâu ngay sát vách mang lại những lợi thế vô cùng thực tế:

  • Chỉ 3 phút di chuyển, nói không với trễ giờ: Studio của Hi-en tọa lạc tại số 219 Đường số 9, Phường Phước Bình – vị trí nằm ngay liền kề Phước Long A (chỉ cách nhau một trục đường Đỗ Xuân Hợp hoặc Tây Hòa). Cô dâu có thể thong thả đi bộ hoặc chạy xe máy qua tiệm làm mặt mà không phải chịu áp lực kẹt xe, hối hả như khi vào trung tâm thành phố.
  • Lớp nền nguyên vẹn, tươi tắn đón quan viên hai họ: Quãng đường di chuyển cực ngắn giúp lớp nền không phải tiếp xúc với khói bụi đường dài hay mồ hùi do nắng nóng, đảm bảo khi bạn bước vào lễ đường, lớp trang điểm vẫn giữ được độ mướt mịn và tươi mới tối đa.
  • Linh hoạt dịch vụ tại nhà (Home Service): Nếu ngày cưới có quá nhiều việc phải lo và không thể ra ngoài sớm, bạn hoàn toàn có thể book lịch dịch vụ Makeup cô dâu tại nhà Phước Long A. Đội ngũ của Hi-en sẽ có mặt từ sớm tại nhà riêng hoặc căn hộ của bạn, mang theo hệ thống đèn led ánh sáng chuẩn để làm layout cho bạn với chi phí di chuyển cực kỳ ưu đãi.

Định Hình Phong Cách Nàng Dâu Chuẩn Gu Cá Nhân

Tại hienmakeup.com, Hi-en hiểu rằng mỗi cô gái sở hữu một cấu trúc xương mặt và sắc tố da hoàn toàn khác nhau. Vì vậy, tụi mình nói không với những layout trang điểm rập khuôn, dầy cộm hay sến sẩm kiểu cũ. Thay vào đó là tư duy trang điểm “may đo” theo nét đẹp tự nhiên của bạn:

  • Tone trong trẻo kiểu Hàn (Glass Skin): Tạo hiệu ứng lớp nền mỏng nhẹ như sương, tôn vinh làn da căng bóng và nét đẹp hiền thục, dịu dàng của người con gái Á Đông.
  • Tone Thái Lan/Tây hiện đại: Nhấn sâu vào đôi mắt biết nói, hàng mi cong vút tơi đều và kỹ thuật tạo khối chuẩn xác giúp gương mặt cô dâu trở nên sắc sảo, kiêu kỳ dưới ánh đèn sân khấu nhà hàng.
  • Cam kết 100% mỹ phẩm High-end: Hi-en chỉ sử dụng các dòng mỹ phẩm cao cấp nhất đến từ các thương hiệu lớn (Chanel, Dior, NARS, MAC, Charlotte Tilbury…), đảm bảo lớp makeup bền màu suốt 12 tiếng, không lo xuống tone và an toàn tuyệt đối cho mọi làn da.

Gợi ý nhỏ cho nàng: Sau ngày cưới, để luôn giữ được diện mạo tự tin rạng ngời khi đi làm, đi chơi hay đi tiệc cùng gia đình nhỏ, bạn có thể tham khảo thêm Khóa học makeup cá nhân Quận 9 được Mentor Hi-en kèm cặp 1-1 trực tiếp tại tiệm nhé!

08/07/2026 0 comments
0 FacebookTwitterPinterestEmail
Makeup cô dâu resort Cam Lâm

Frequency Separation 2021

by nhiepanhcamranh 27/04/2026
written by nhiepanhcamranh

A long (long) time ago I wrote an essay on Frequency Separation, even if the main subject was disguised in the more approachable title “Notes on Sharpening”. That was early 2009, way before Frequency Separation was cool, then popularized/mainstream, then possibly cool again. I’ve thought to revisit the original article to give the subject a new coat of 2021 paint, plus all sorts of new detours.

Spoiler alert: I’m interested in Frequency Separation as a tool for a broader set of manipulations not limited to, nor particularly focused on, beauty/skin retouch.

1. Frequencies

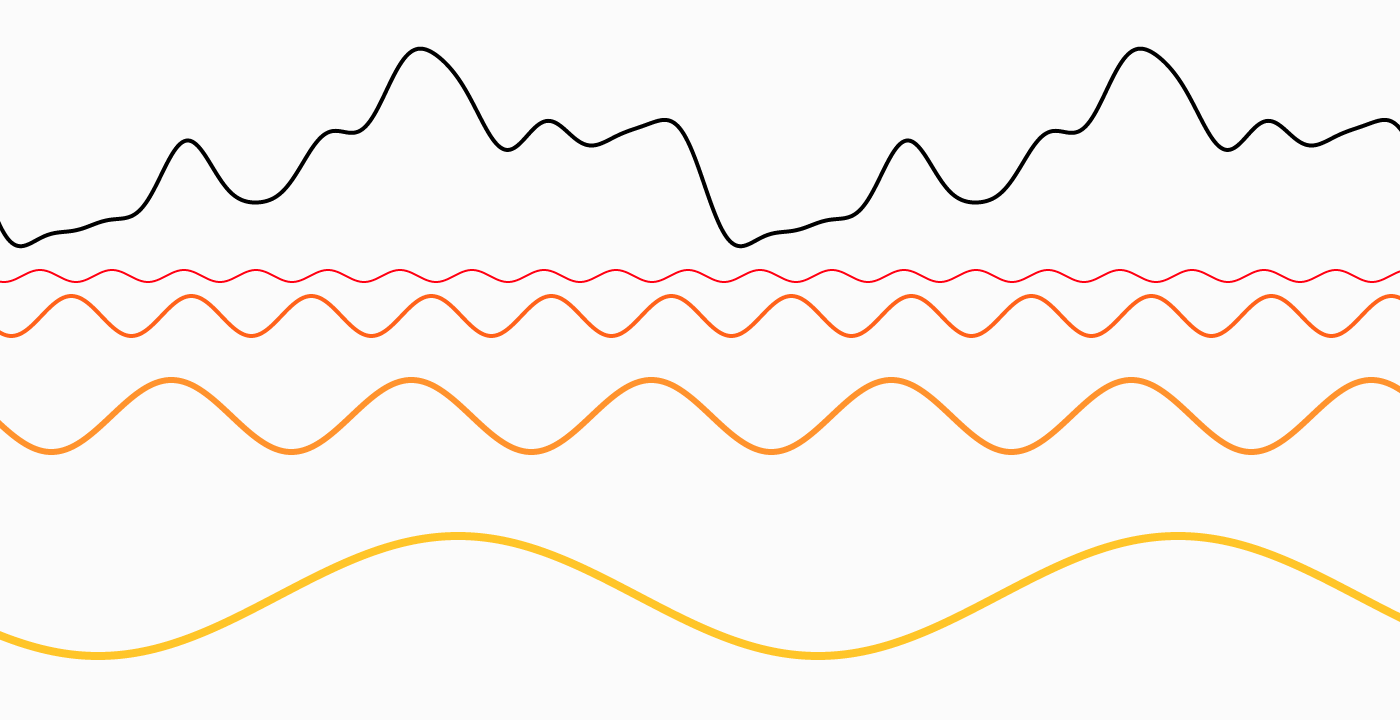
I assume that you already know what we’re talking about, TL;DR any signal, e.g. a sound wave no matter how complex can be built composing “pure” frequencies.

Low frequencies are at the bottom, high on top, black is the result. If you want to understand the concept better, this article goes in much more detail and will blow your mind too.

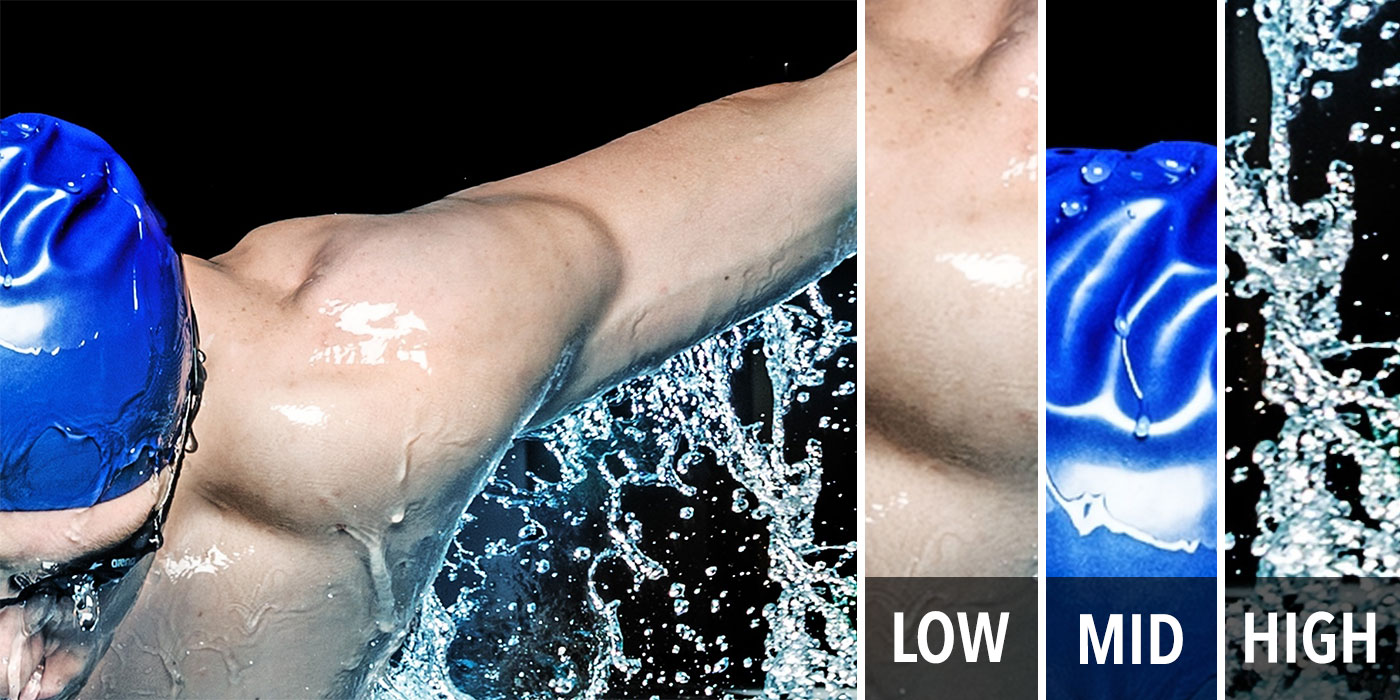
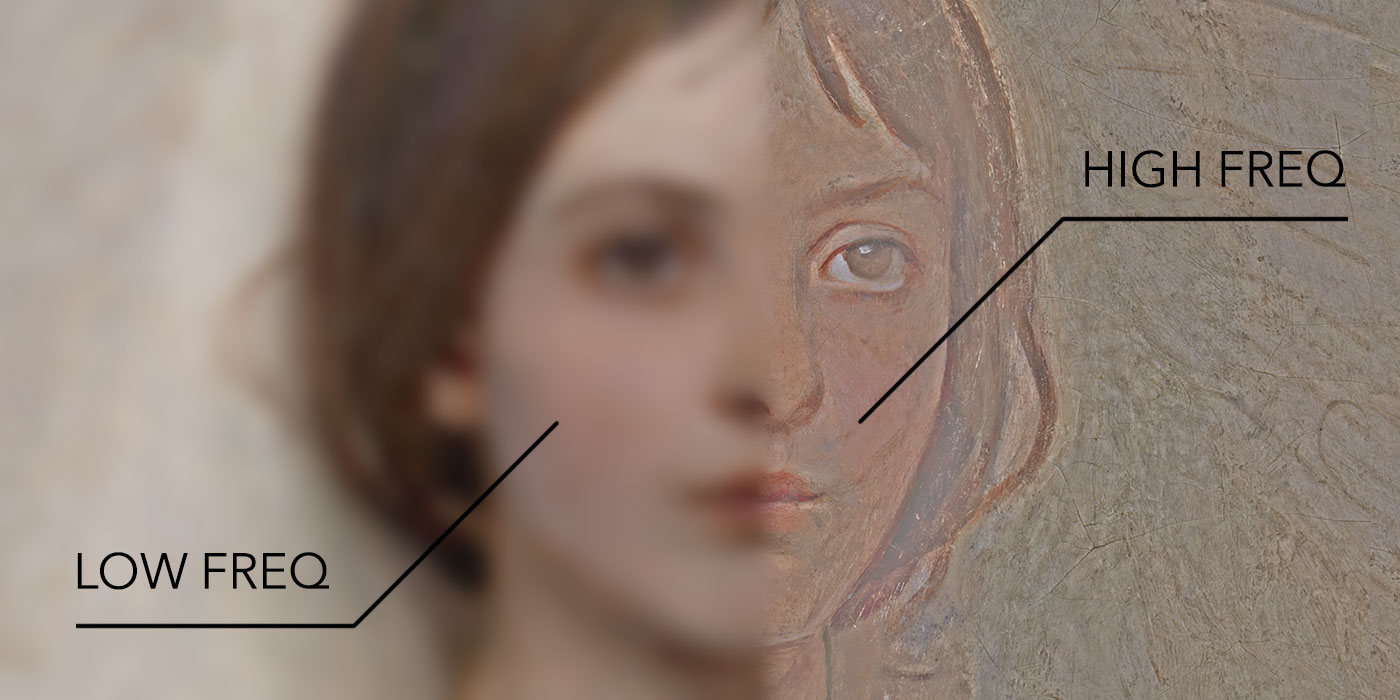
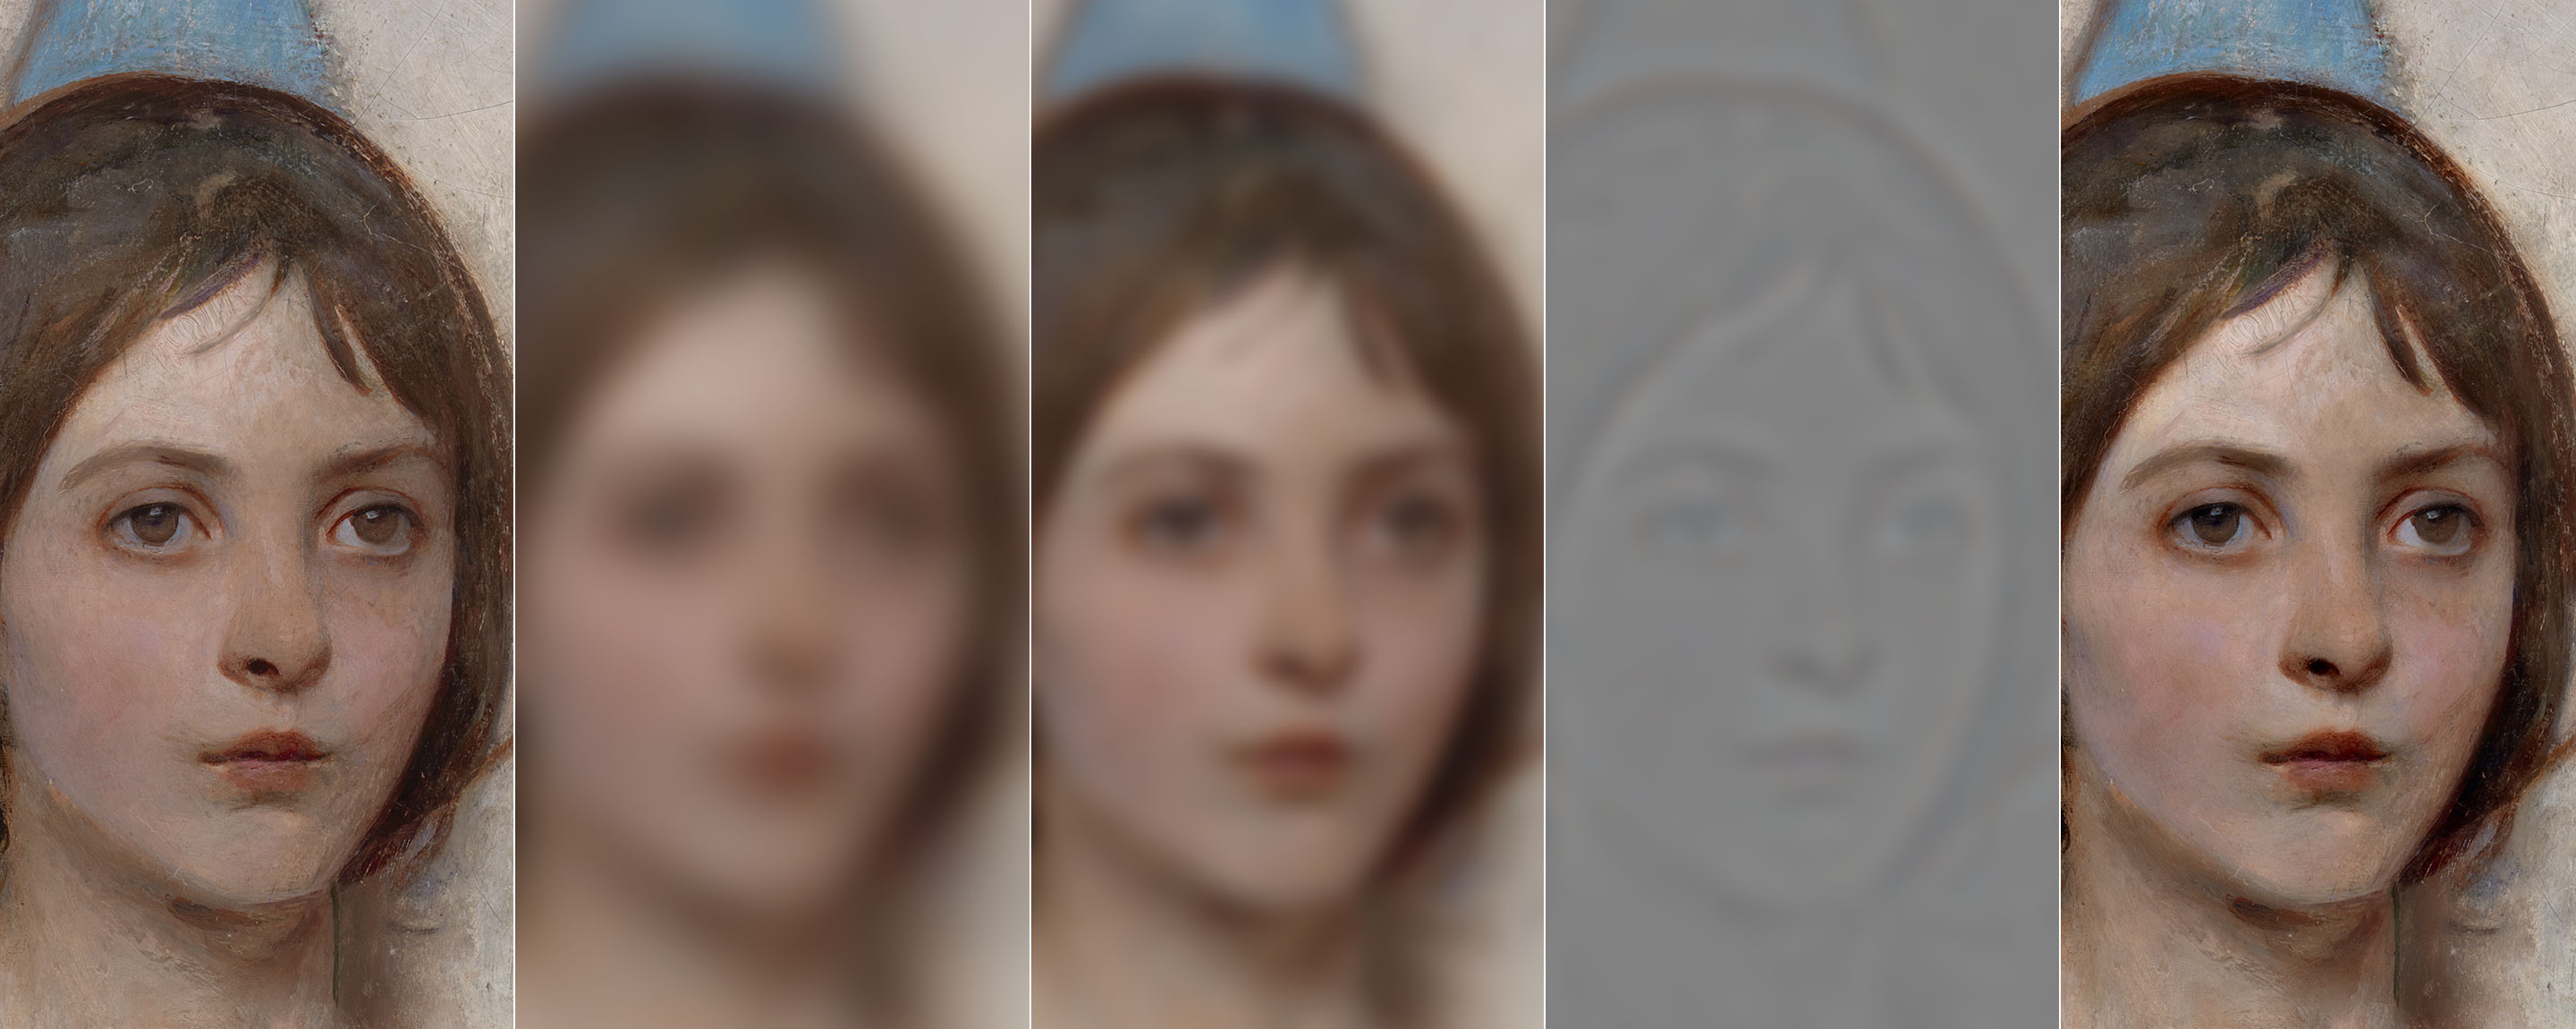
In the more familiar realm of images, you can think of high frequencies as describing thin detail (given a defined area, a lot of stuff happens there), while low frequencies are in charge of spatially slower changes:

2. Basic frequency separation

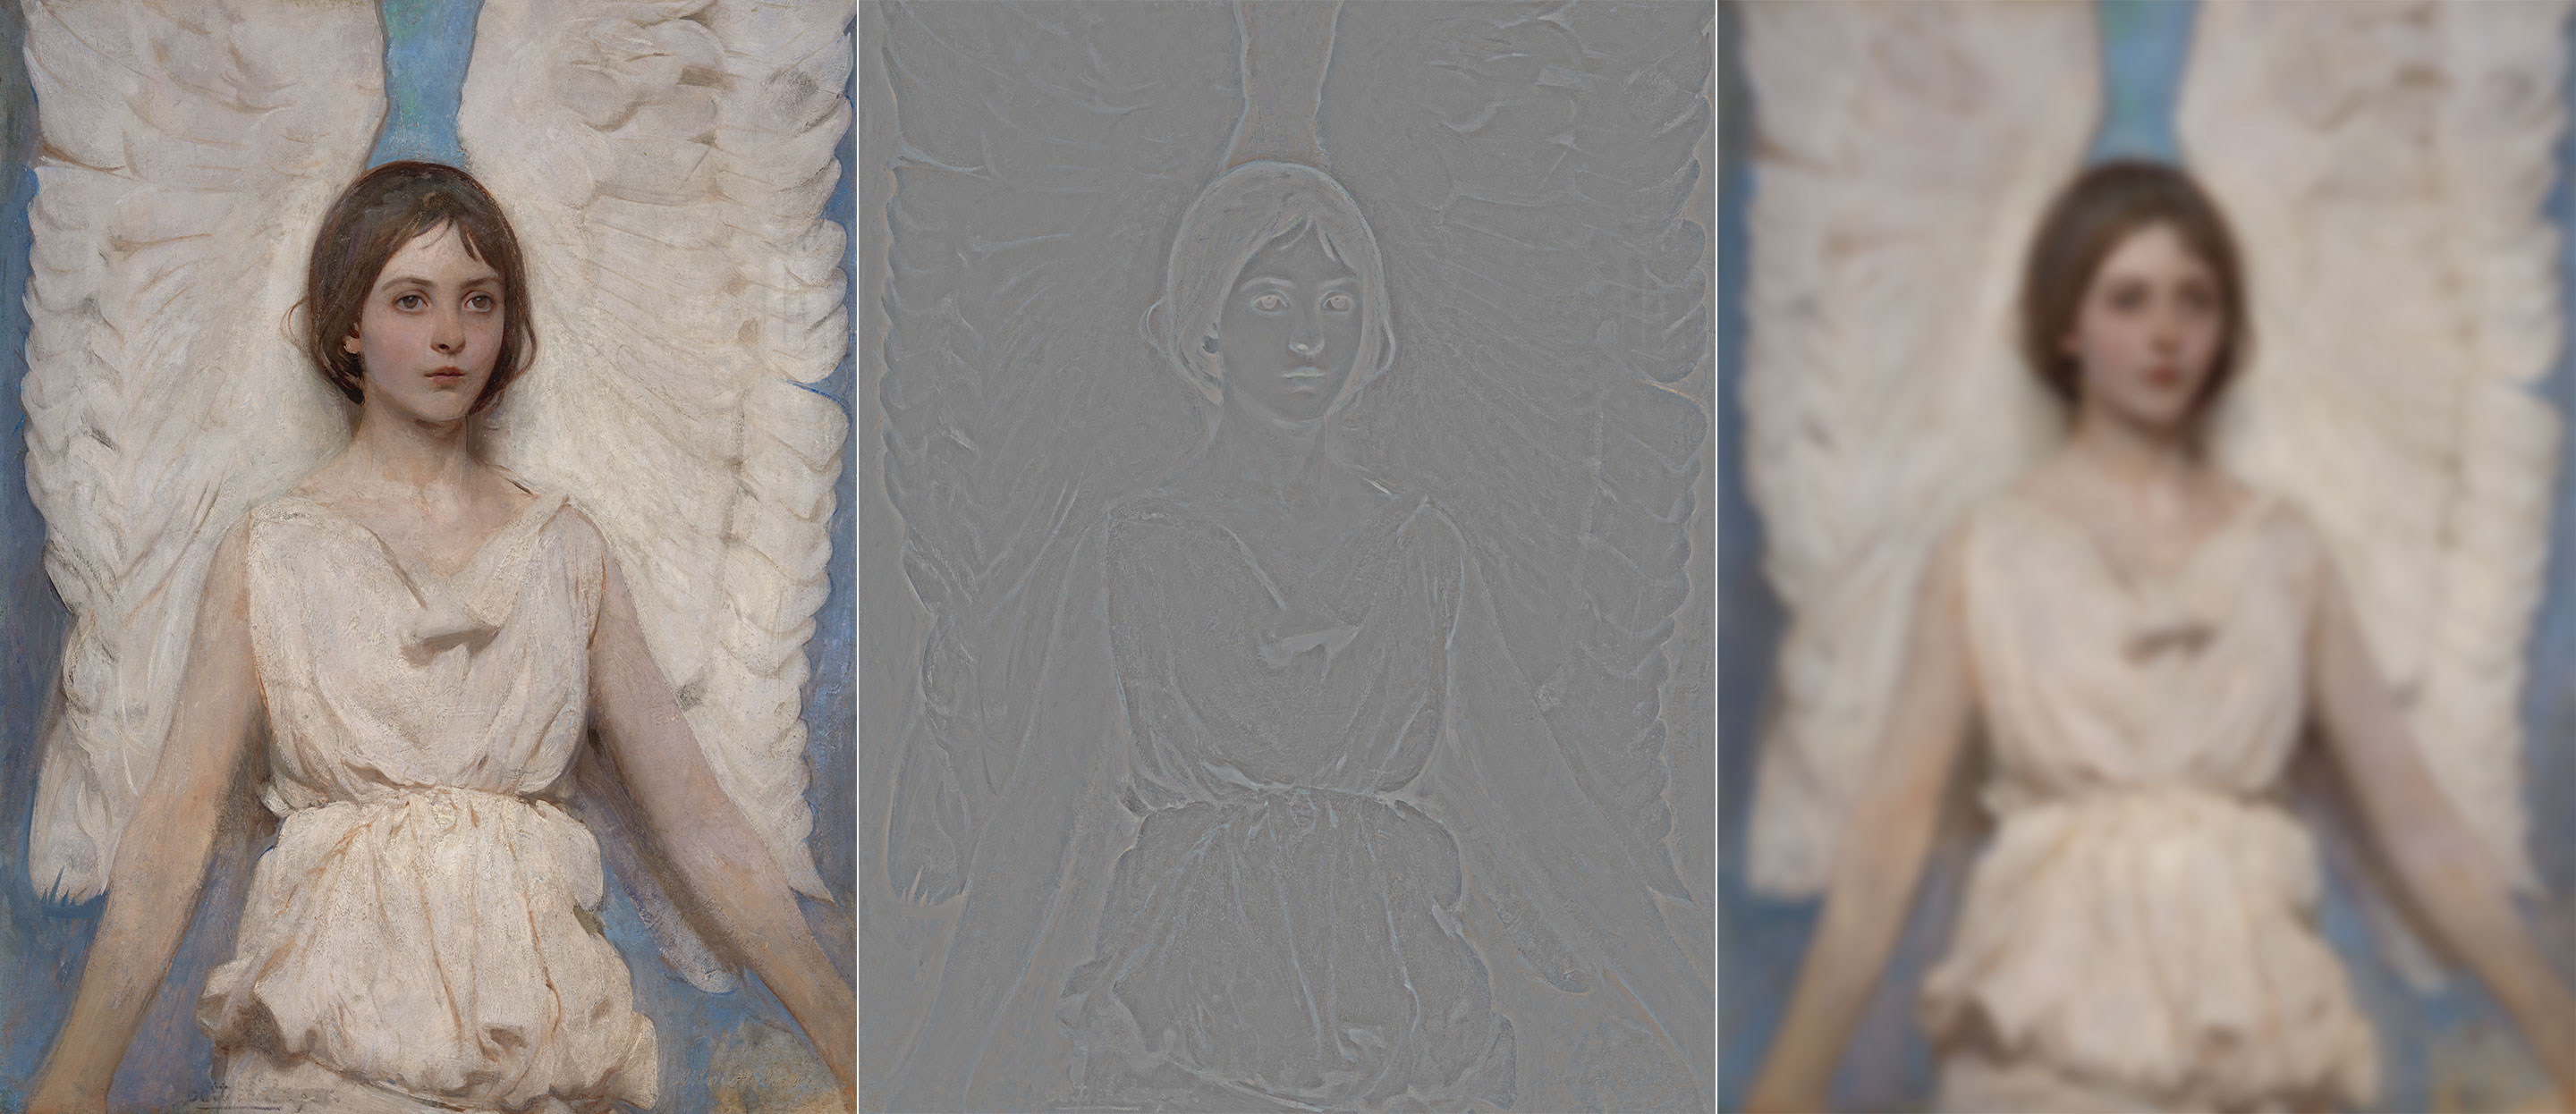
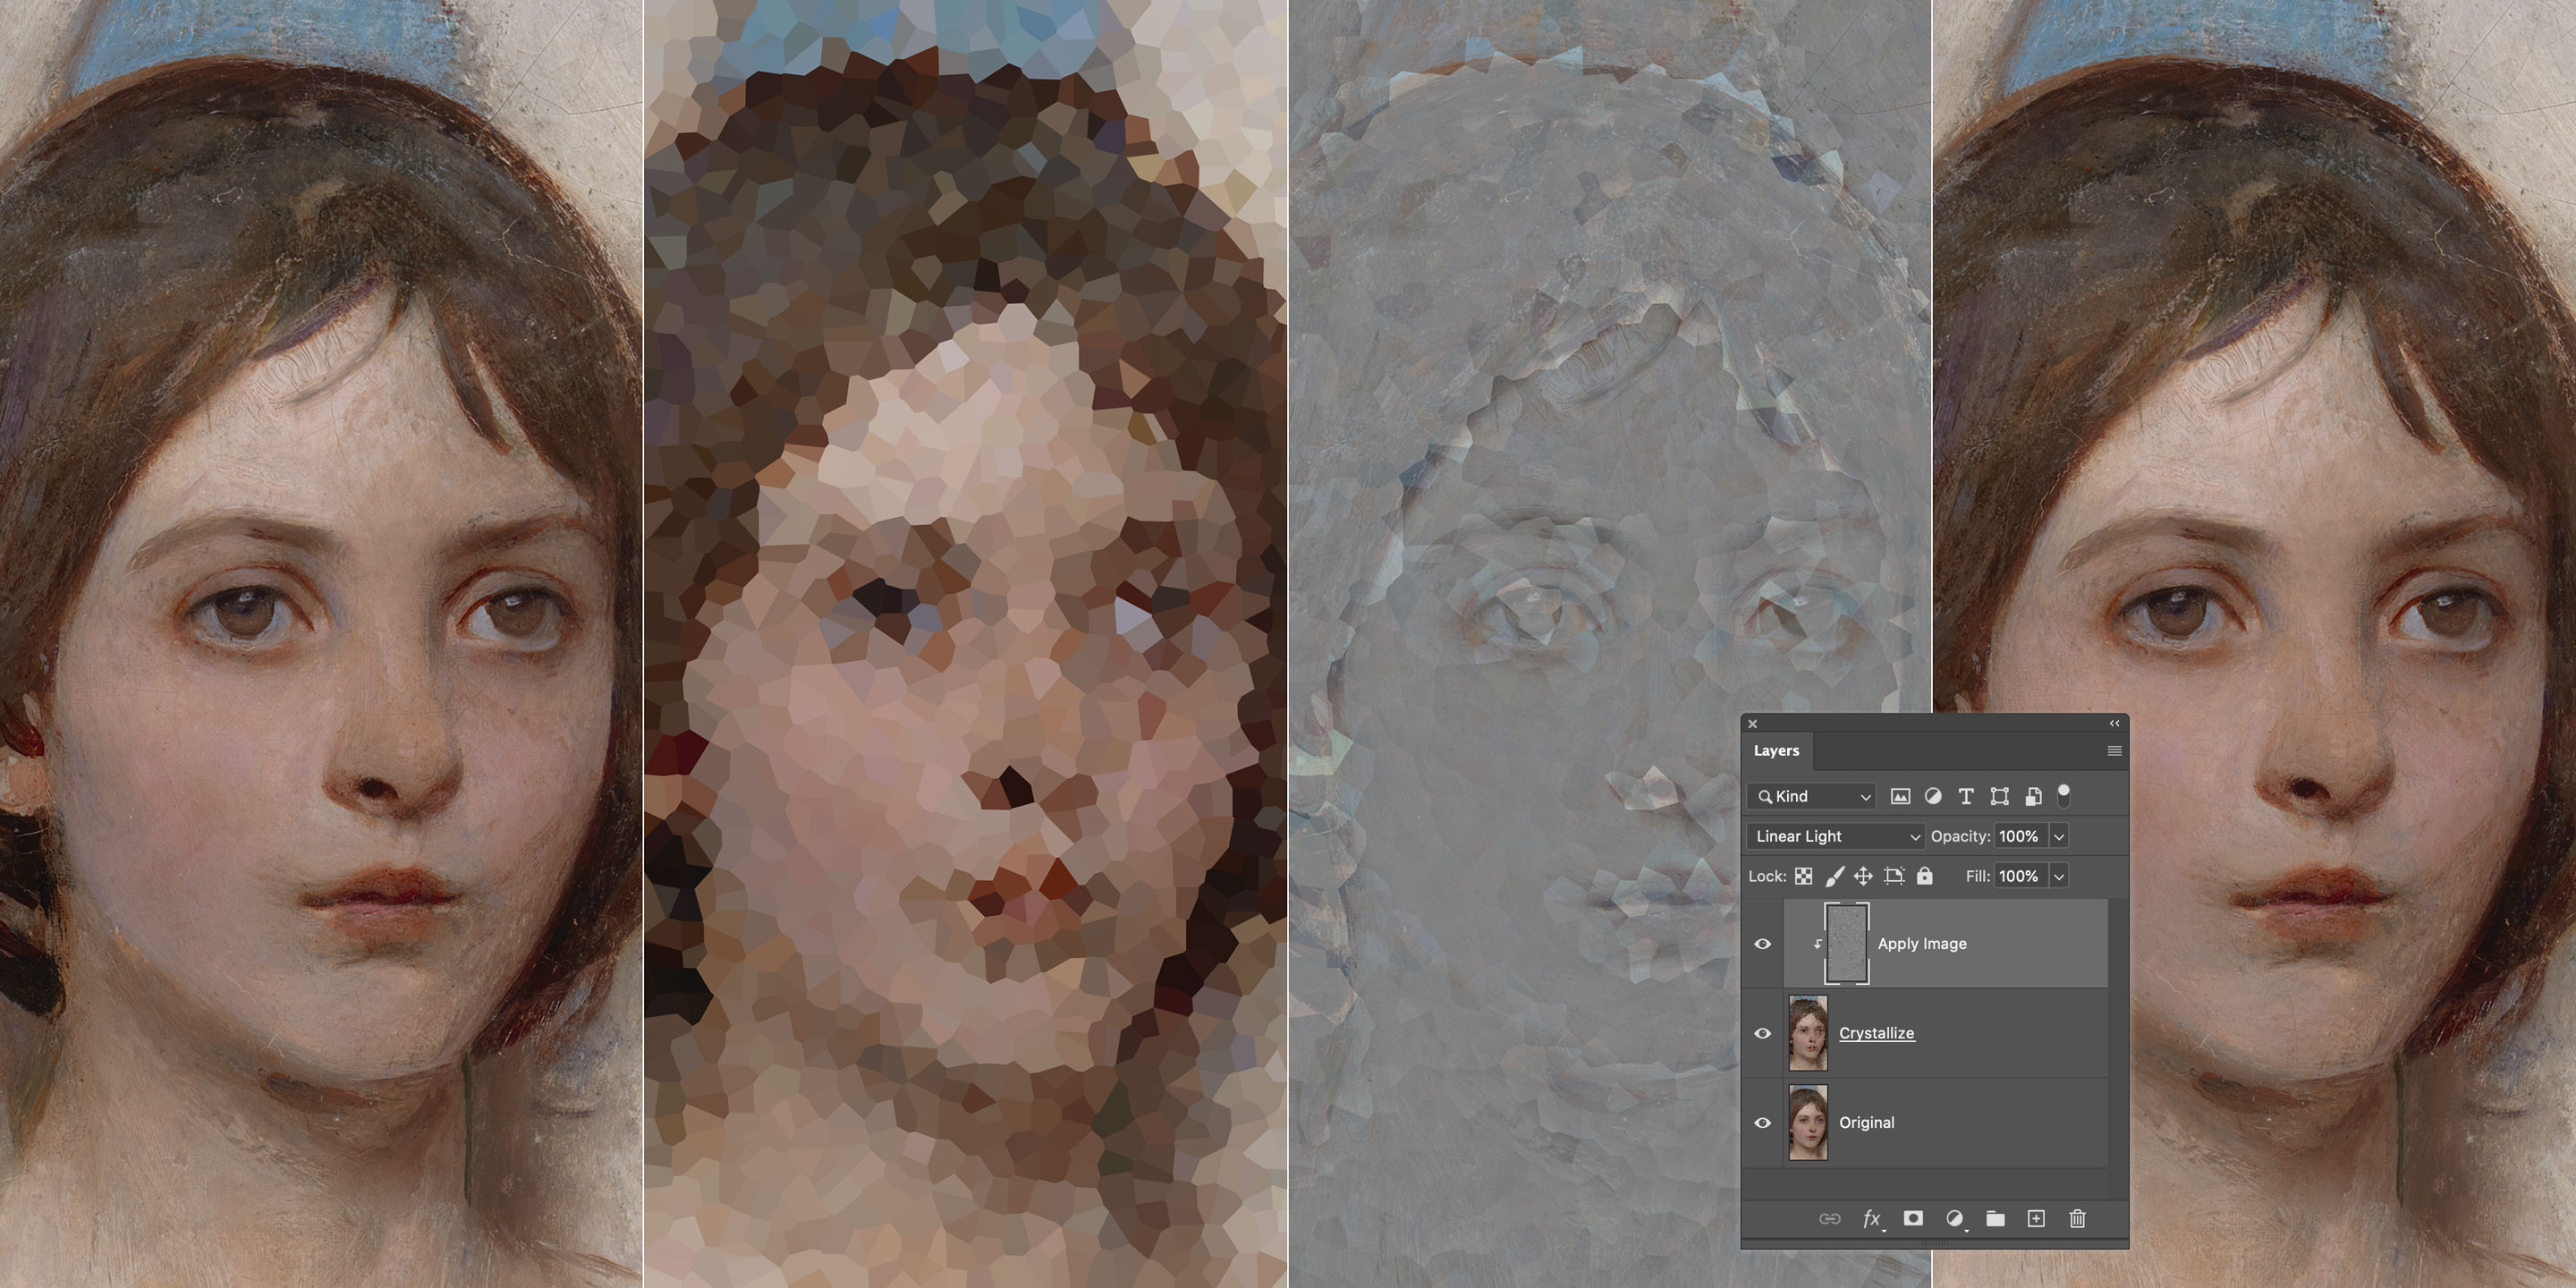
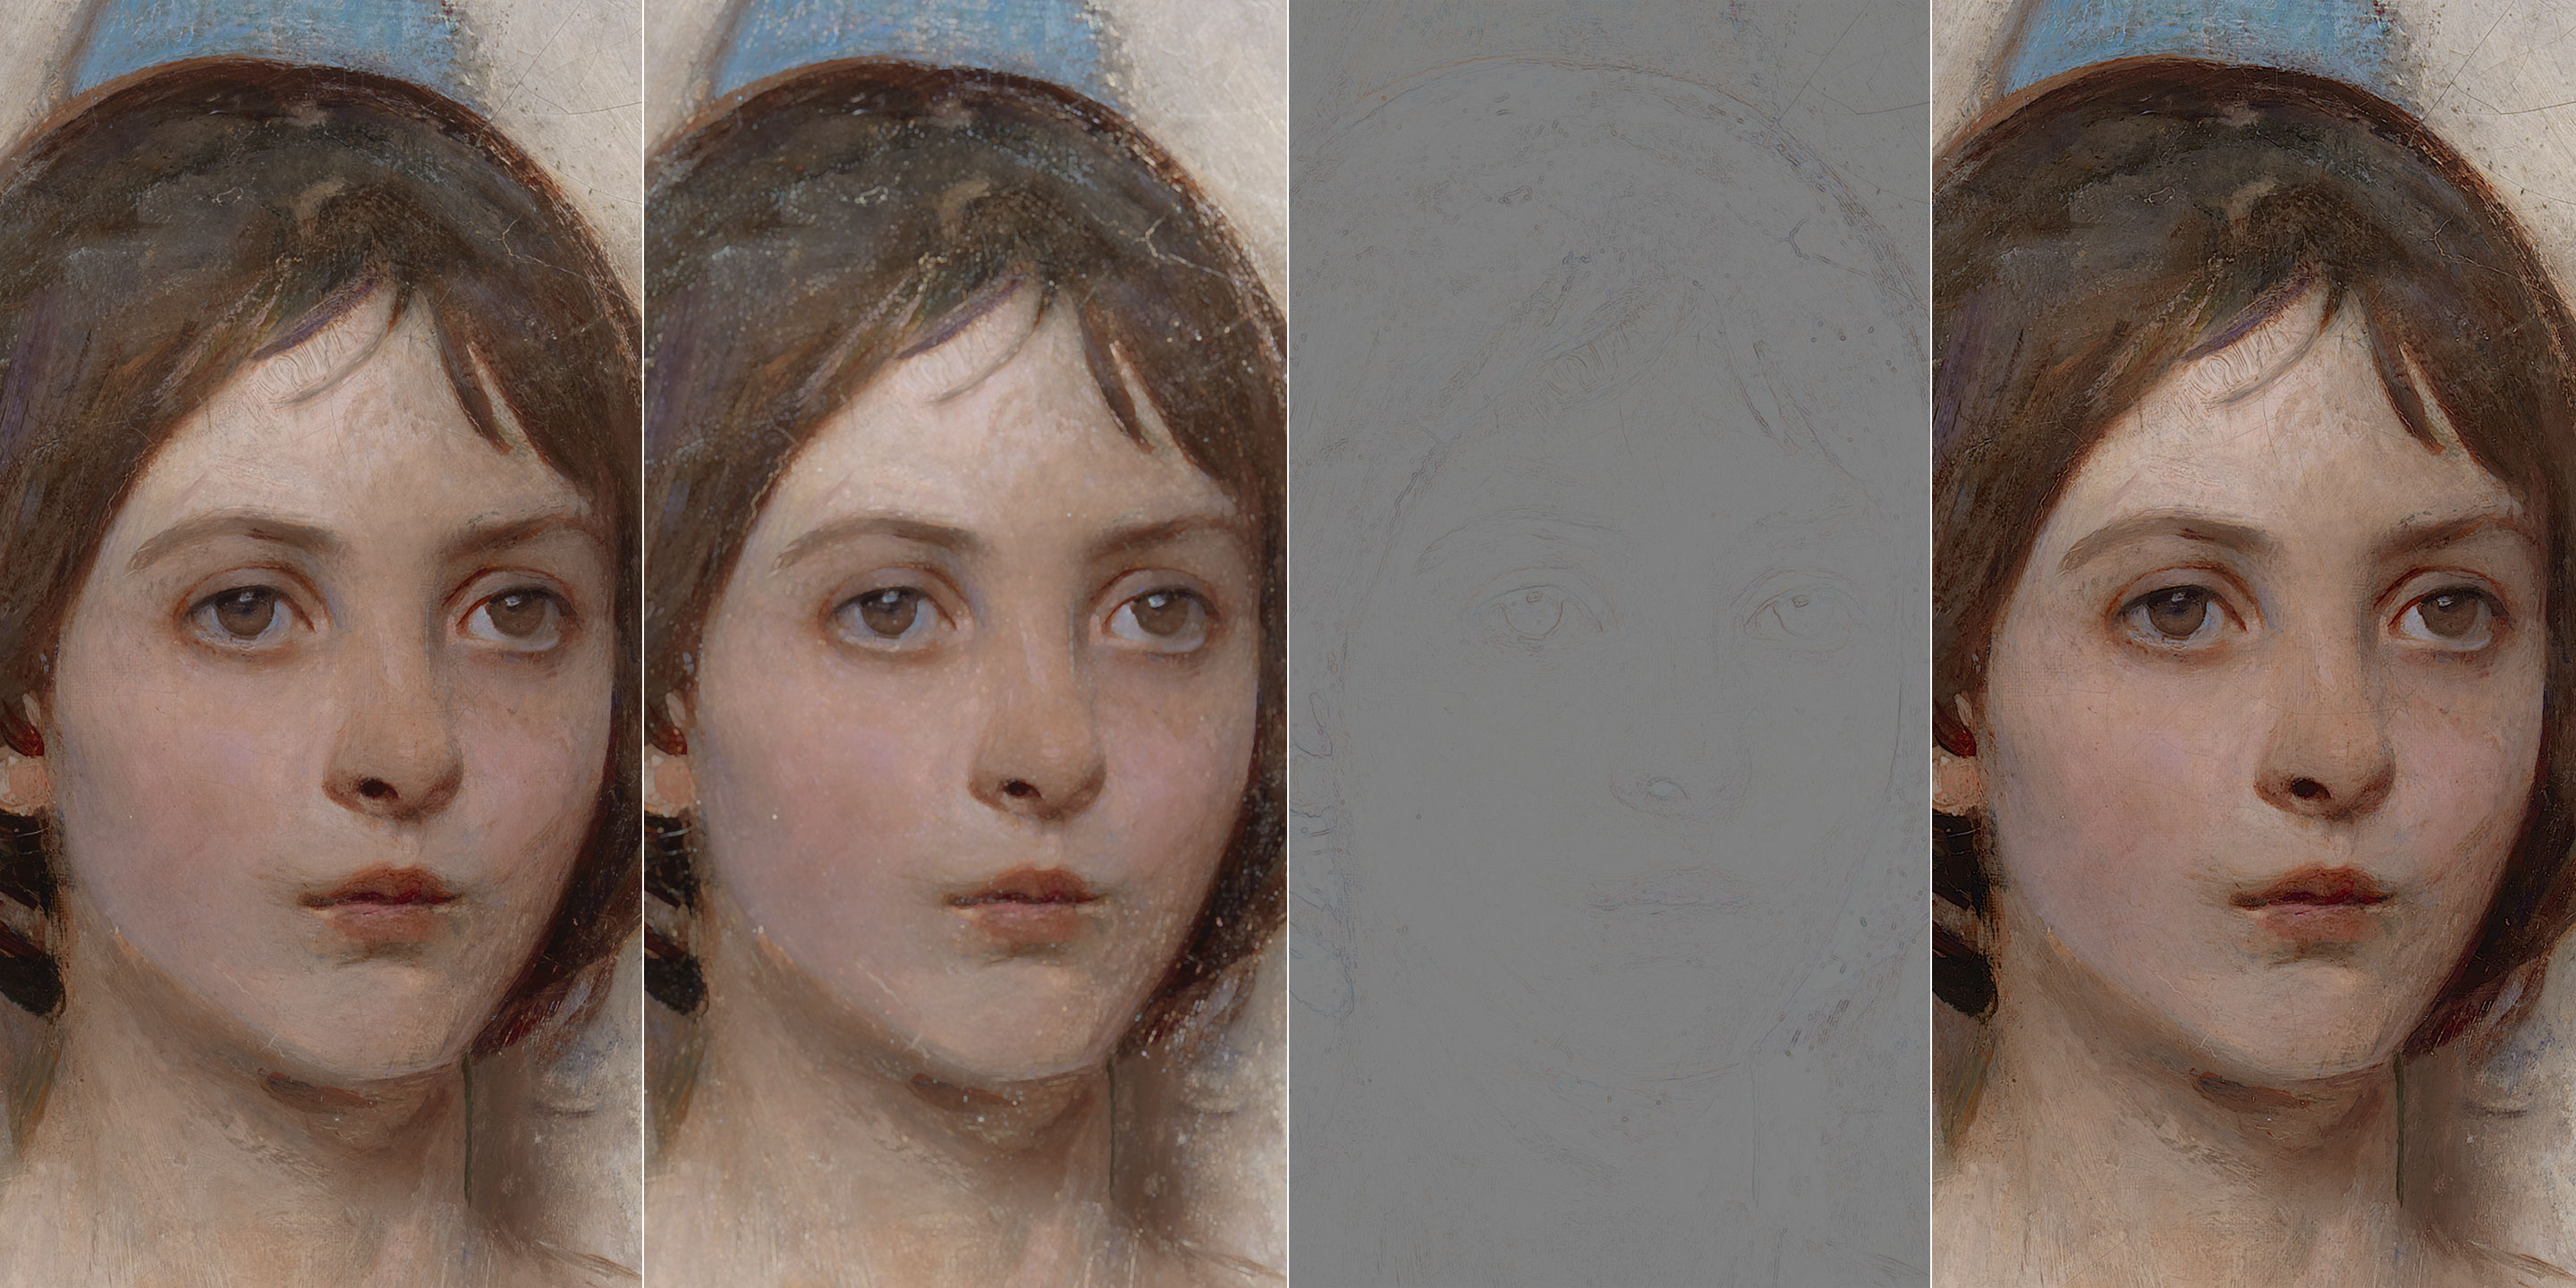
As opposed to the signal wave example, with images we usually deal with frequency ranges. When you filter with Gaussian Blur (Filter > Blur > Gaussian Blur, GB from now on) e.g. radius 10px, you’re getting rid of all the high frequencies (i.e. detail) that belong to the smaller-than-10px range. Whereas if you High-Pass (Filter > Others > High Pass, HP from now on) with the same radius you’re doing the opposite: you’re left with everything that belongs to the smaller-than-10px range (only the high frequencies are allowed to pass – hence the filter name).

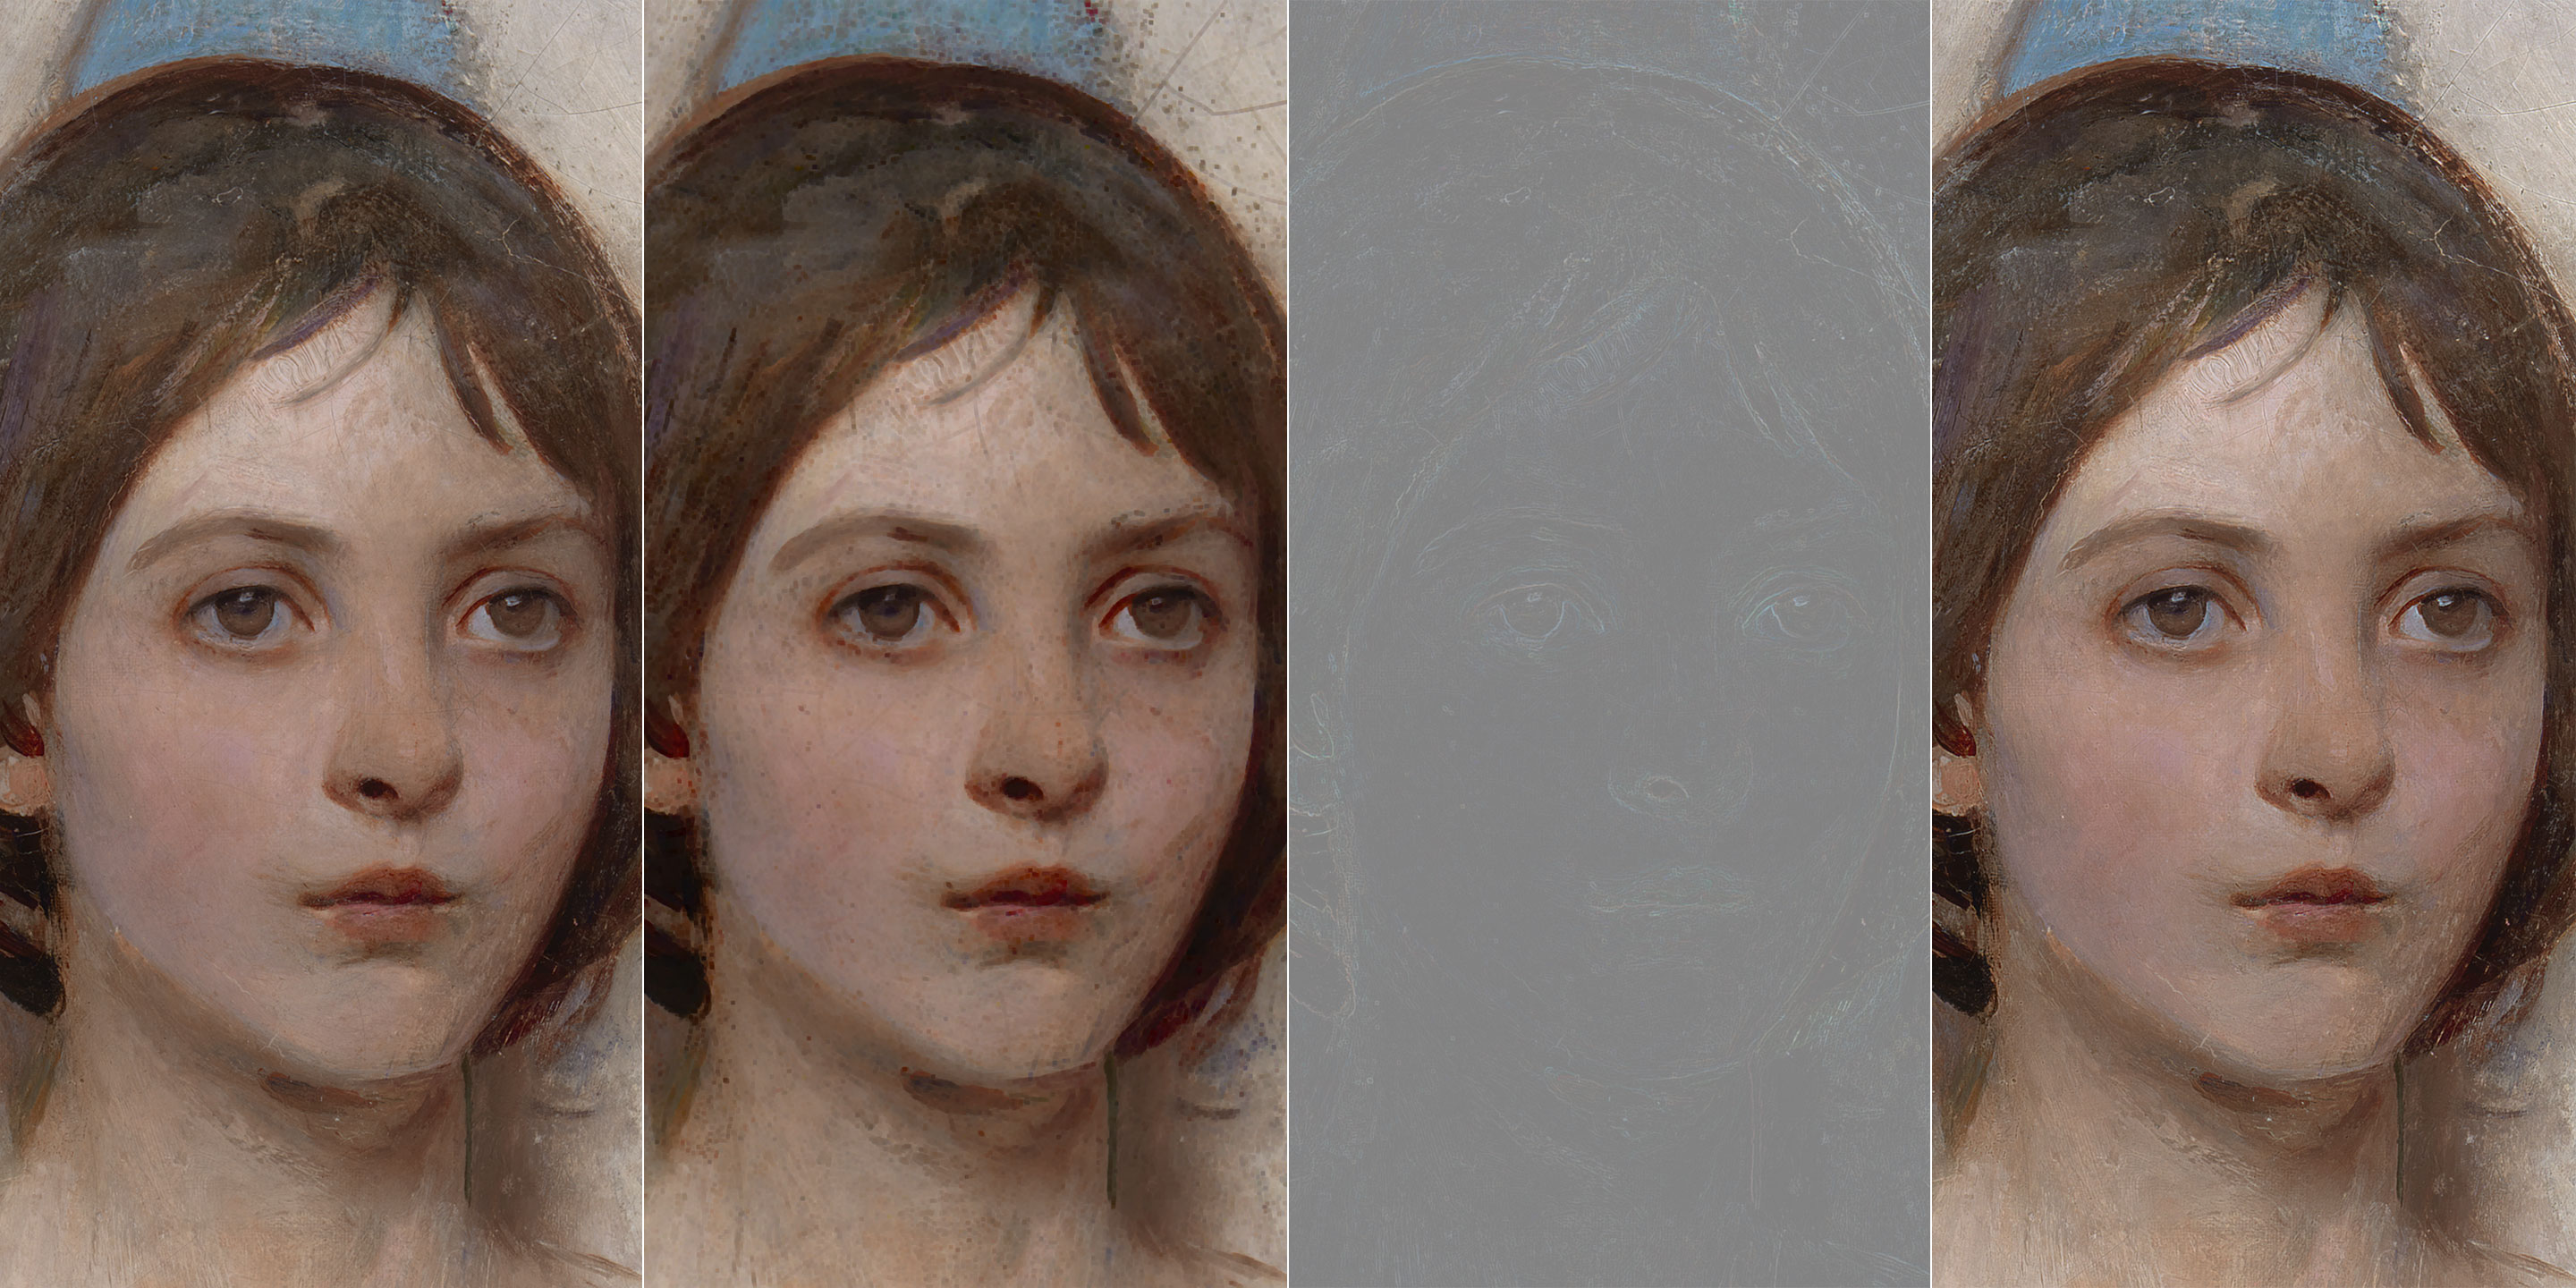
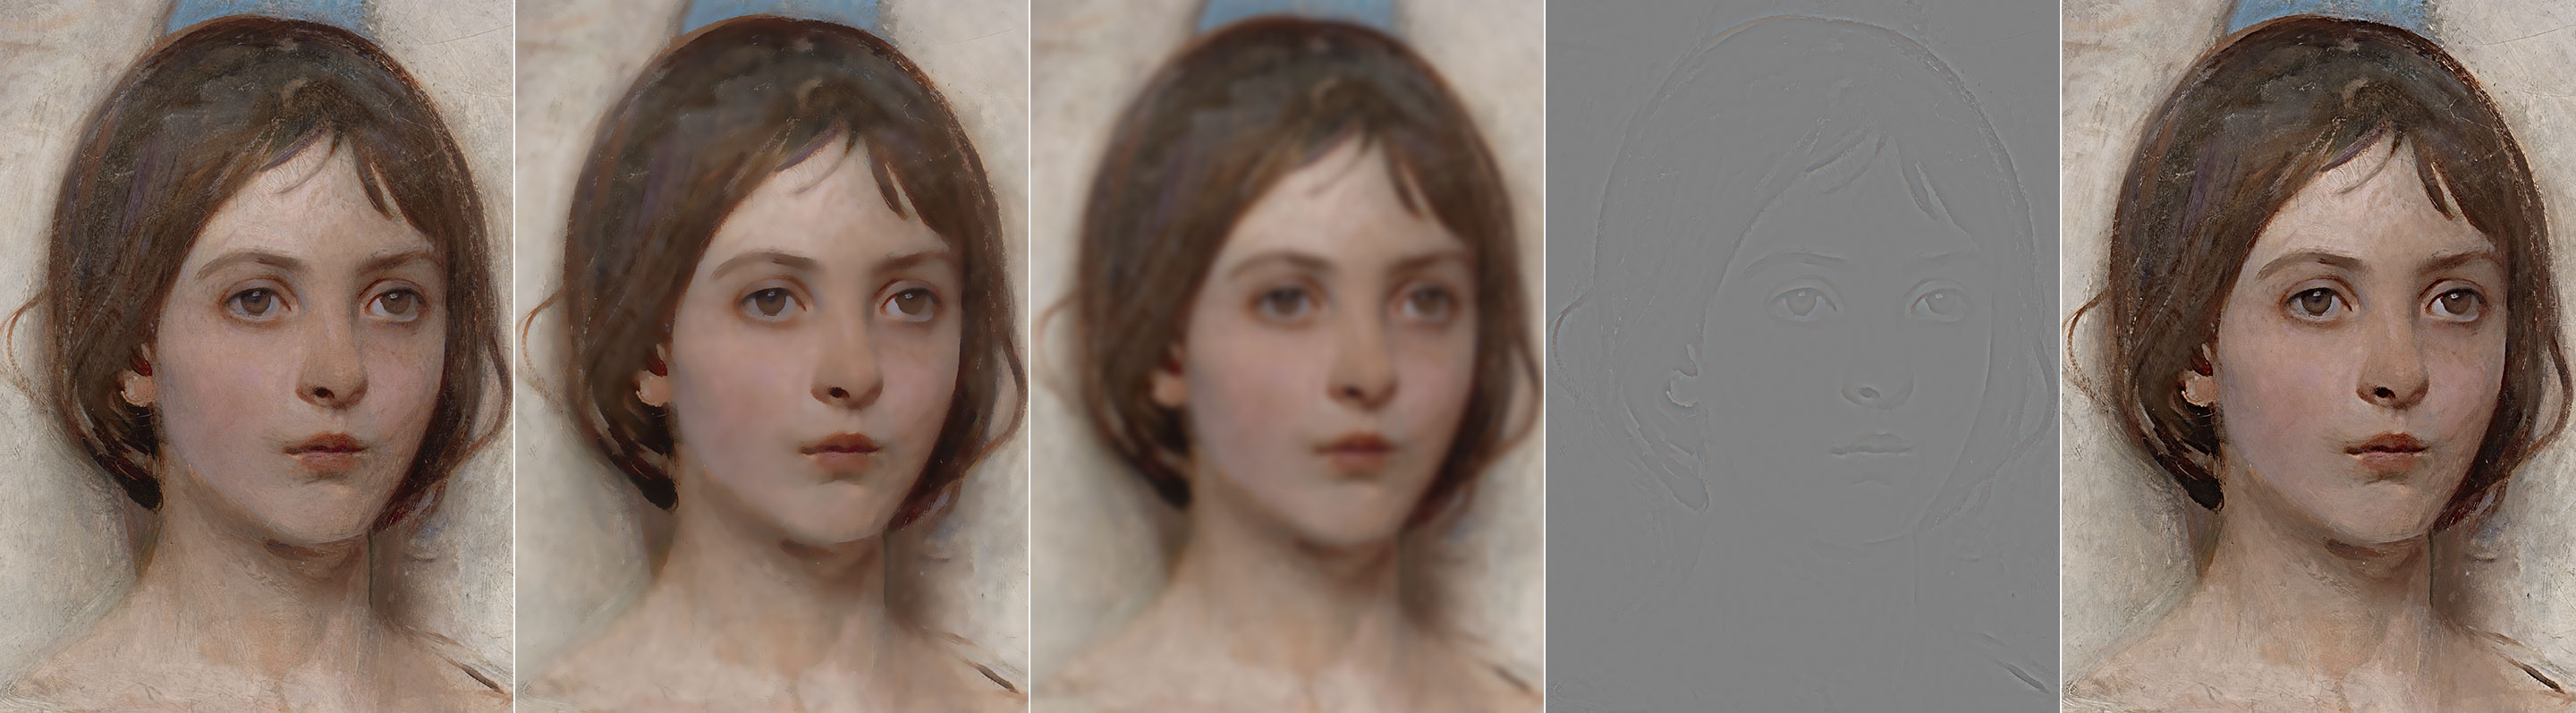
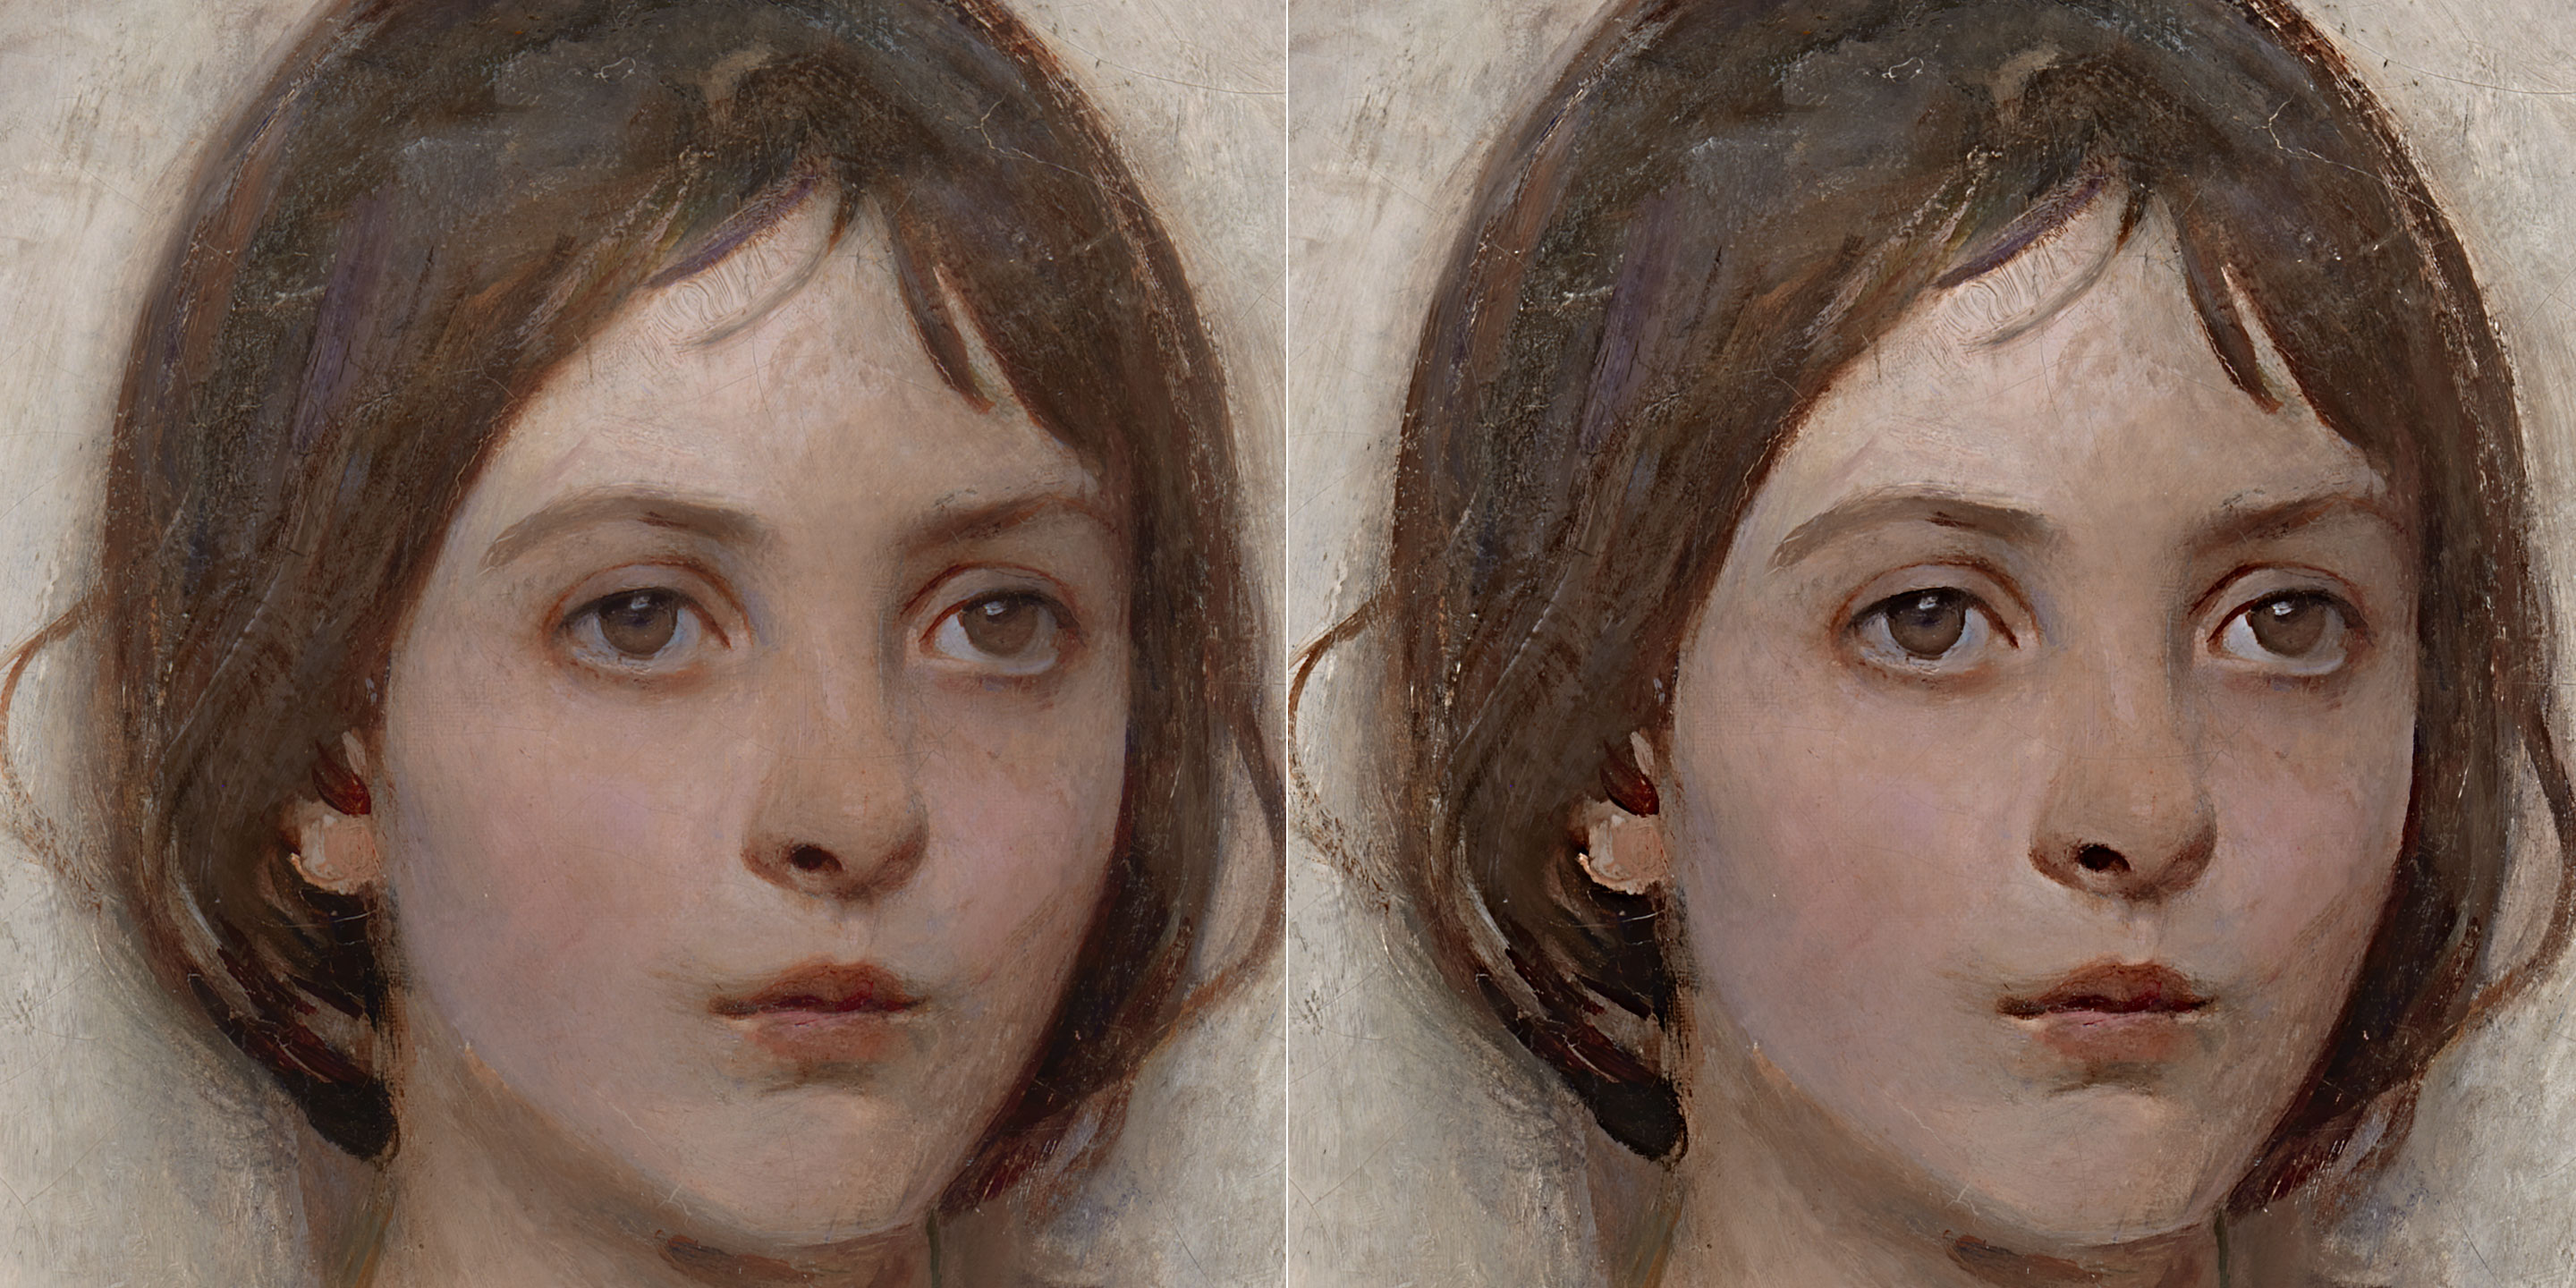
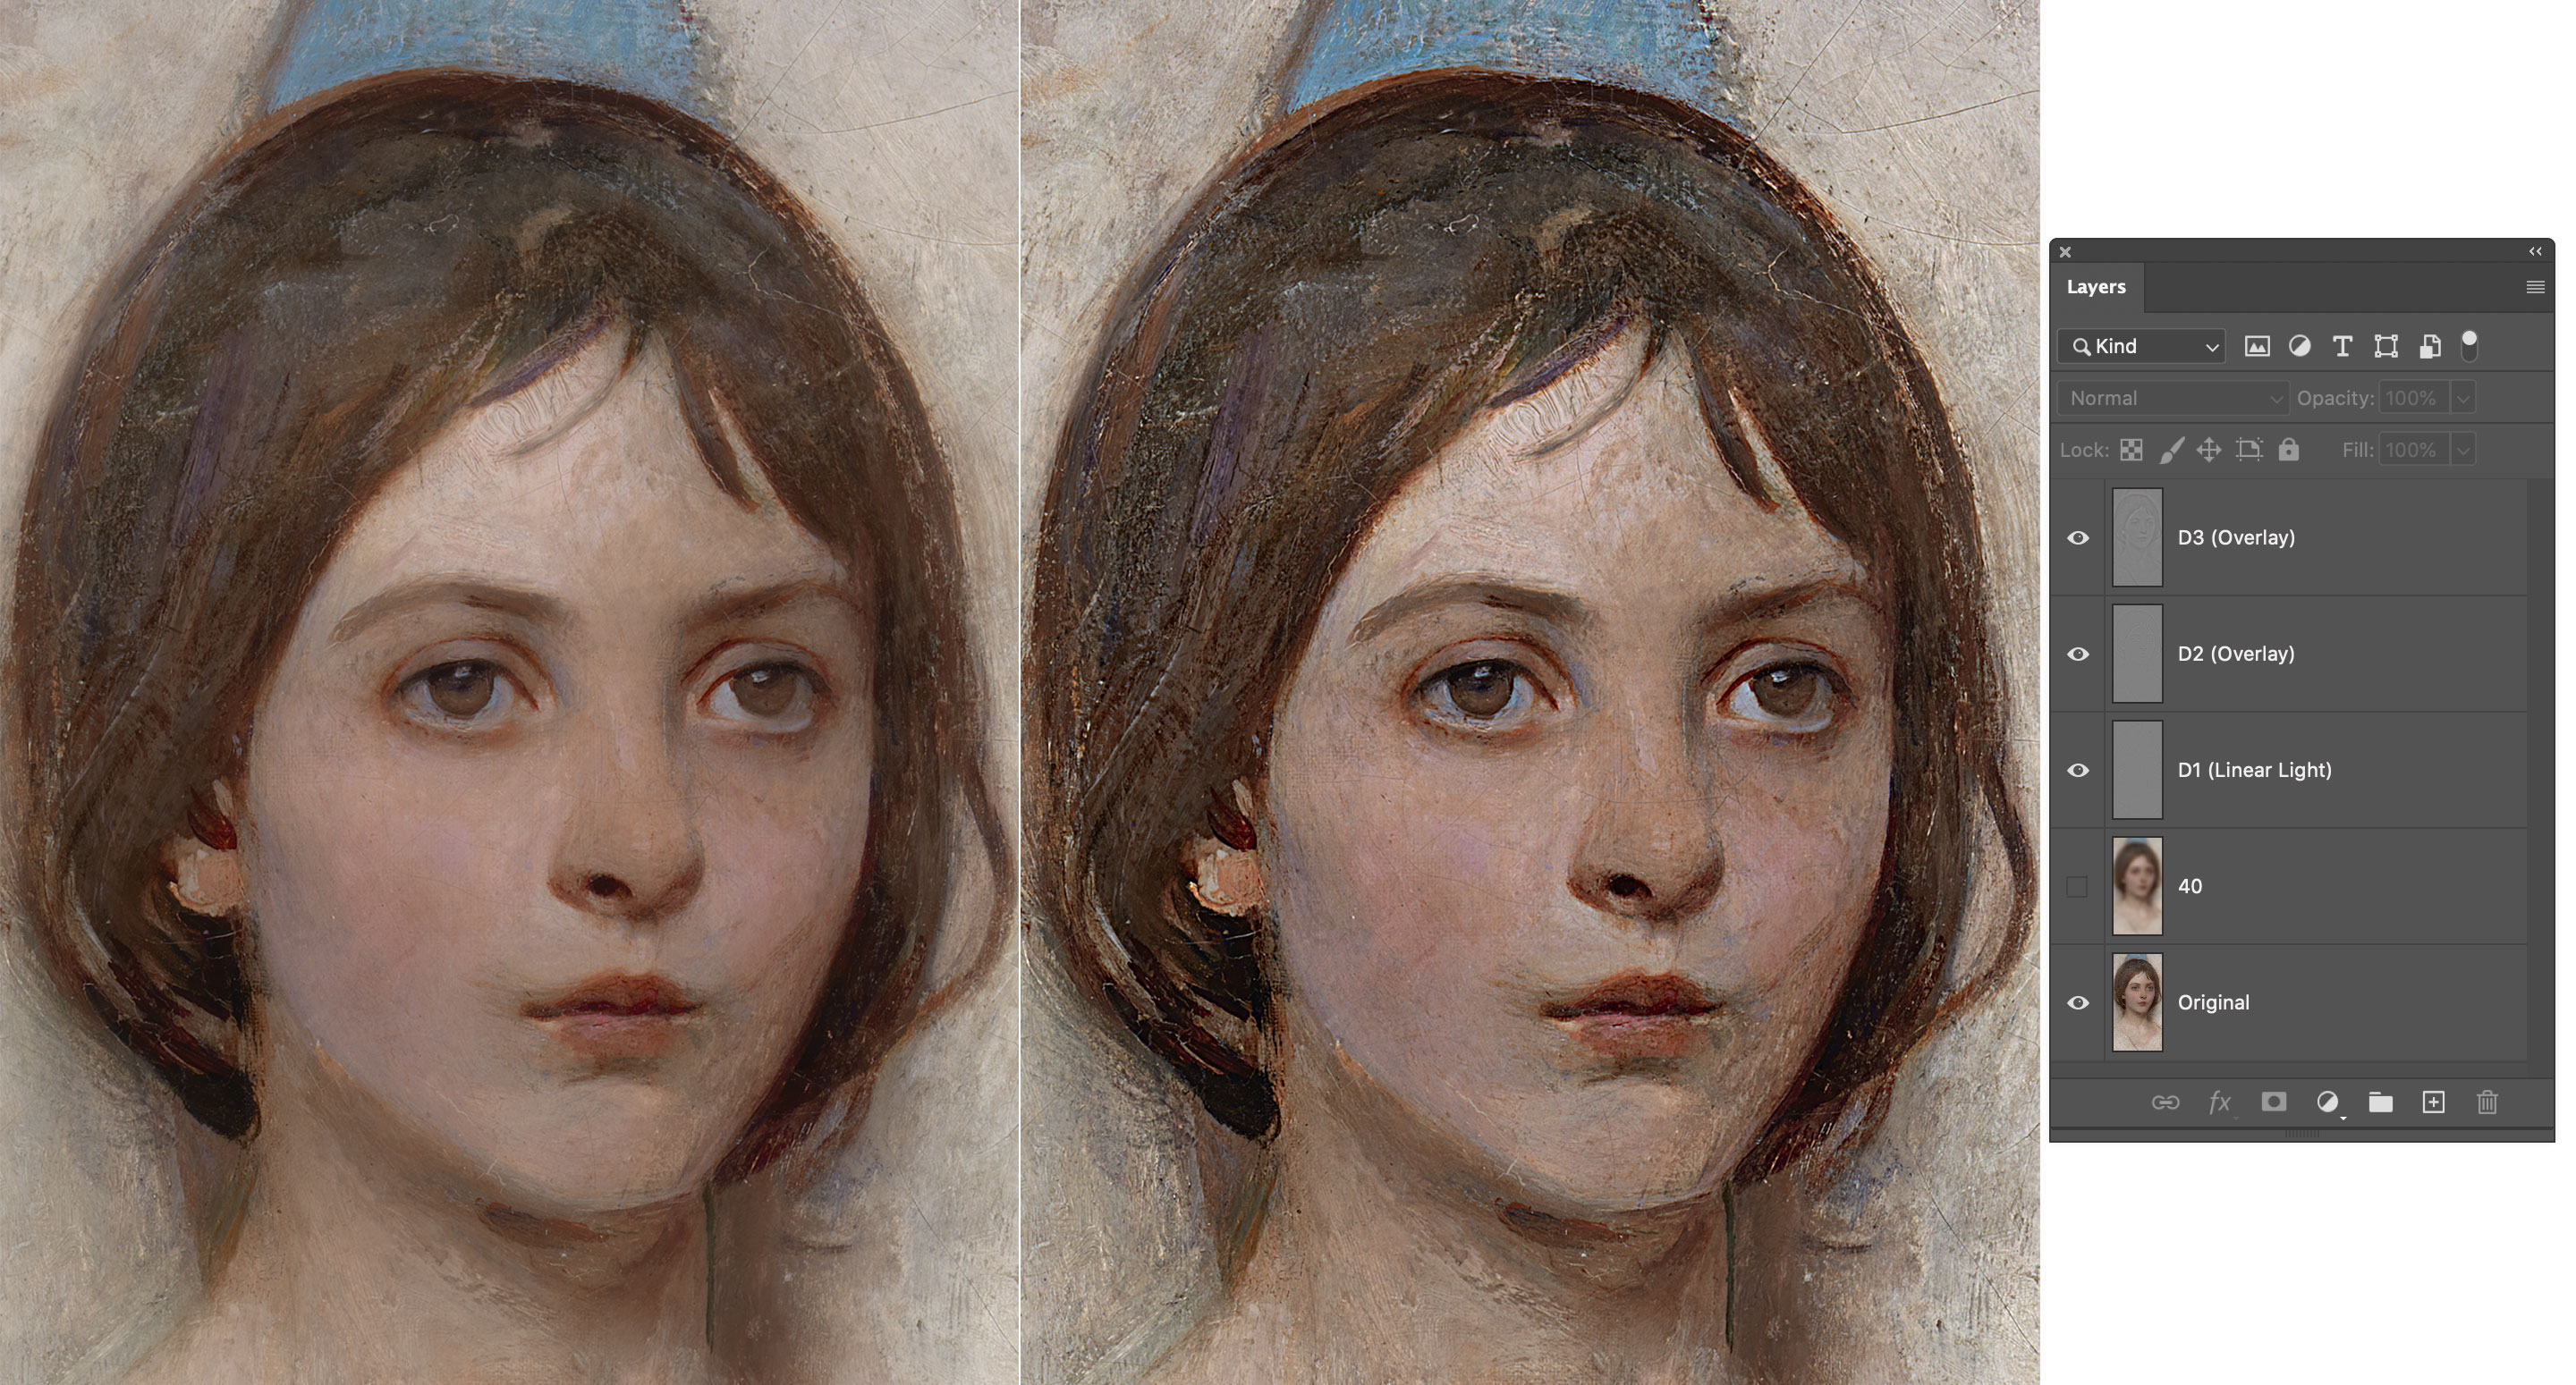
I’ve picked this image for most of the examples – it’s a 1887 painting by Abbott Handerson Thayer, a portrait of his daughter from the Smithsonian Institute collection.

In the early days we used to combine the GB and HP layers (the latter in Linear Light blending mode, 50% opacity) but that’s not really precise enough for our purposes here. There are two ways to deal with a proper frequency decomposition, depending on whether the file is 16bit or 8bit.

  • Duplicate the original (O) twice, and call the two new layers L (low) and H (high).
  • Place H above L, hide H and select L.
  • Apply GB to L, with a radius large enough so that the detail that you want to migrate to the other layer disappears.
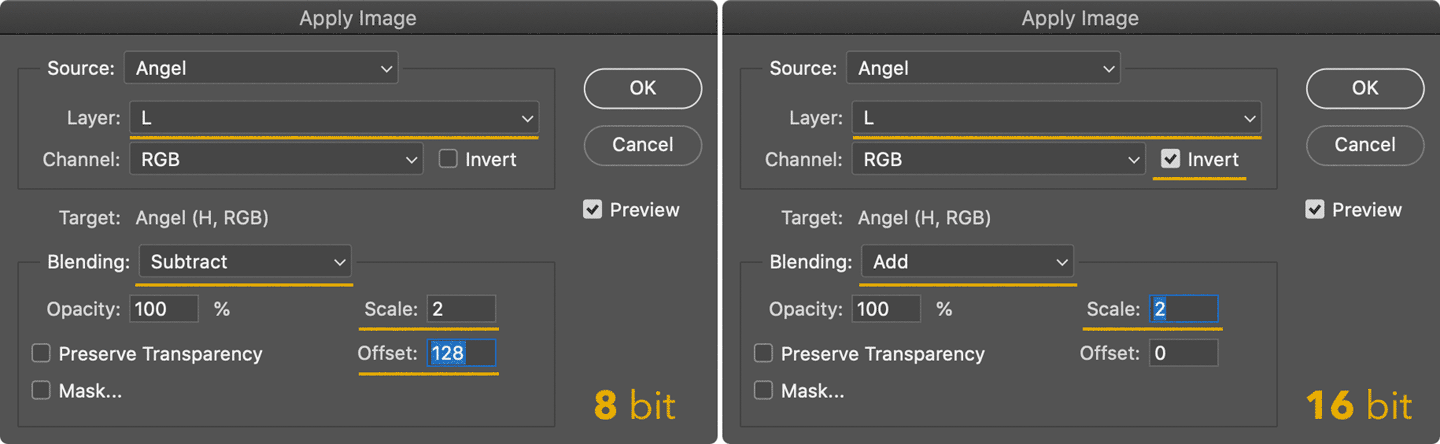
  • Select H, then Image > Apply Image with the following settings
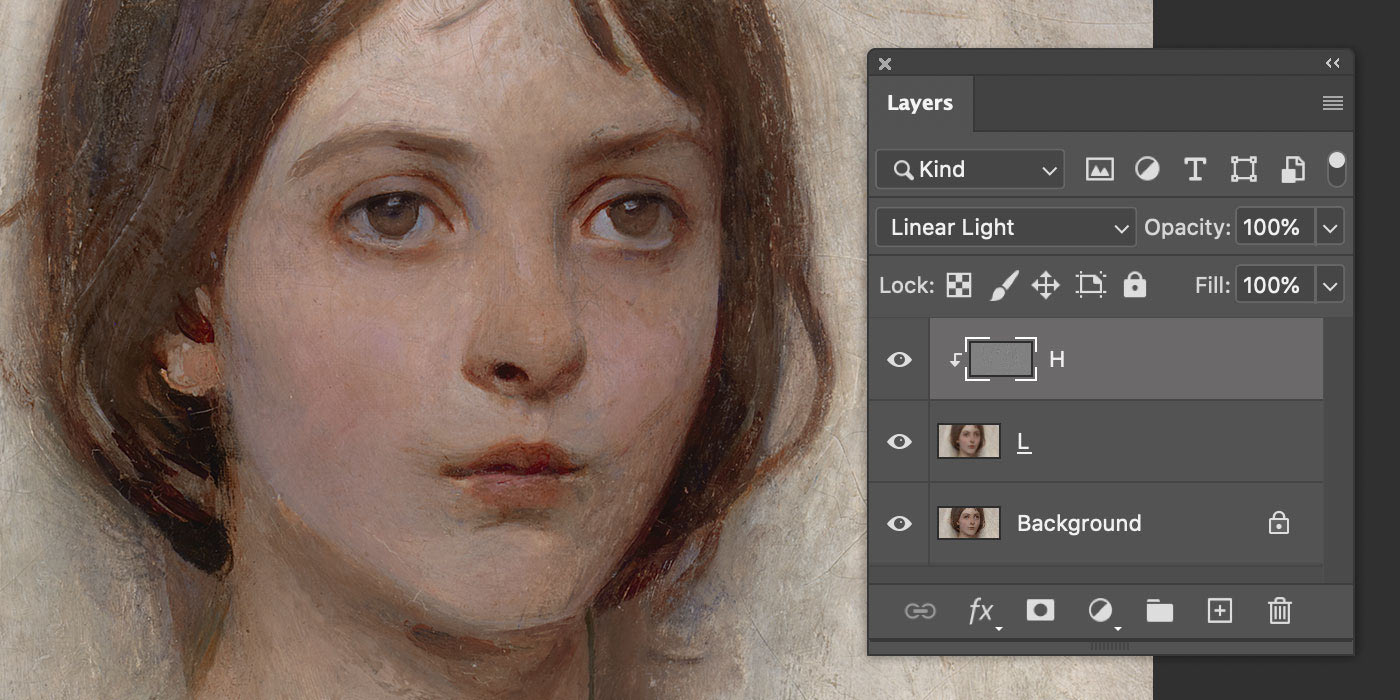
  • Change the H blending mode to Linear Light (LL from now on)
  • Optionally, clip H to the L layer (Alt or Option click the line in between the L and H layers in the Layers palette)

You should end up with this simple setup:

That is to say: the original layer, and the same built with a Low + High frequency decomposition. They are 100% identical, but why? And also, why different Apply Image settings for 8/16bit? That’s not been discussed very much (if at all): to properly understand we need to get into blending modes maths.

3. Blending Modes maths

Blending modes are arbitrary ways to mix two layers – say a Base (B) below and an Active (A) above – according to a formula.

Some blends are easier to understand if applied on normalized values, i.e. in the range (0,1). As an example, Multiply is a well known darkening blending mode, but not if the multiplication is calculated with pixel values in the (0,255) range. Let’s pretend that we have the following values1.A=51B=153A∗B=51∗153=7.803

A brightened result, that must be normalized with a 255 factor to be meaningful and appear darkened:51∗153255=30.6

If you normalize them first it’s just the sameA=51255=0.2B=153255=0.6A∗B=0.2∗0.6=0.120.12∗255=30.6

When the result is out of scale it’s clipped to 0 or 255, unless further blends are to be calculated.

Various online sources state that Linear Light is a mix of Linear Dodge (Add) and Linear Burn. Is it really? (Spoiler alert: nope) Let’s test it. With Linear Dodge (Add), the formula for the blend is (A + B). Being a simple addition, you can use both the normalized (0,1) or the (0,255) range: it makes no difference. Using the same values for A, B from the previous example:A+B=0.2+0.6=0.80.8∗255=204A+B=51+153=204

The Linear Burn formula is A + B – 1: an addition follwed by an inversion (white is subtracted).A+B−1=0.2+0.6−1=−0.2A+B−1=51+153−255=−51

Negative values are clipped to zero. Let me stress that “inversion” here means “subtraction with white”, which is 1 in the normalized range, and should be 255 for 8bit documents (more on that later).

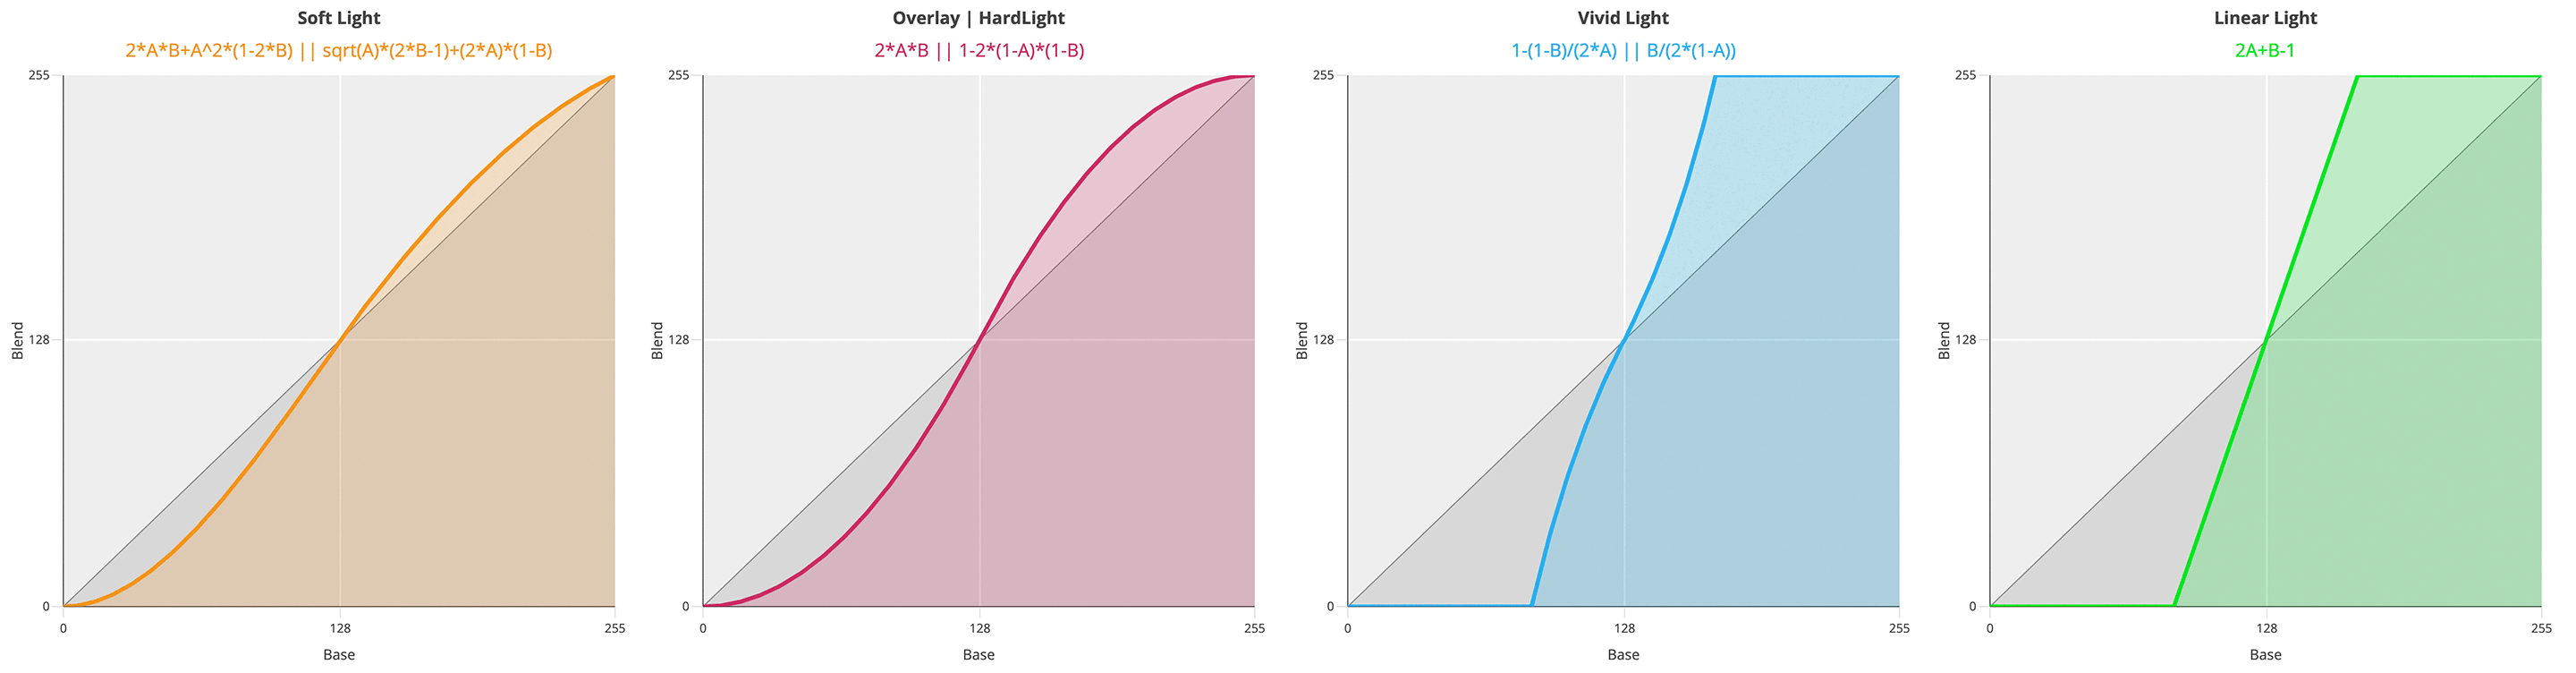
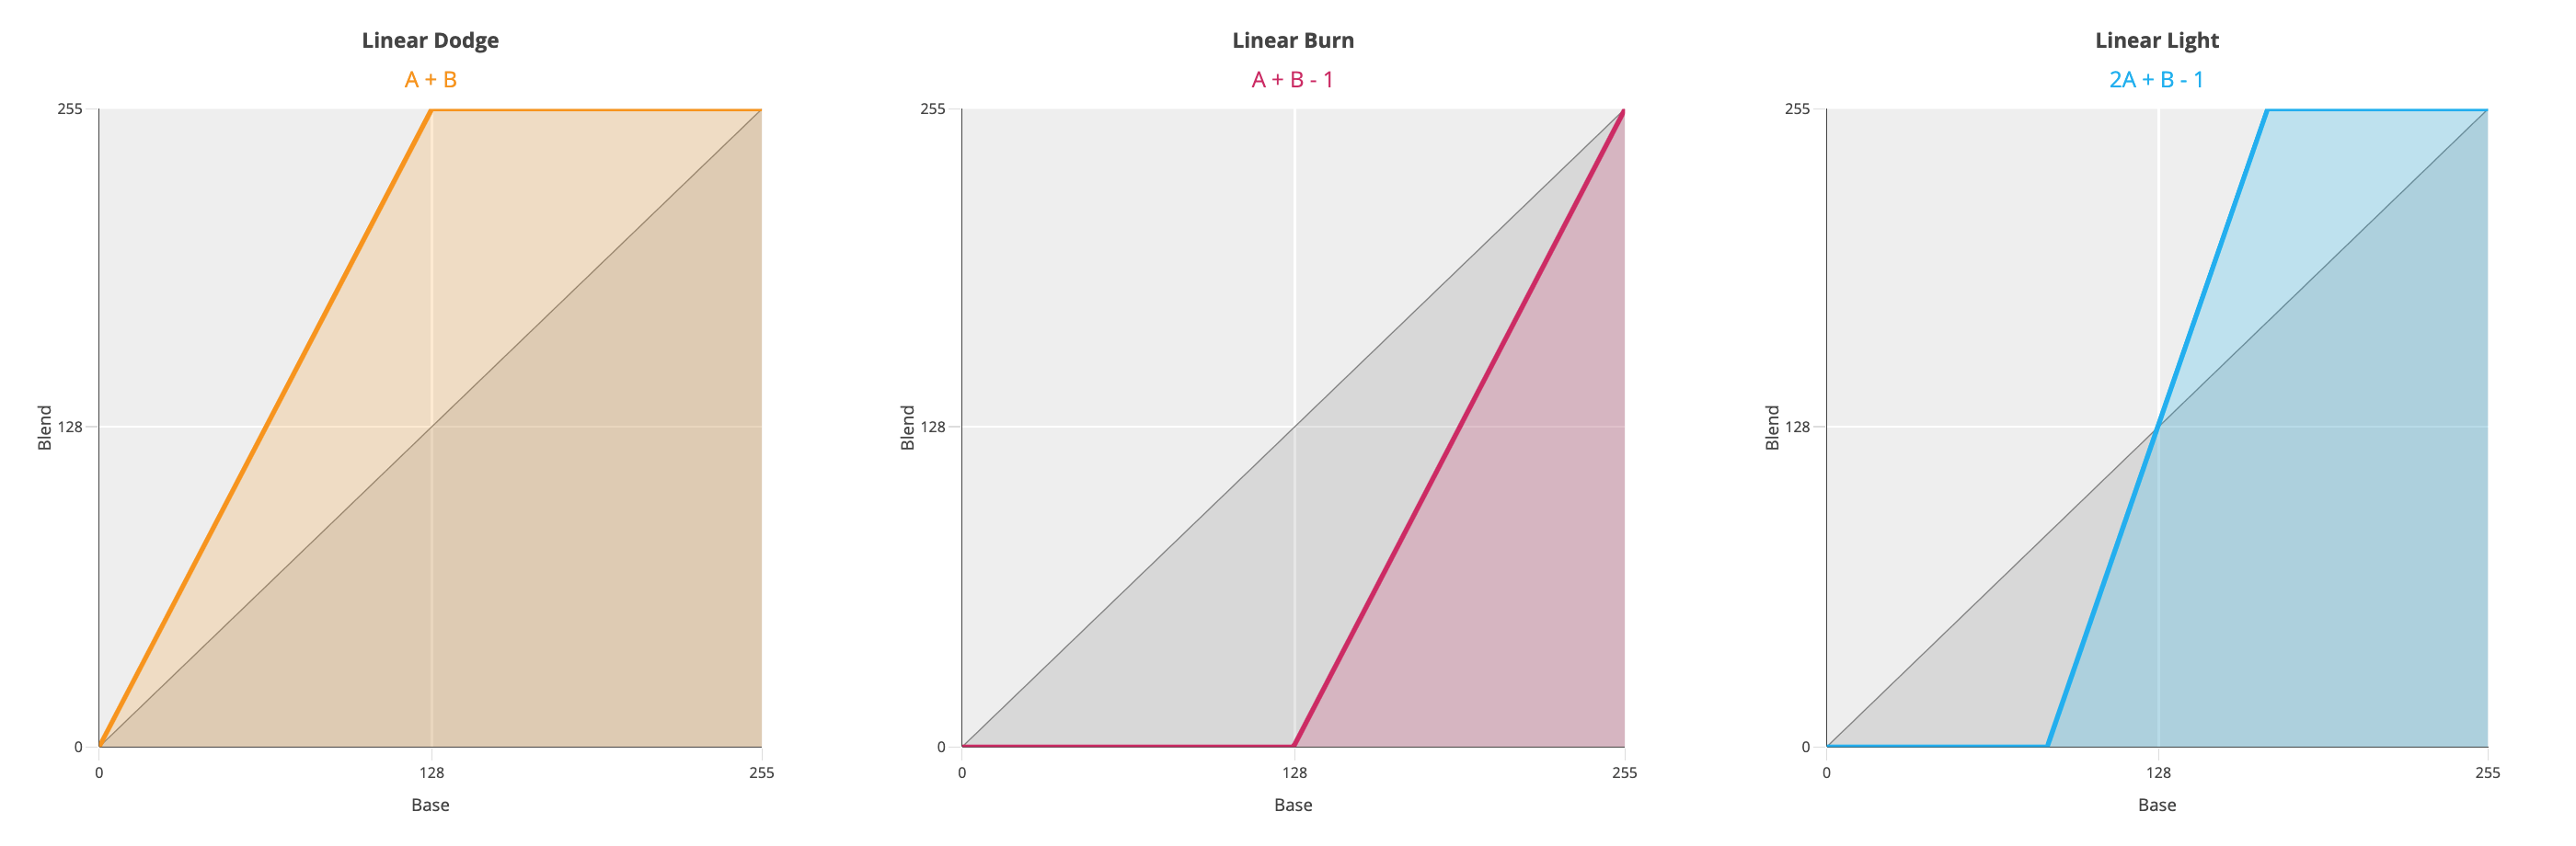
The Linear Light formula is instead 2A + B – 1, so twice the impact for the top layer. If you draw a gradient from Black to White on a new document, duplicate the layer and change its blend mode, these are the result for Linear Dodge/Burn/Light:

So I’m afraid no, LinearLight is not “a combination of Linear Dodge and Linear Burn” because the slope of the curve is different. It’s not a shift of either formulas (resulting in A + B – 0.5), which would have in fact pivoted the line around (0.5, 0.5). With Linear Light the slope is steeper – and in fact the formula is 2A + B -1.

Now that we’ve got this, let’s try to understand why Linear Light works with the kind of Apply Image that we’ve used. There’s nothing inherently “frequency separation-y” with Linear Light, it just happens to combine perfectly with the sort of Image Calculations we’ve performed. We’ll start with the 8bit version, and move to the 16bit next.

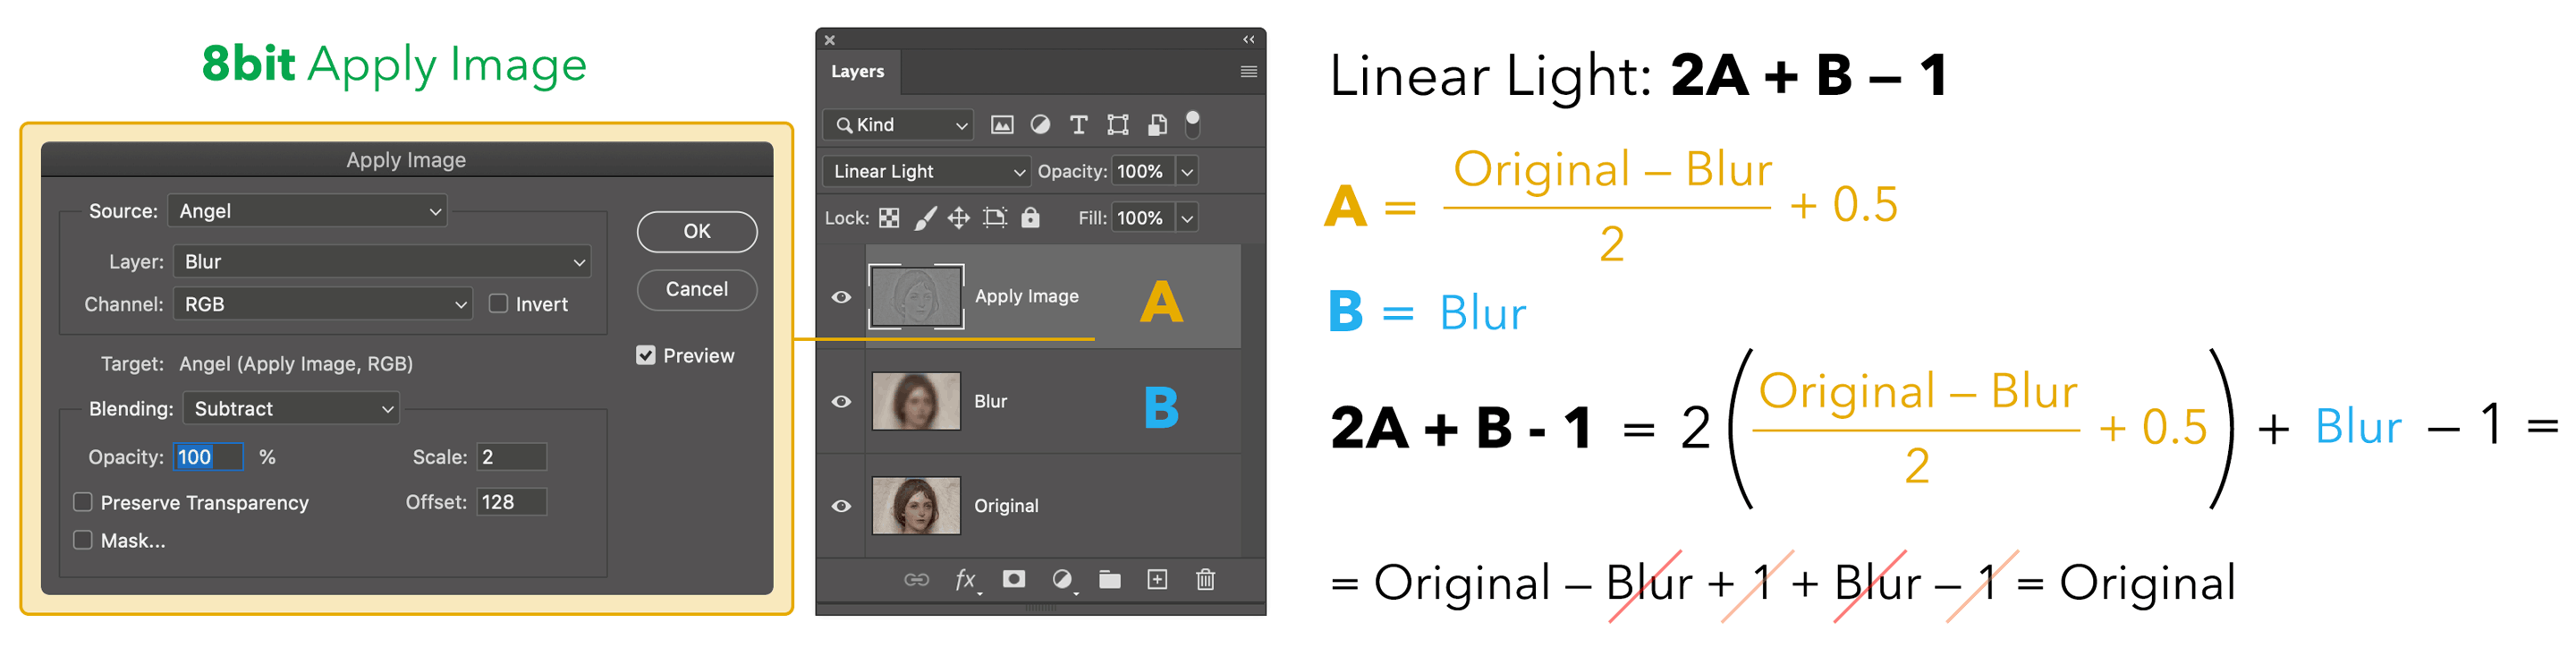
The Apply Image step was the Original minus the Blurred (hence the Subtract mode) with Scale 2 (meaning divided by 2) and Offset (i.e. plus) 128 that is normalized to 0.5. All this is equal to the grayish detail layer, which is then set to Linear Light blending mode: being on top, let’s call it A. The layer below (B) is the Original, and the blend formula for Linear Light is 2A + B – 1. Let’s substitute A with (Original – Blur)/2 + 0.5 in the formula and you see that everything simplifies to Original, QED.

In other words, we’ve demonstrated why this particular Subtraction (with Scale 2, Offset 128) perfectly combines with the Linear Light blending mode to return an identical copy of the original. Cool!

Let’s see how the theory works with 16 bit files and its different Apply Image.

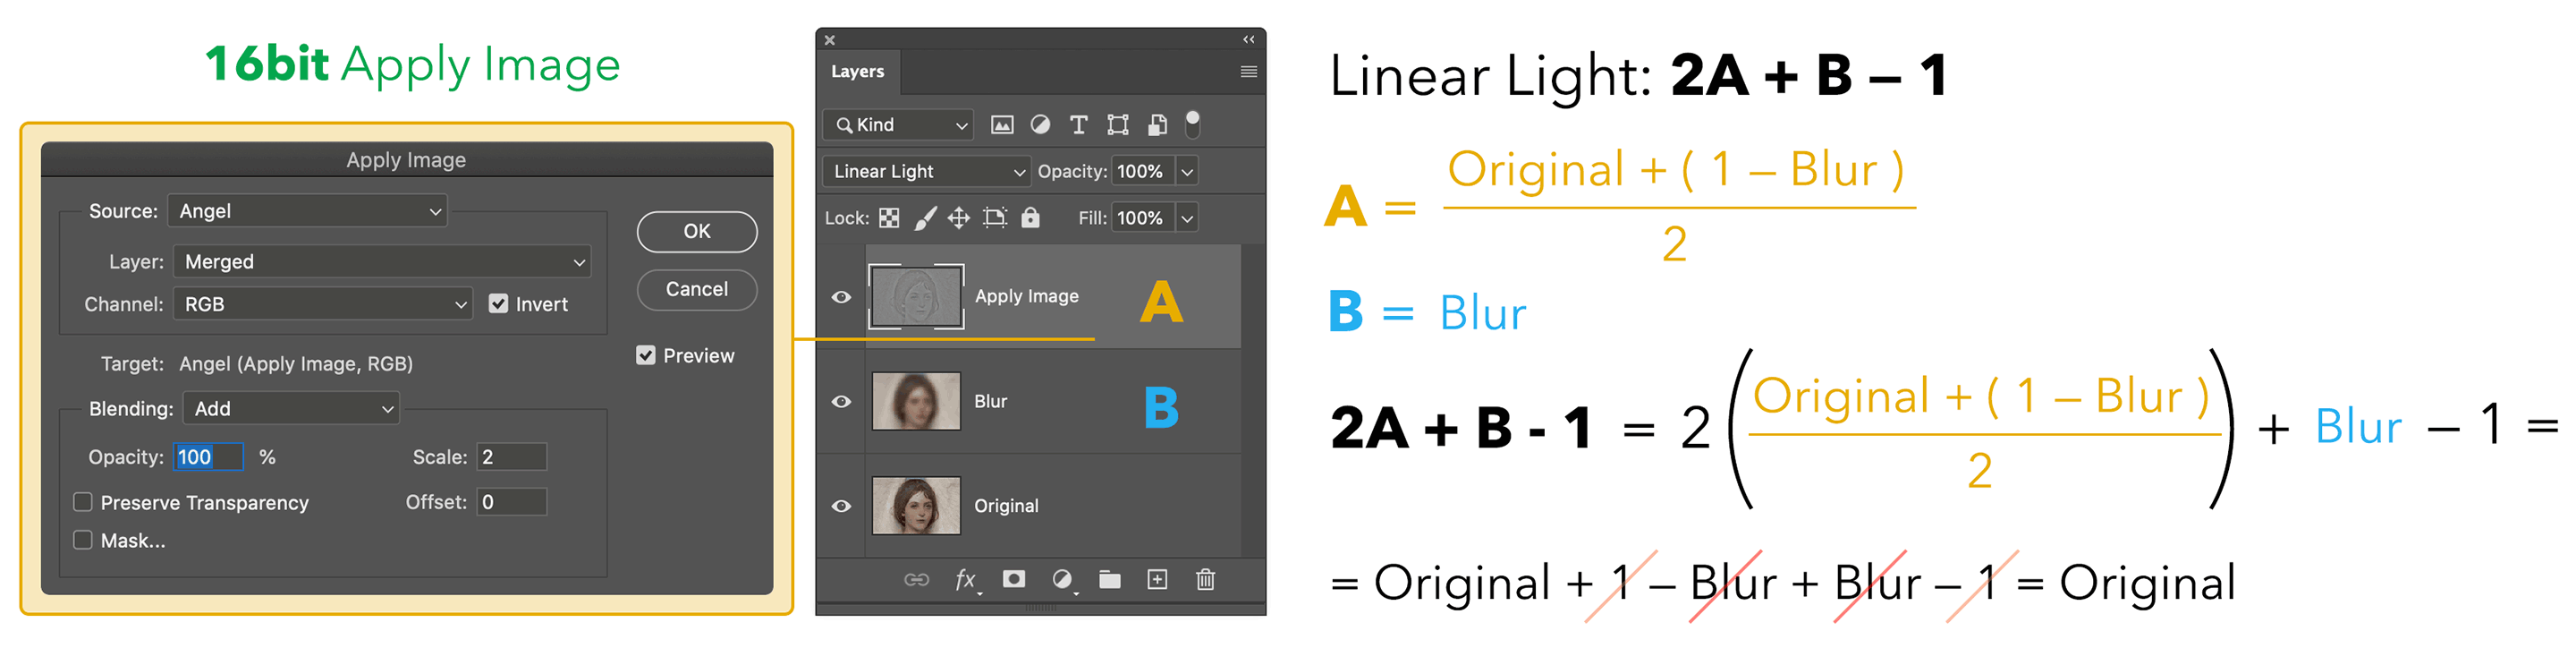
Here we’re Adding to the Original the inverted Blurred (hence 1 minus Blurred, this is how you invert pixels), scaling 2 (i.e. divided by 2). This is again the detail layer then set to Linear Light mode: we call this A, and B is the Original. Applying the same blending formula 2A + B – 1 we can substitute A in it and everything simplifies to the Original. Great!

So it’s not that Linear Light is a magic blend mode, nor that it fits Frequency Separation. The Apply Image settings happen to work with Linear Light in returning the original values.

Then… why two different methods with 8bit/16bit documents? You’re ready for some bit depth Maths.

4. 8bit vs. 16bit Maths

For 8bit images, pixel values are in 2^8 = 256 range, i.e. (0,255). Black is zero, White is two-hundred-fifty-five. You might be tempted to assume that 16bit works the same, but it turns out that Adobe Photoshop’s 16bit is in fact 15bit + 1, meaning 2^15 + 1 = 32768 + 1 = 32769, expressed in the range (0,32768). Why? The accepted answer is that “this gives a midpoint to the range (very useful for blending), and allows for faster math because we can use bit shifts instead of divides” (source).

4.1 8bit special inversion

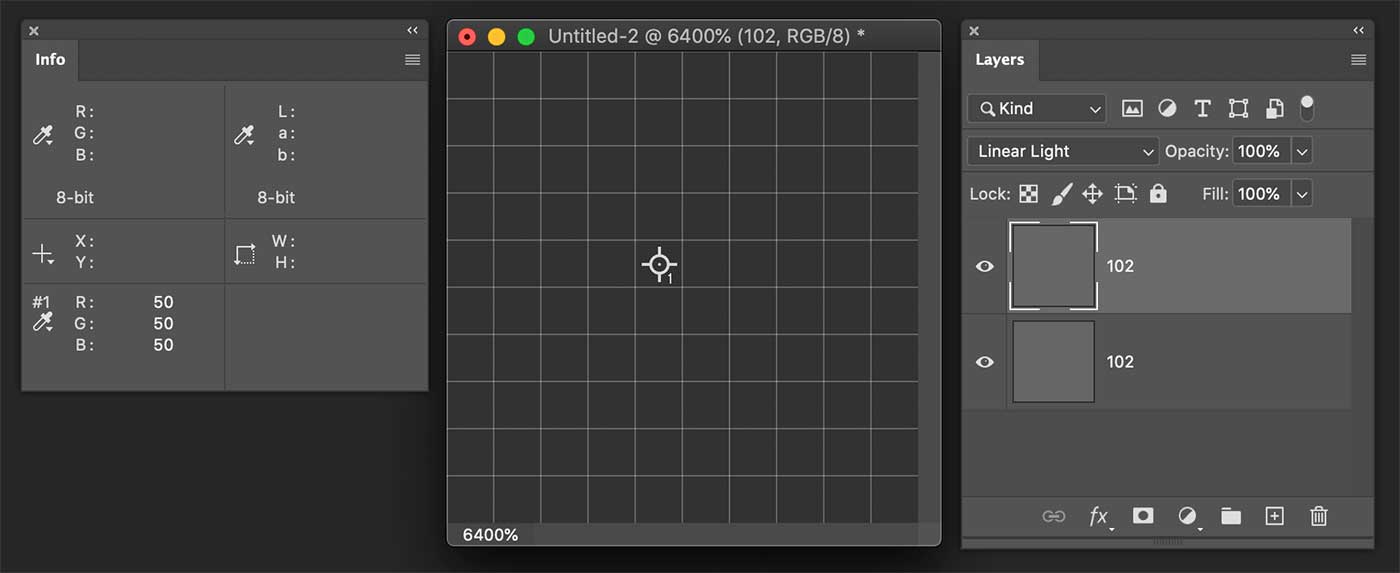
I’ve tried to reverse engineer the way Photoshop handles pixel calculations, and there is something interesting going on here. Let’s create a dummy test document, 8bit.

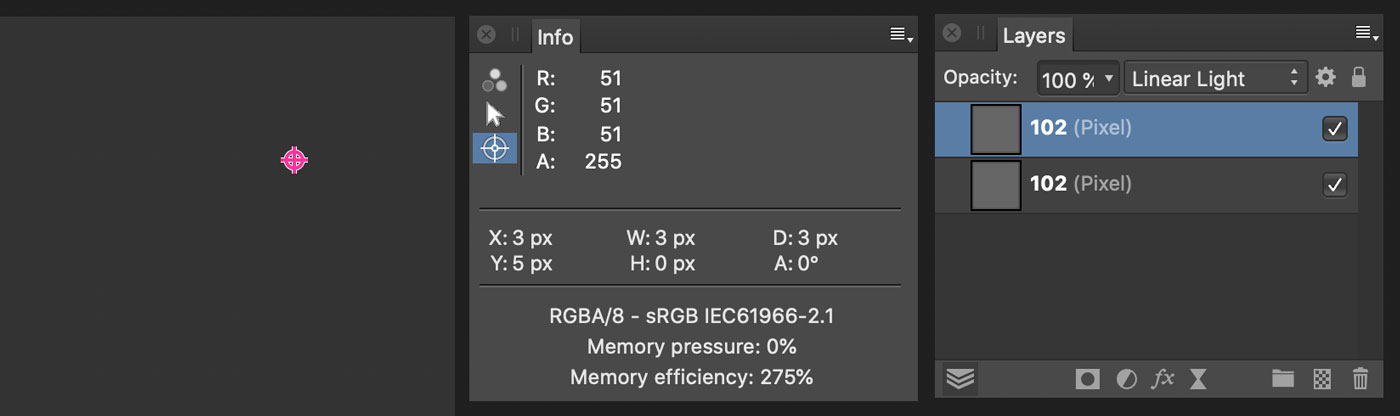
As you see I’ve created two layers, solid 102,102,102. When the topmost is in Linear Light I would expect the blend to be 2A + B – 1, where 1 is the highest value possible in the (0,255) 8bit range, that is to say White: 255. Hence the formula would give:LL=2A+B−1=2∗102+102−255=51

Alas, “computer says no”, and PS calculates 50. There are no divisions here, so I wouldn’t expect rounding errors of any sort, it’s quite straightforward. I’ve tested it with a bunch of different pixel values for the top and bottom layers, and the result is always off by 1.

Out of curiosity I’ve tested Affinity Photo and it works as I’d expect:

The only explanation is that Photoshop subtracts 256 instead of 255. This is in fact the case, and the reason is that otherwise there would be no neutral color in Linear Light with 8bit documents.LL=2A+B−1

A is the layer above, the one which middle gray is meant to be “neutral” (have no effect) in the blend. Let’s rewrite it as:LL=B+(2A−1)LL=B+ΔA

Where:ΔA=2A−1

There must be a value of A (the neutral, mid-gray) such that deltaA is equal to zero. But using 255 as the white, zero is nowhere to be found.A=128ΔA=2∗128−255=1A=127ΔA=2∗127−255=−1

Instead, if you subtract 256 the neutral value happens to be 128, which is in fact the proper mid-gray value in use:A=128ΔA=2∗128−256=0

This is true for 8bit documents only.

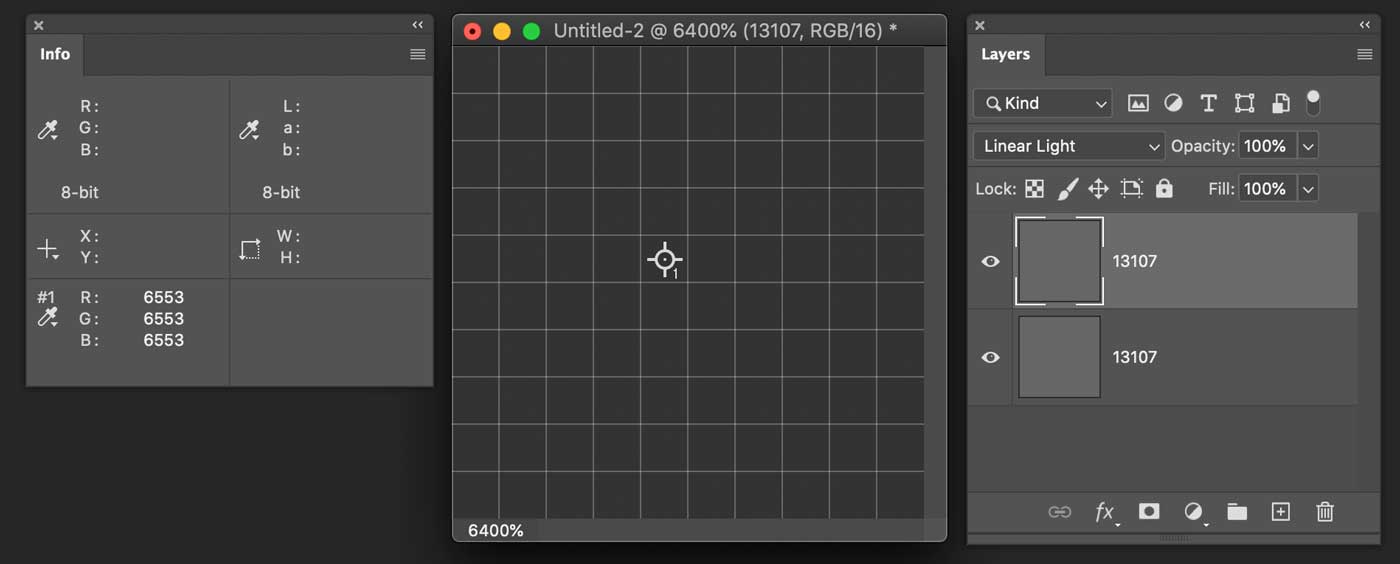
For 16bit documents, given their particular nature of 15bit + 1, there are 32769 values in the (0, 32768) range, hence no need to tweak the white subtraction. In fact, the used value is the proper 32768.

LL=2A+B−1=2∗13107+13107−32768=6553

4.2 Image Calculations: 8bit

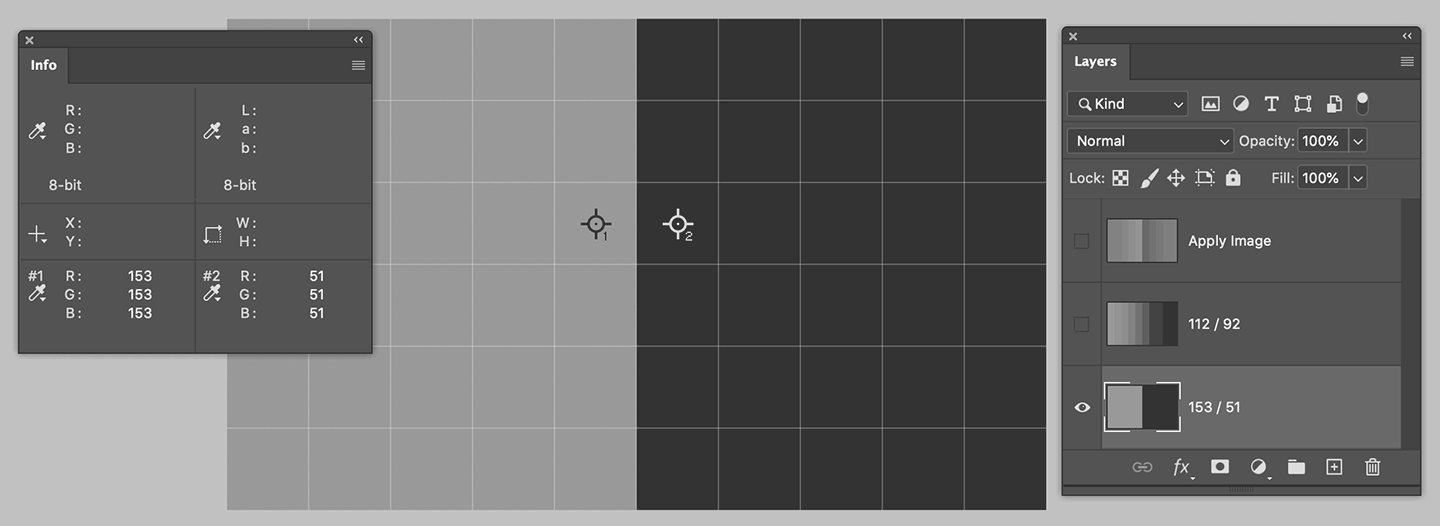
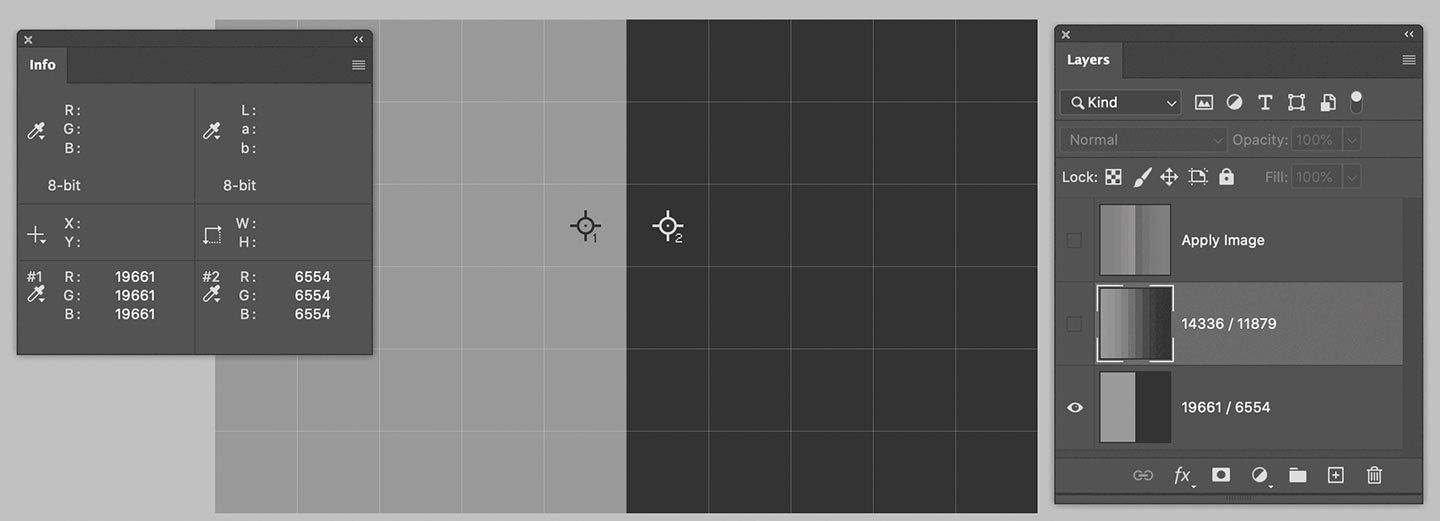
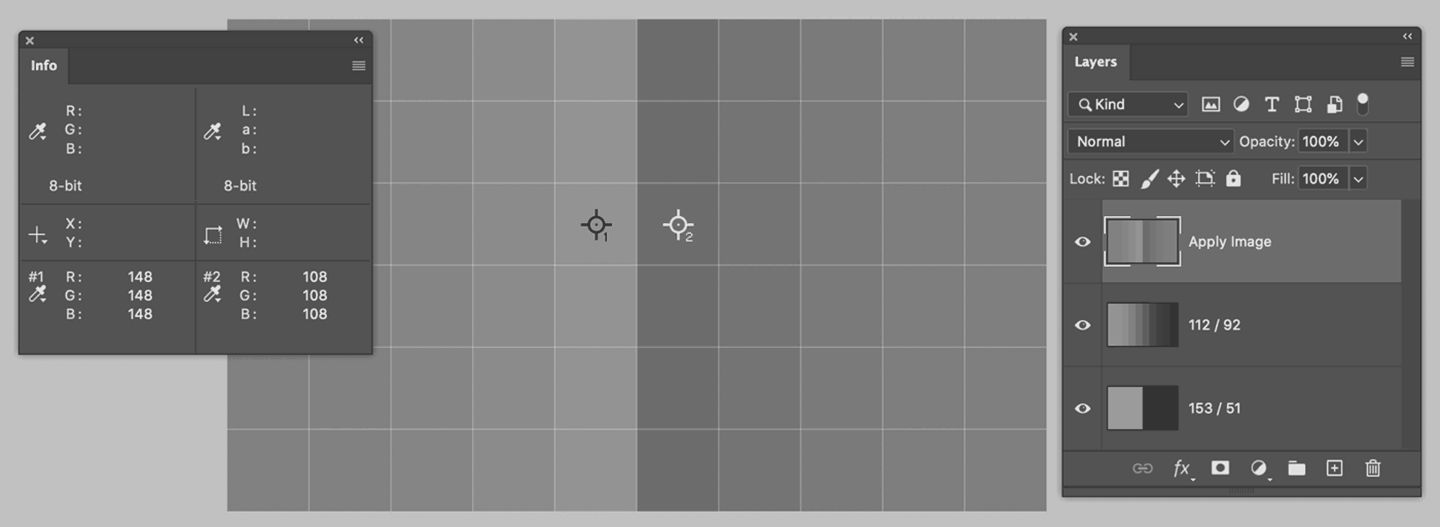
I’ve created an edge and noted the pixel values for the Original layer that you can see either in the Info palette for the two color samplers and in the layer name as well. I’ve also added a Blurred (2px radius) layer – trust me the color sampler values are ones in the Layers palette.

Let’s crank some numbers and see if we’re able to calculate the Apply Image value.

Please note this is an 8bit file, so let’s start with the recommended calculation, a Subtraction with Scale 2 and Offset 128.O=153GB=112ApplyImage=O−GB2+128=153−1122+128=412+128

Let me pause for a moment: 41/2 here is equal to 20, for there’s no such a thing as 20.5 in the integers (0,255) range – more on rounding in a minute.ApplyImage=20+128=148

Which is exactly the correct value that Photoshop comes up with:

A quick check for the darker values too:O=51GB=92ApplyImage=51−922+128=−412+128=−20+128=108

Which is exactly what you can see in the Info palette above. We’ve confirmed the Apply Image result.

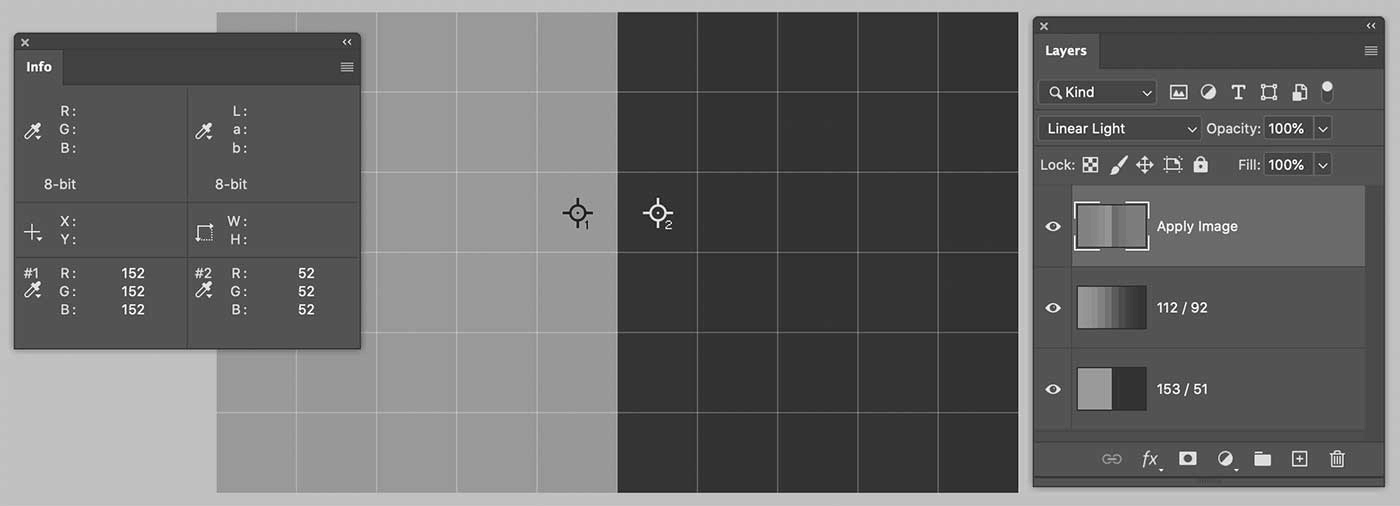
Now it’s kinda easy, we need to apply the Linear Light formula (2A + B – 1), where A is the value we’ve calculated, B is the Blurred, and 1 is the “special” white that Adobe uses for 8bit Linear Light, i.e. 256.

Lighter values on the left:LL=2∗148+112−256=152

Darker values on the right:LL=2∗108+92−256=52

Photoshop confirms:

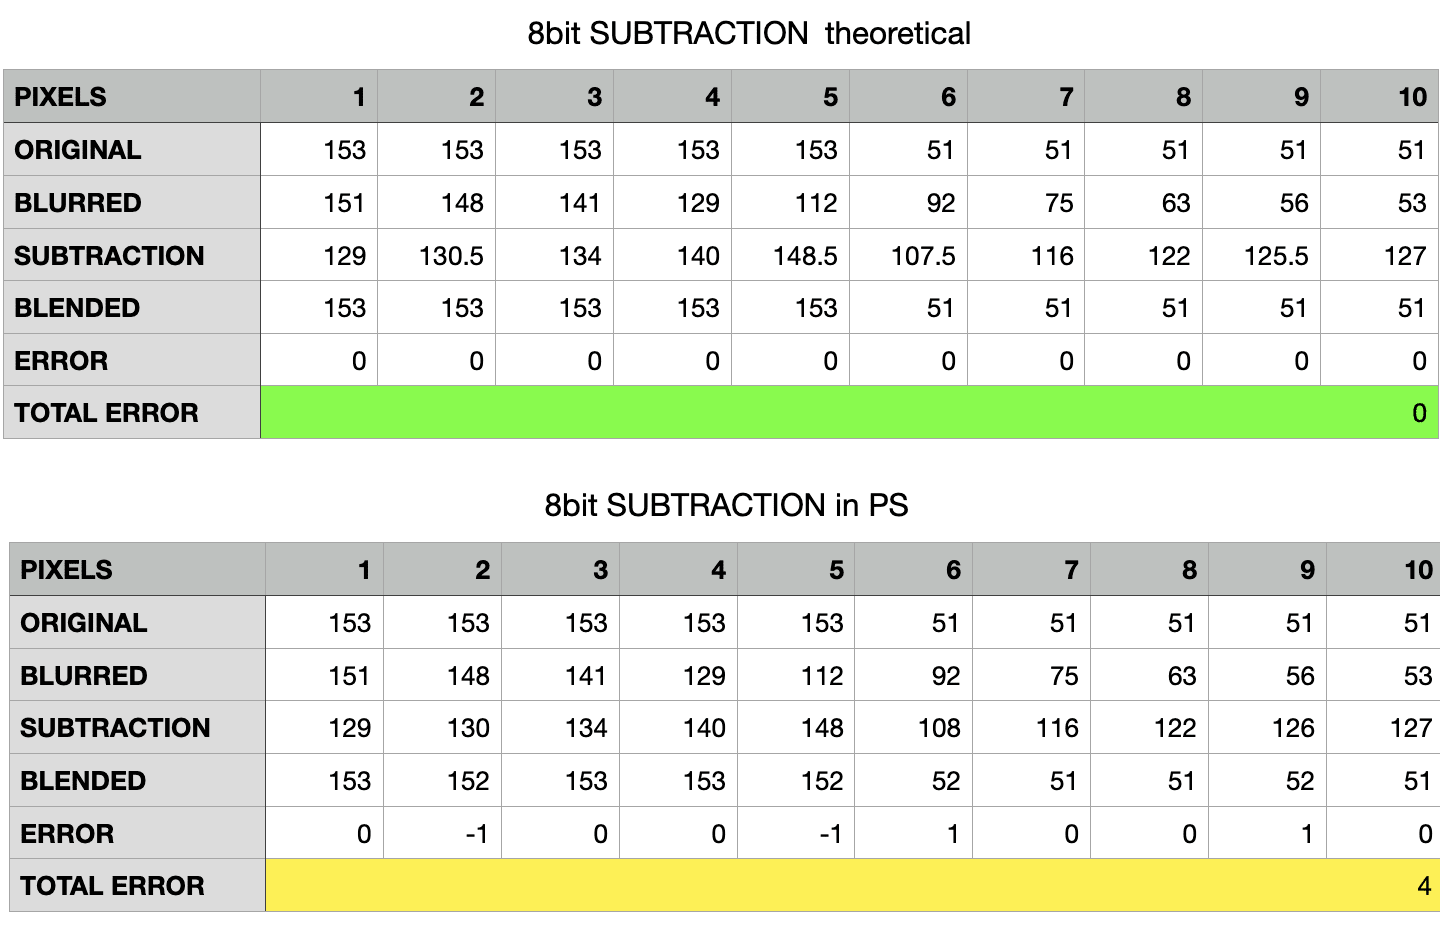
So we’re off one point in both dark and light side. I’ve noted all the values along the 10 pixels the image is wide:

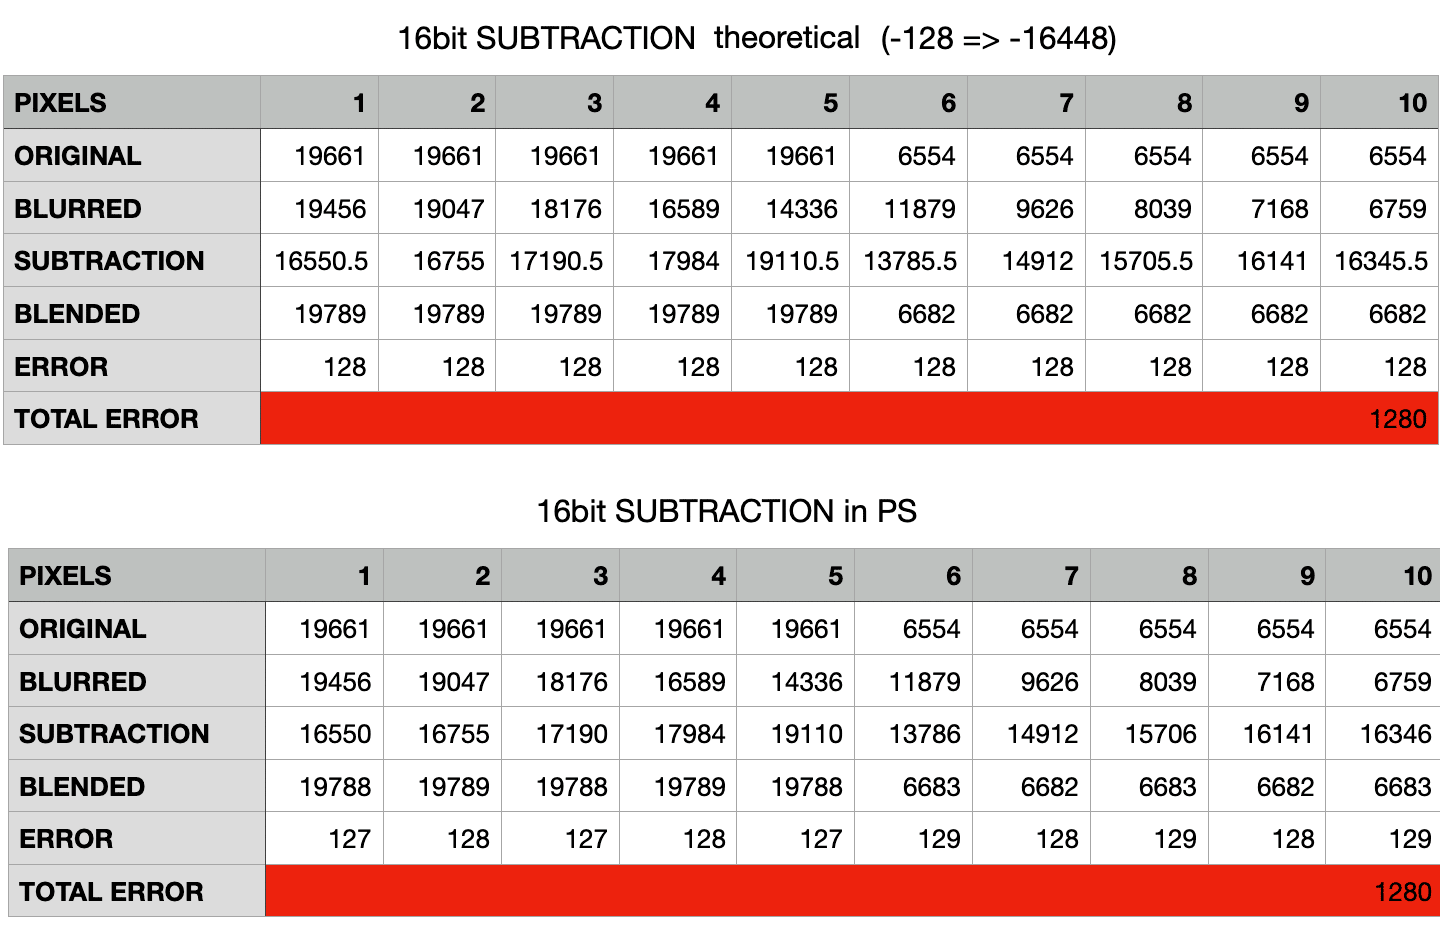
Why two different tables? Because Photoshop rounds values to the integer in an inconsistent way – or at least in a way for which I haven’t been able to find the rule. The table above shows the “theoretical values” (floats, which would lead to zero errors everywhere), while the bottom one is filled with the actual readings. I say PS rounds inconsistently because for reasons unknown to me the first five values in the Subtraction row are rounded down (130.5 → 130, the floor), while the last five values are rounded up (125.5 → 126, the ceiling). Go figure.

All in all, for 10 pixels we’ve got 4 off by 1 (in absolute value), so a total error of 4.

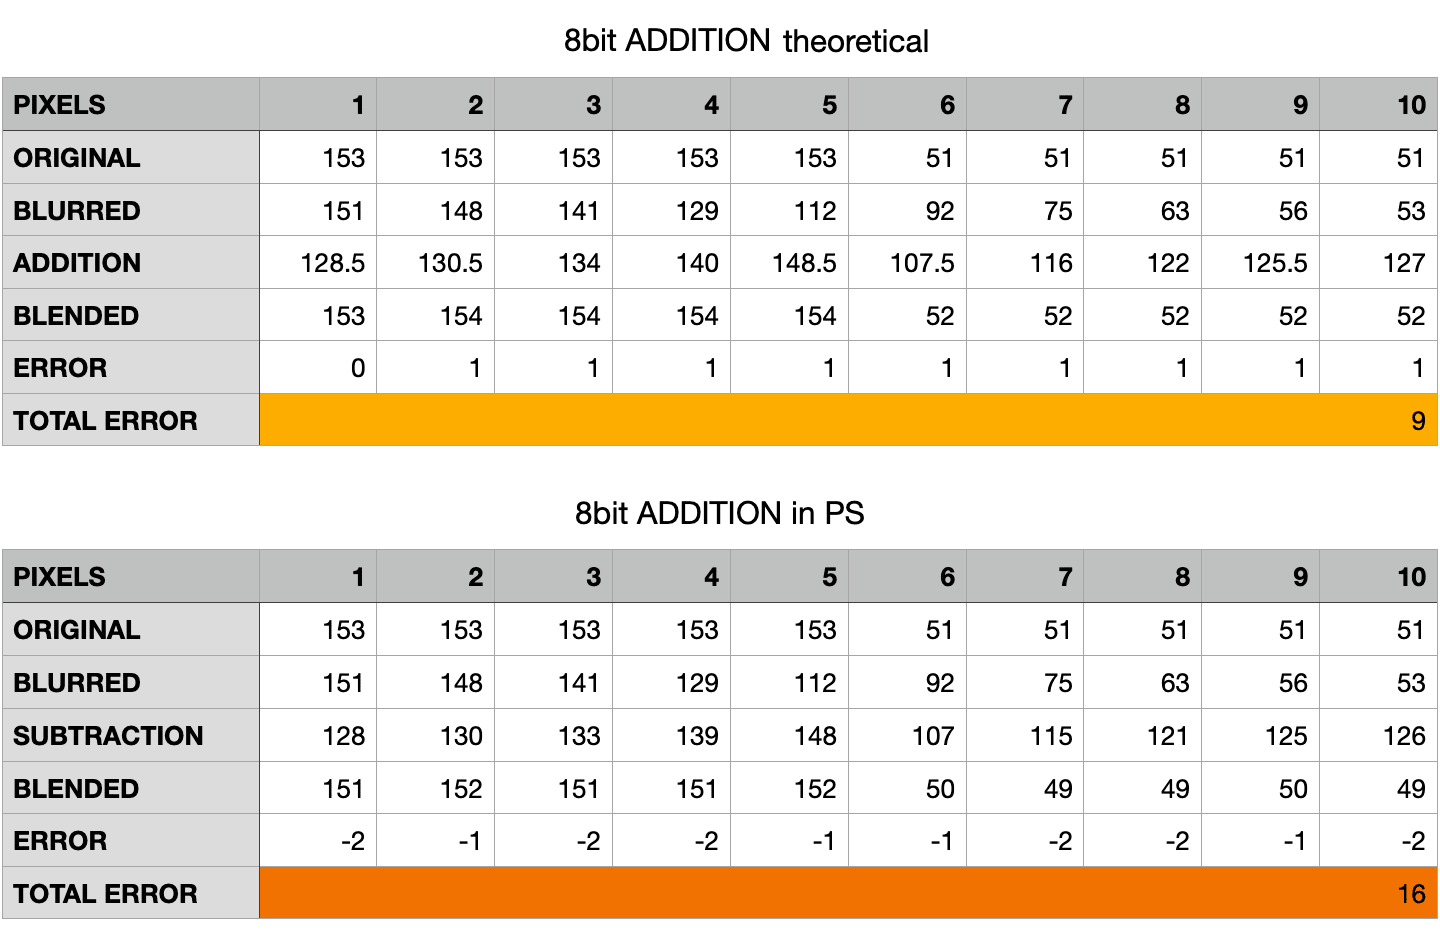
Let’s try with the same 8bit document, but with the 16bit Calculations instead (the Addition of the inverted, Scaled 2)

The results are much worse. On the one hand there are the same weird behaviour mixing ceiling and floor rounding. On the other hand, the theoretical error is more than twice the real error for the Subtraction calculation, and 4 times that in the actual document!

Even when rounding is not needed (e.g. for pixels 3, 4, 7, 8, 10) the theoretical value is always off by 1. My understanding is that the special white value (256 instead of 255) used in the LL blend is compensated with the 128 offset in the Subtraction method only. Why some values are even worse in the actual readings (same pixels 3, 4, 7, 8, 10) I have no explanation for. But the experimental result is that Addition in an 8bit file results in a greater error, 4 times the Subtraction’s.

4.3 Image Calculations: 16bit

I’ve set up a similar document, but 16bit (with the sampler set to read 16bit values):

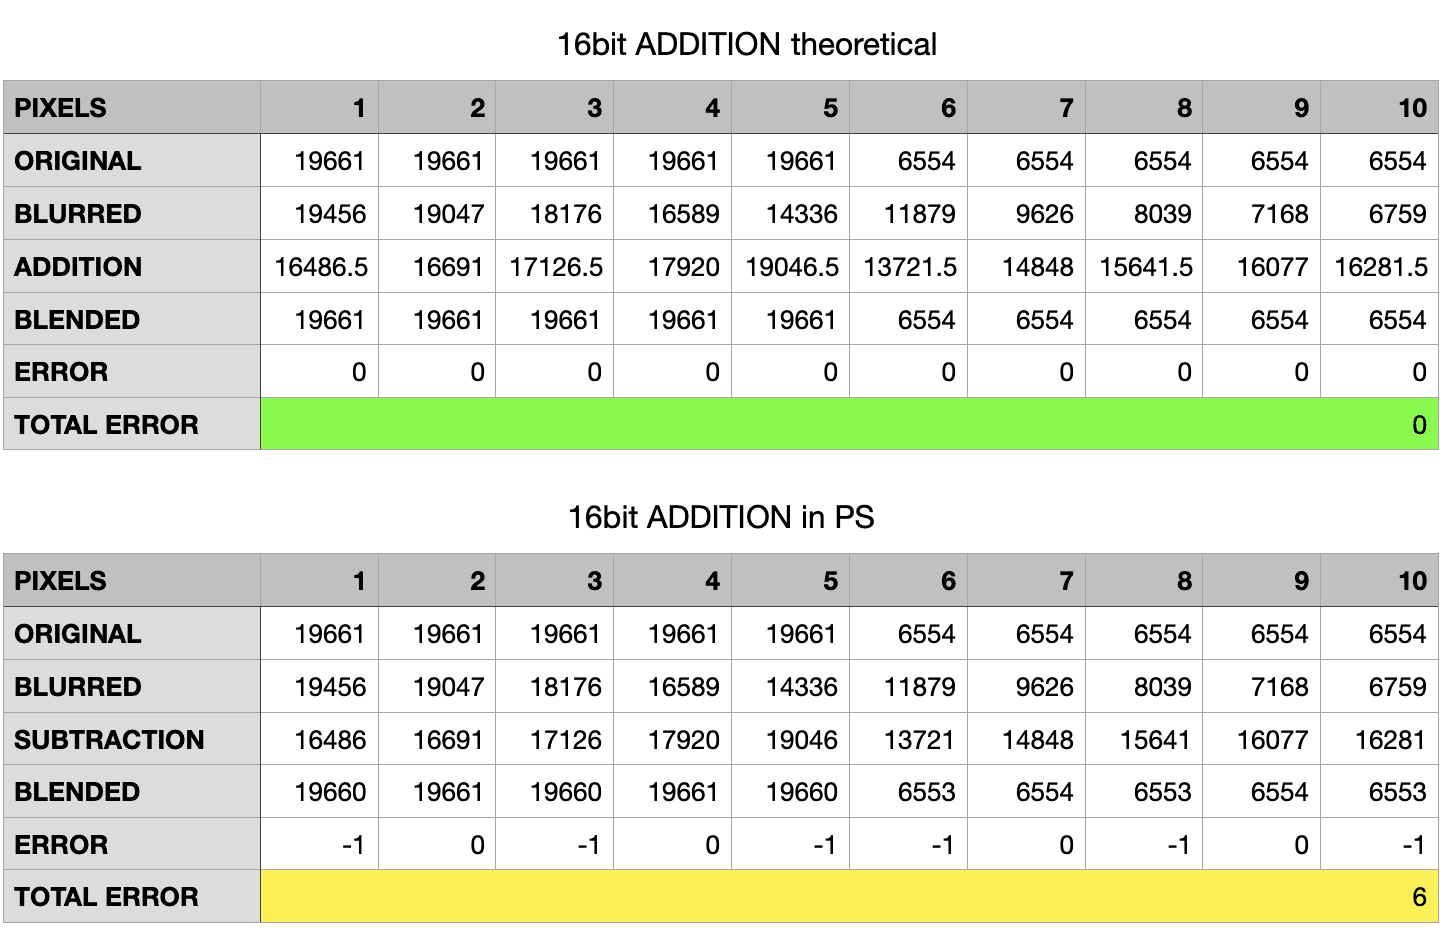
Let me show you the spreadsheets for the recommended 16bit calculation, Addition of the inverse, Scaled 2

Here the theoretical error is always zero, whereas the actual document shows minimal deviation. Different story if you try the recommended Apply Image settings for 8bit, the Subtraction with Scale 2 and 128 Offset:

Here the error is much greater: I’d say due to the fact that 128 translates (in 16bit) to 16448. Try adding a 128 solid color layer and measure it in Photoshop with the color sampler set to 16bit, this is the value you’re going to get. My interpretation of the experimental results is that the difference is due to the mismatch between the theoretical middle-gray offset for 16bit documents (16384) and the one used in Apply Image (16448) – where you have to enter an 8bit number even if the document is 16bit.

Mind you: 1280 seems to be a much bigger error than the 16 points of the 8bit Addition case, but it’s actually lower: it’s a 4% error, compared to 6% of the 8bit.

Fun fact: in 16bit documents, it seems that rounding is always floor in the Addition, ceiling in the Subtraction.

There still are some points for which I haven’t a proper explanation:

  1. Why there are differences between theoretical and actual readings even with non rounded values.
  2. How can PS rounds using both floor or ceiling values for x.5 numbers.

All in all, the above experiment proves that no method hits the bull’s eye but the measured errors are smaller when using Subtraction with Scale 2 and 128 Offset on 8bit documents and Addition of the inverse with Scale 2 on 16bit documents.

4.4 High Pass

Before going any further, let me point out that the High Pass filter doesn’t output the same Detail layer as the decomposition we’ve performed.

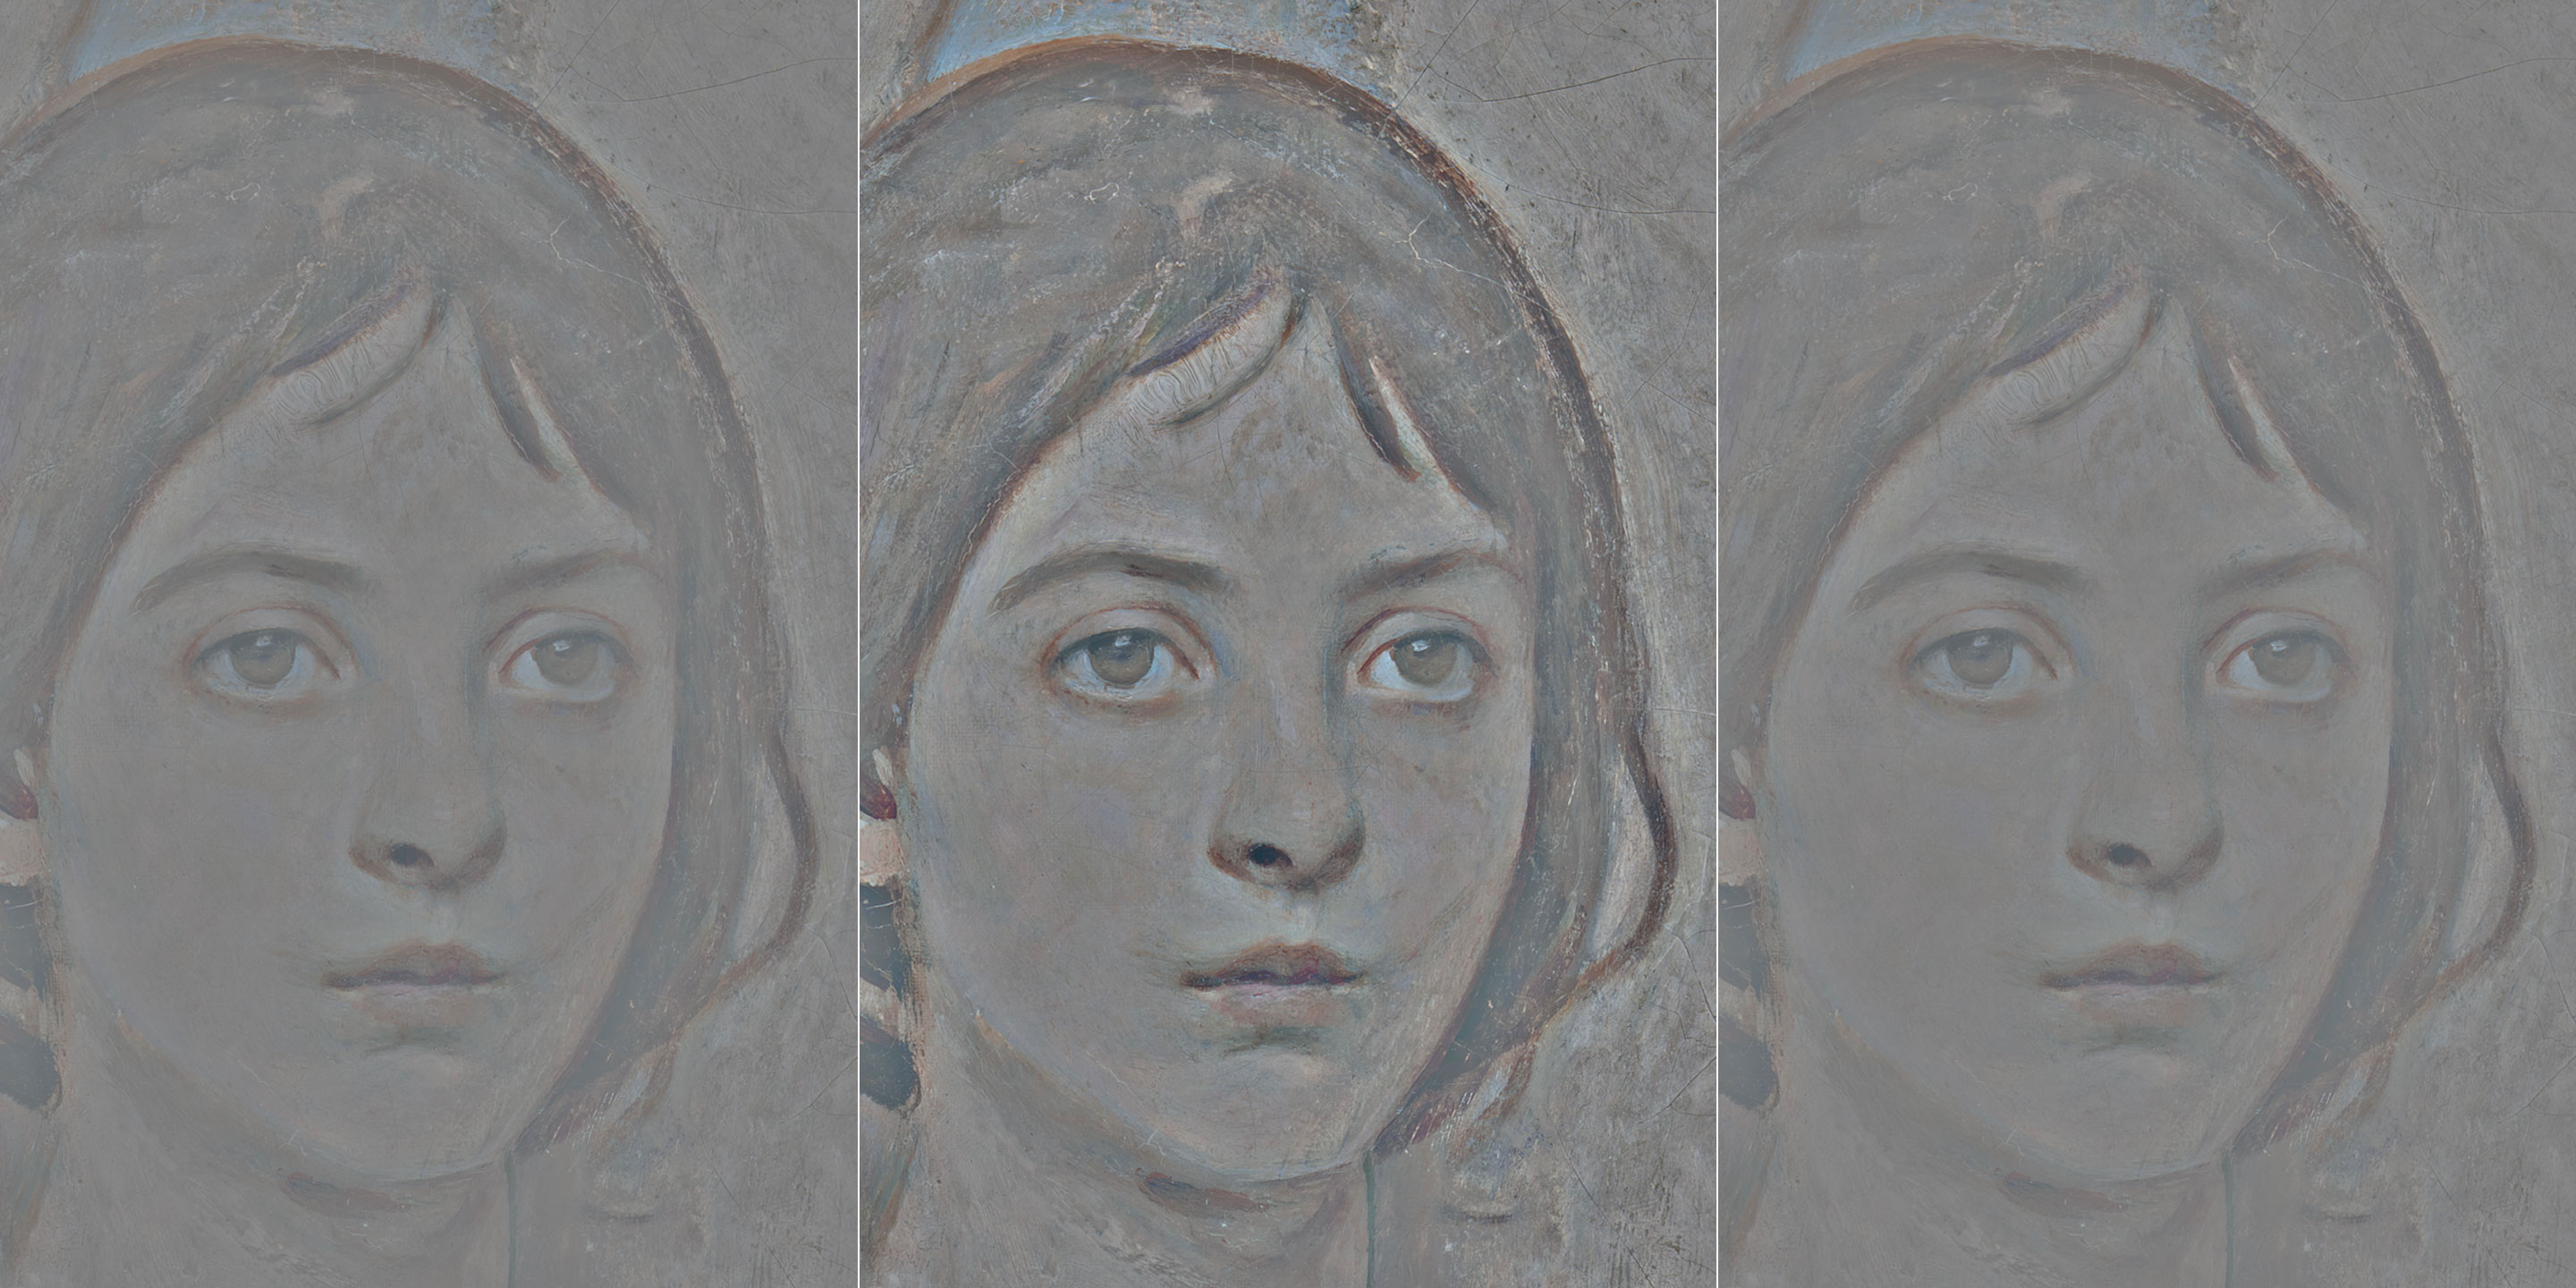
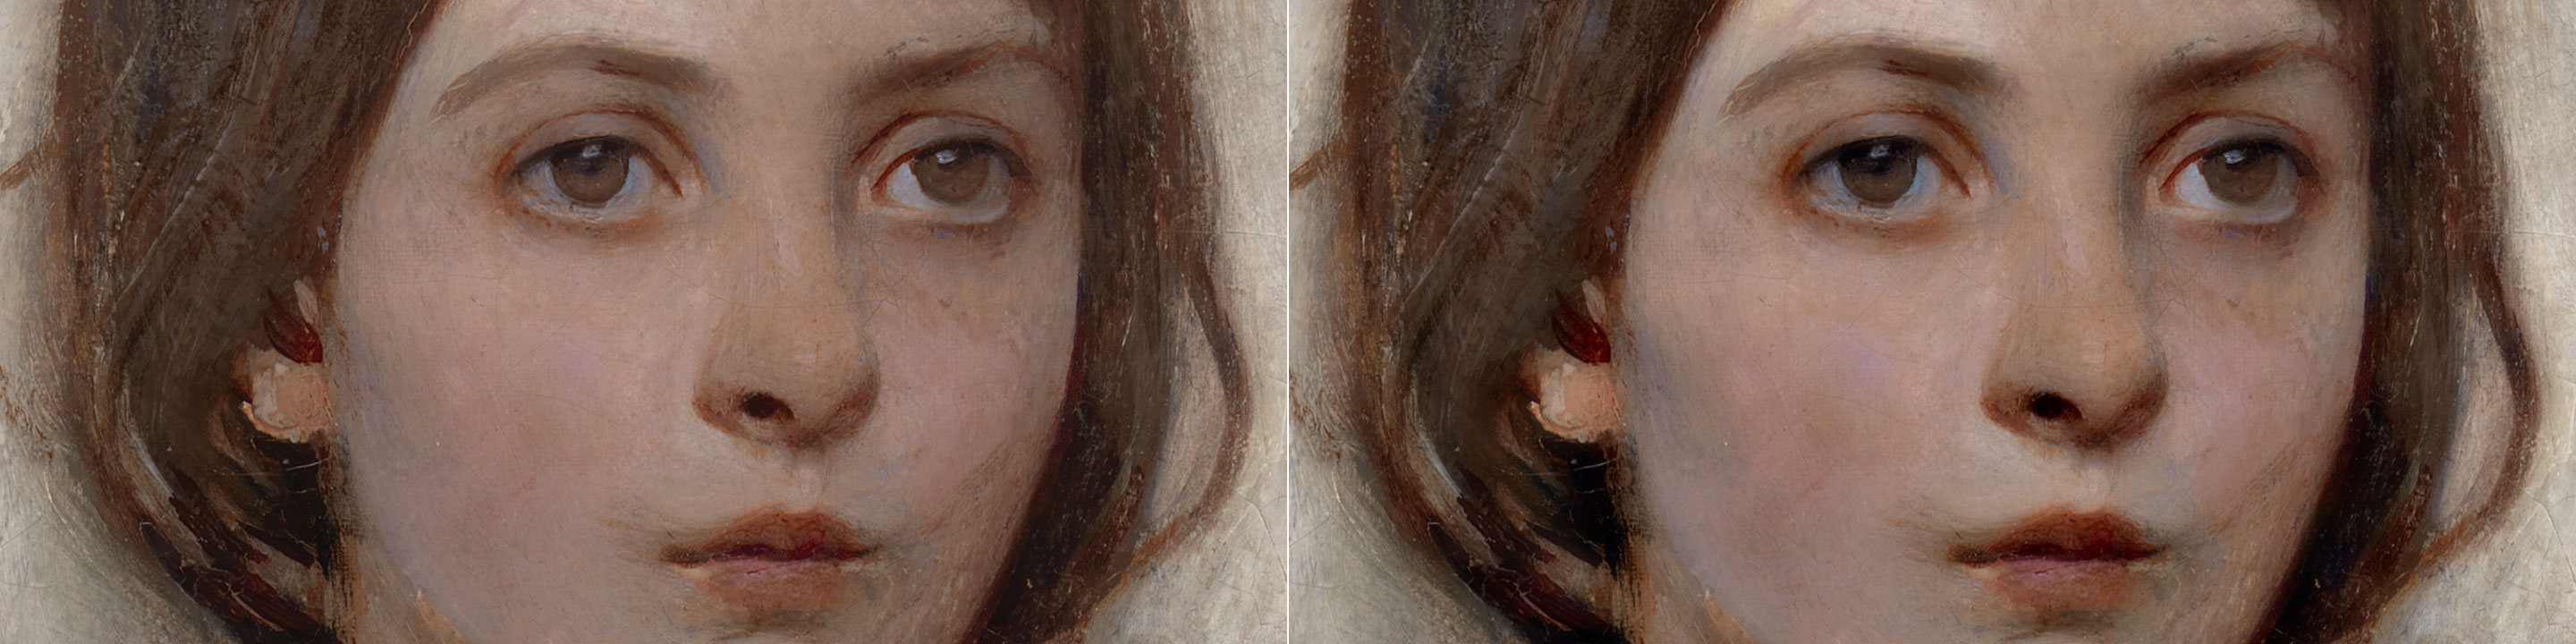
On the left you see the Detail layer, center the High Pass with same radius as the Gaussian Blur (much stronger effect). Right, putting the HP layer half opacity on top of a mid-gray layer (Edit > Fill > 50% Gray). Apparently it’s now identical: if you put the HP on top of the Detail, Difference blending mode, the result is full black and both Mean and Std Deviation (from the Histogram palette) are equal to zero. This for a 16bit file, while an 8bit file shows 0.50. In both cases, an extreme contrasting curve shows noise, which in the 16bit case might be just rounding errors (not so sure about the 8bit one).

All in all, I will keep using the Apply Image method, especially when decomposing the image for retouching purposes.

5. Single Kernels

In my experience, Photoshop people tend to think about Frequency Separation mainly as a retouching tool. Sure the image decomposition helps targeting the retouching process in ways and with such precision/ease that would be otherwise impossible, but I am personally also interested in contrast enhancements.

5.1 Gaussian kernel

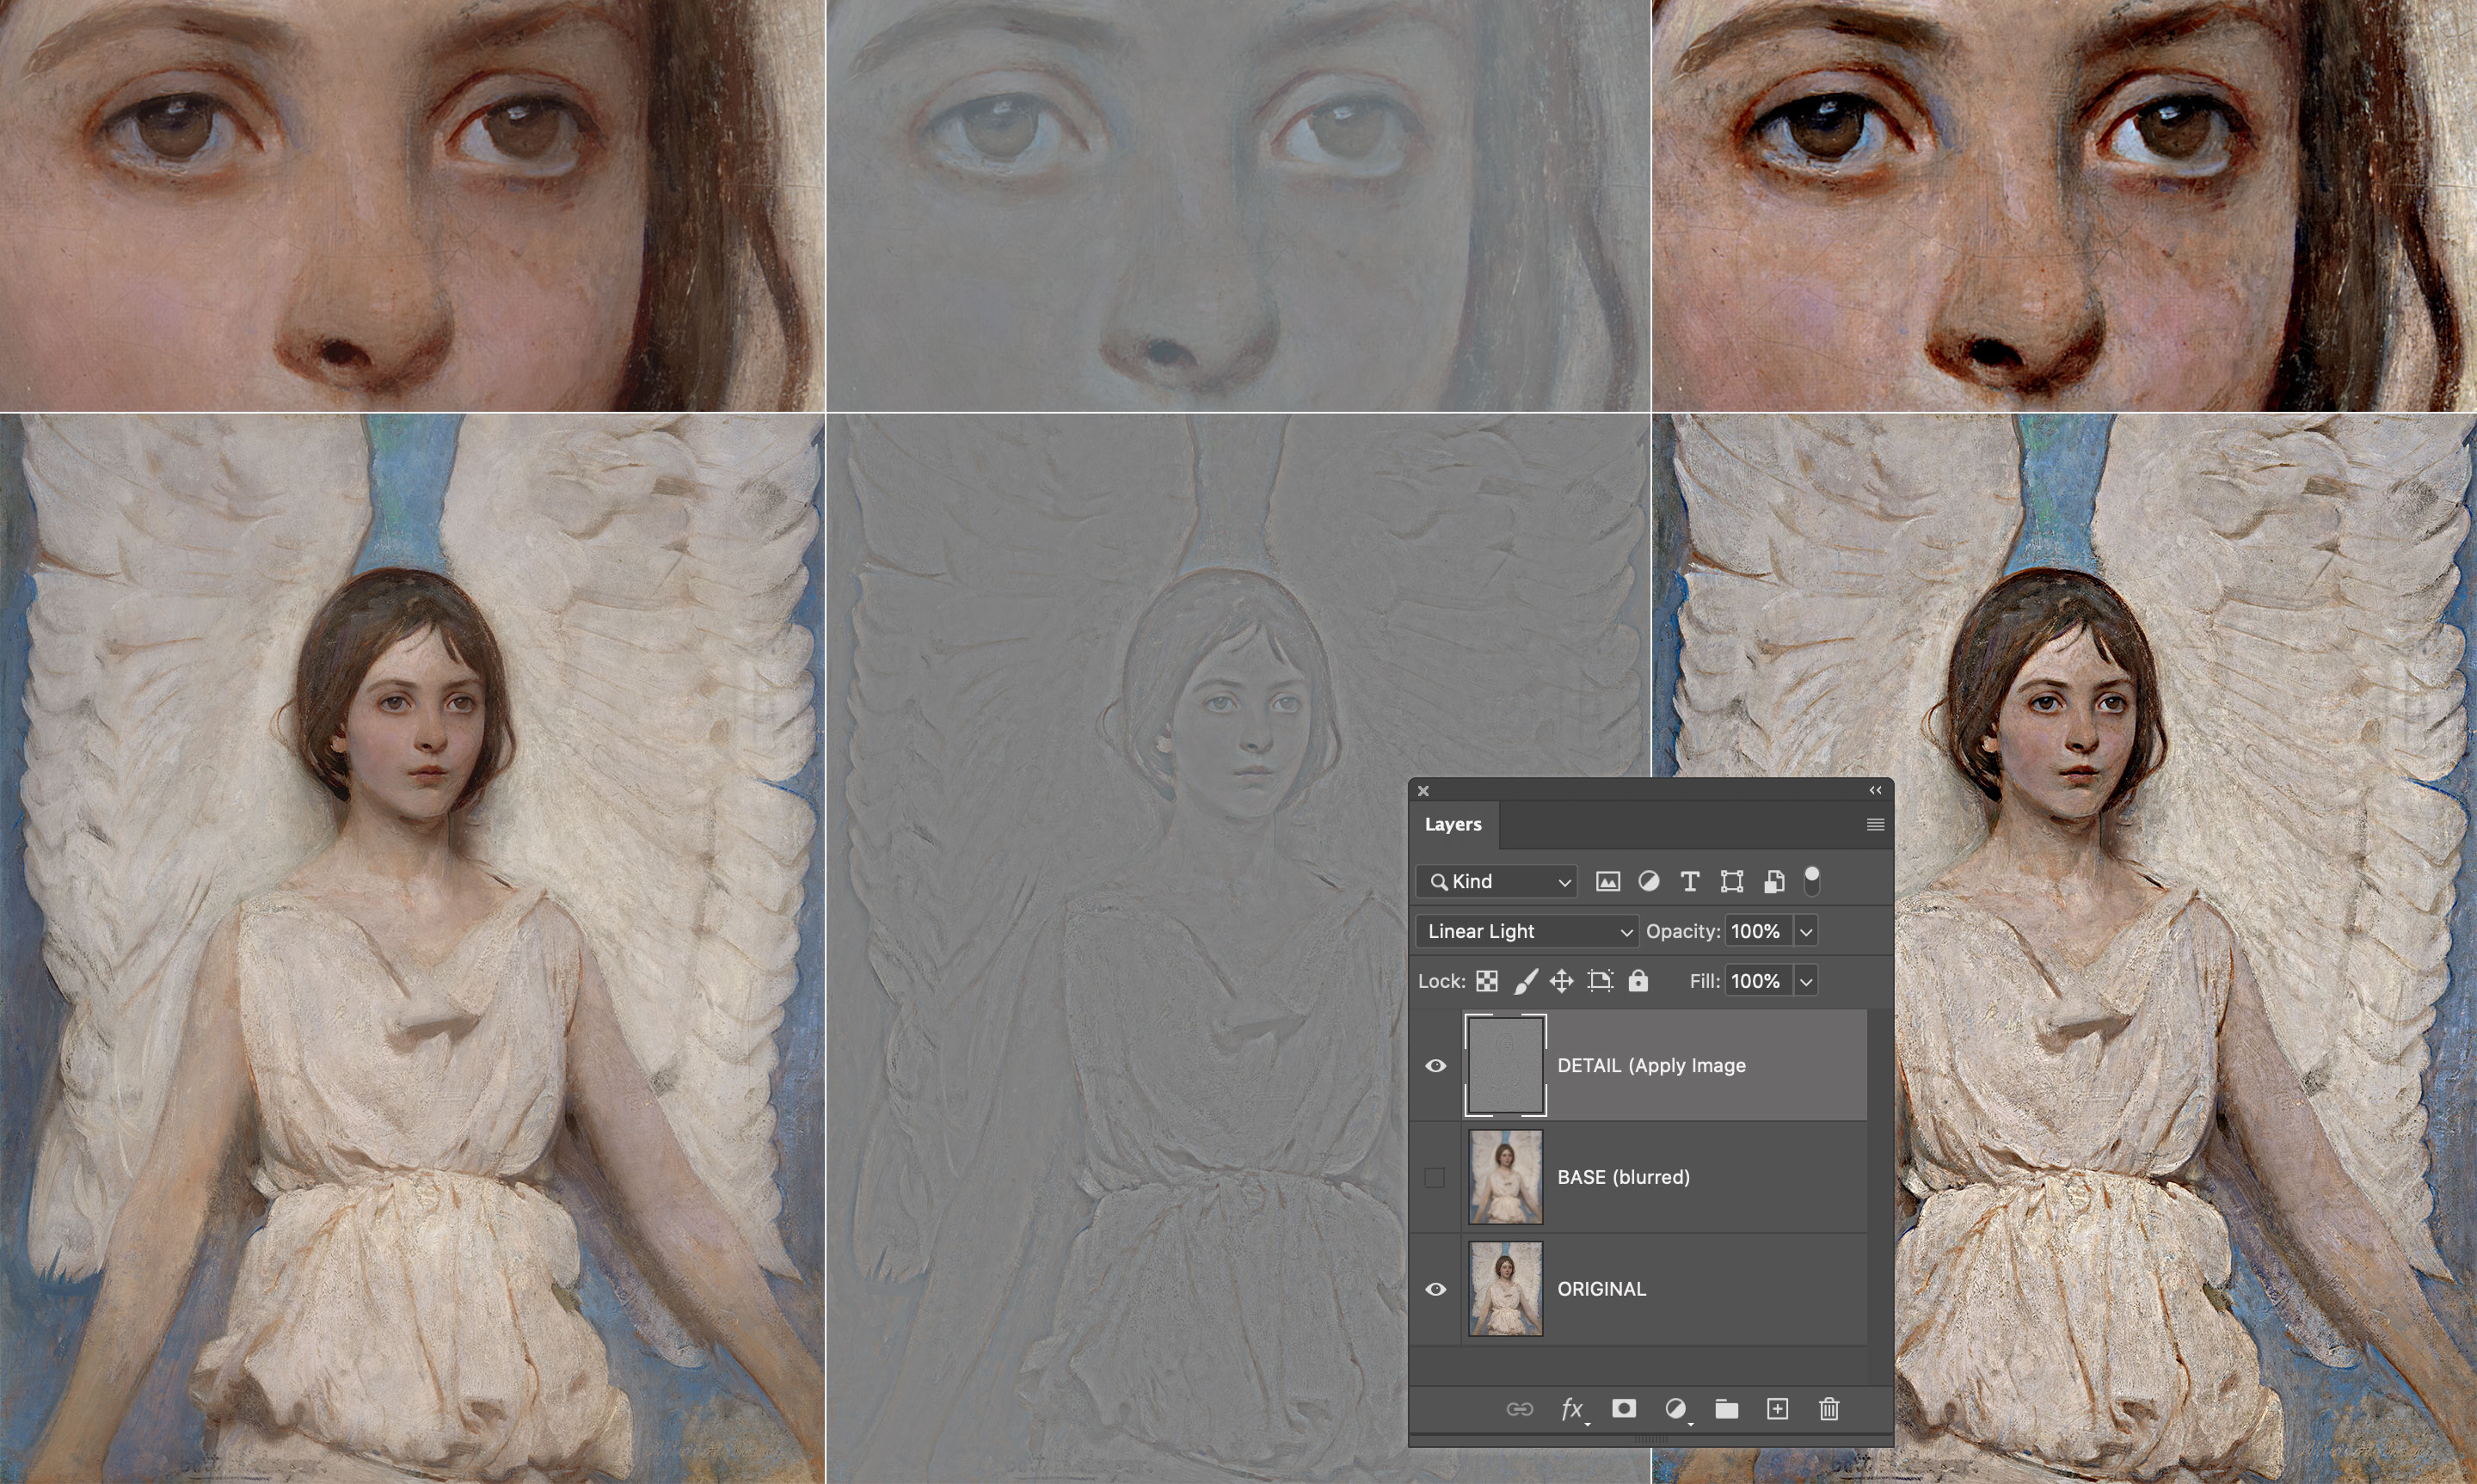
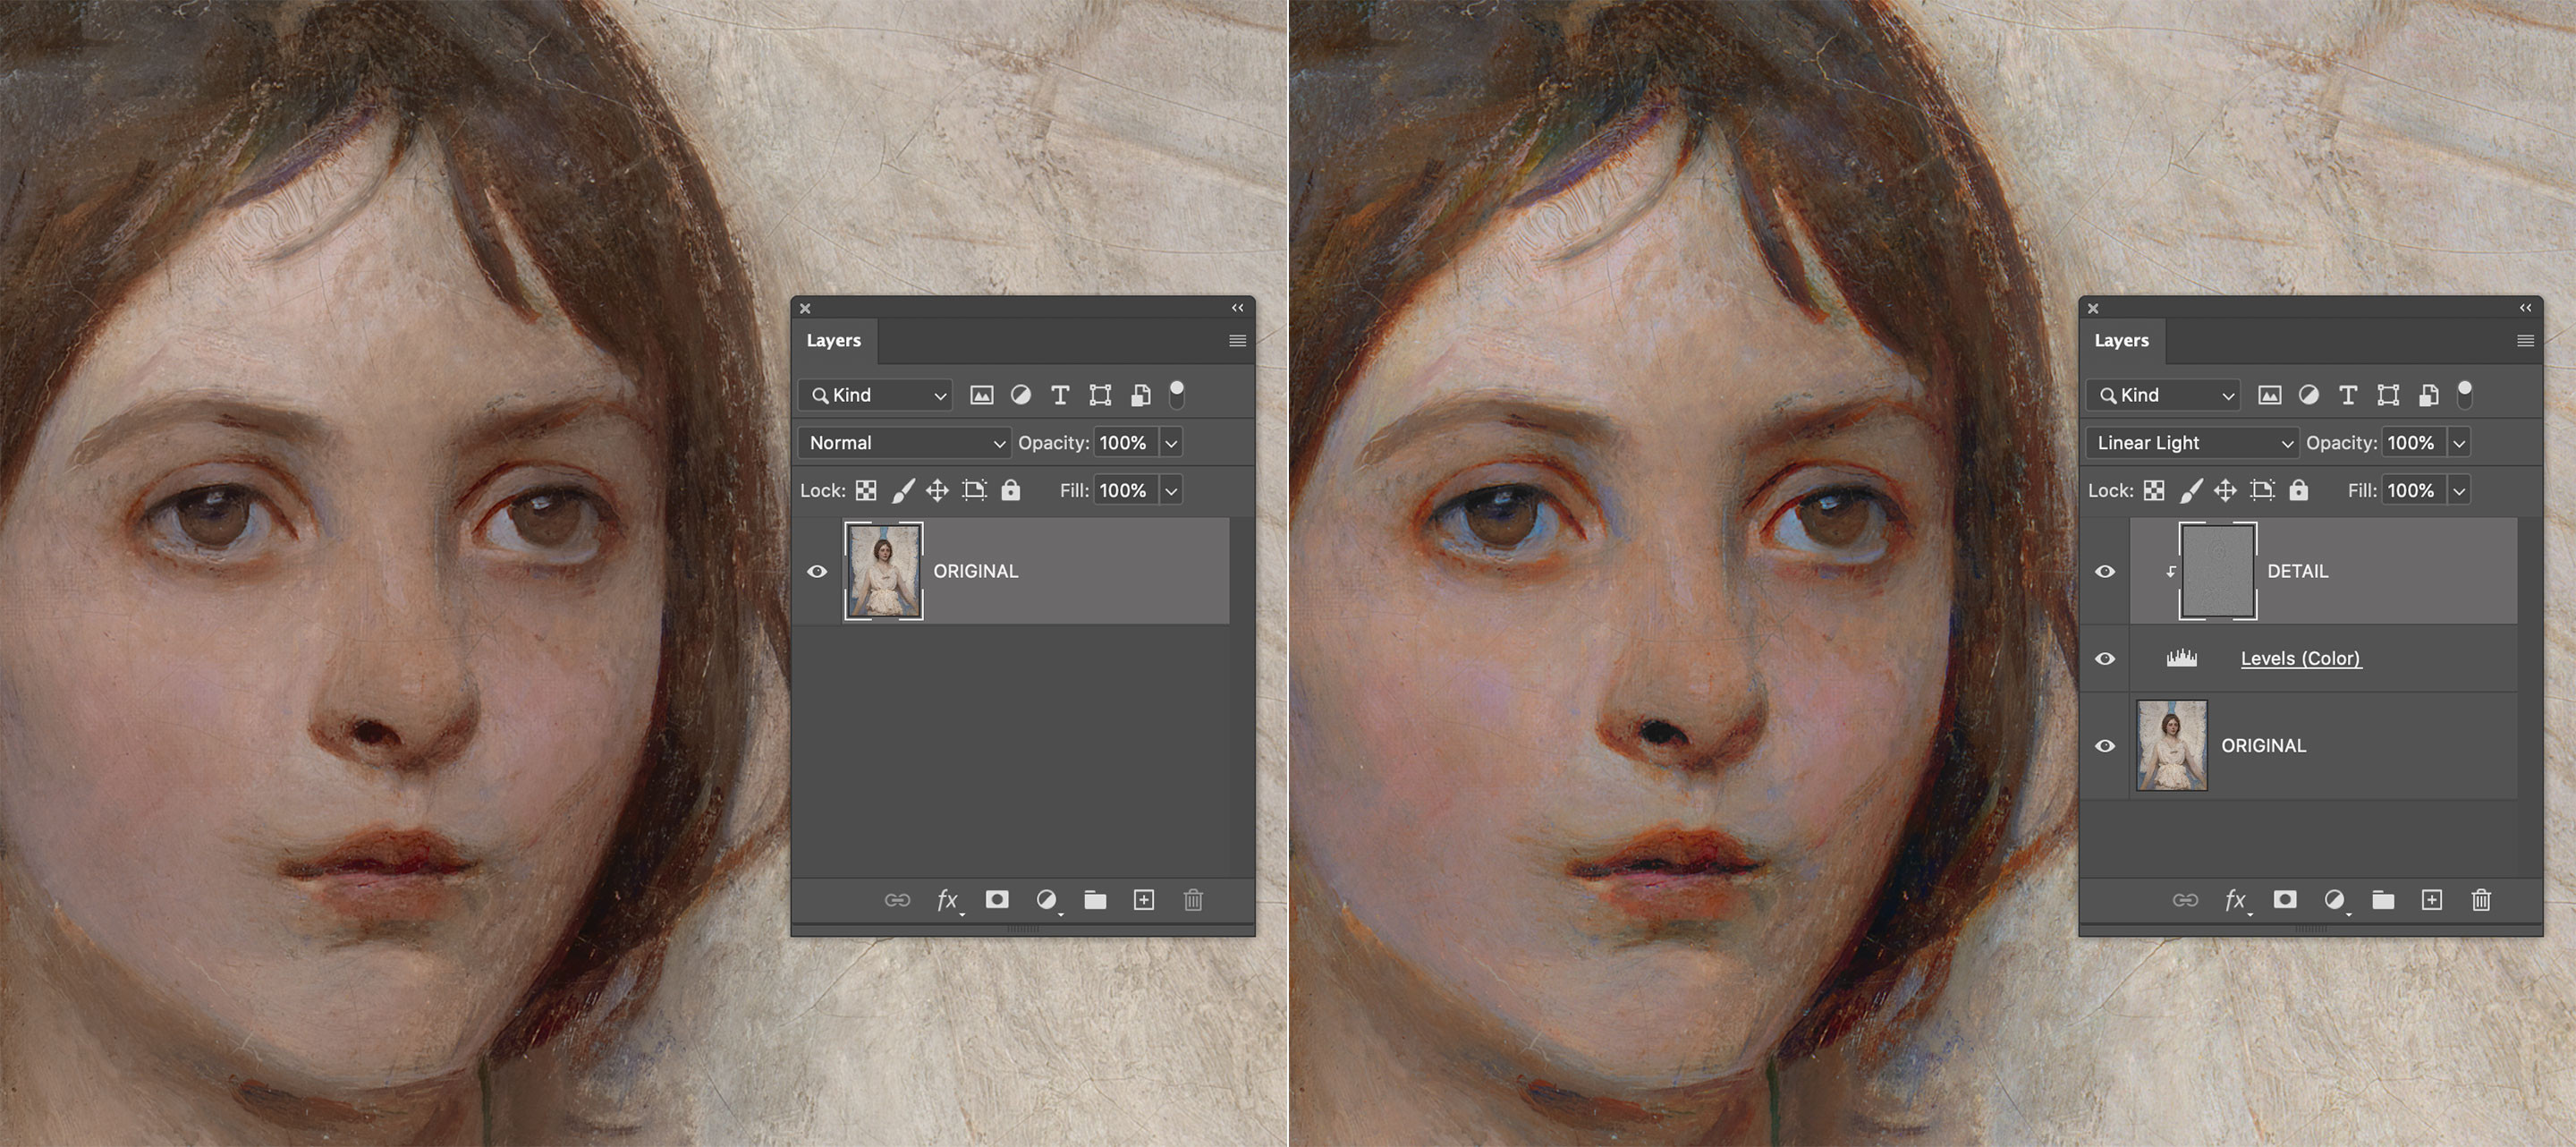
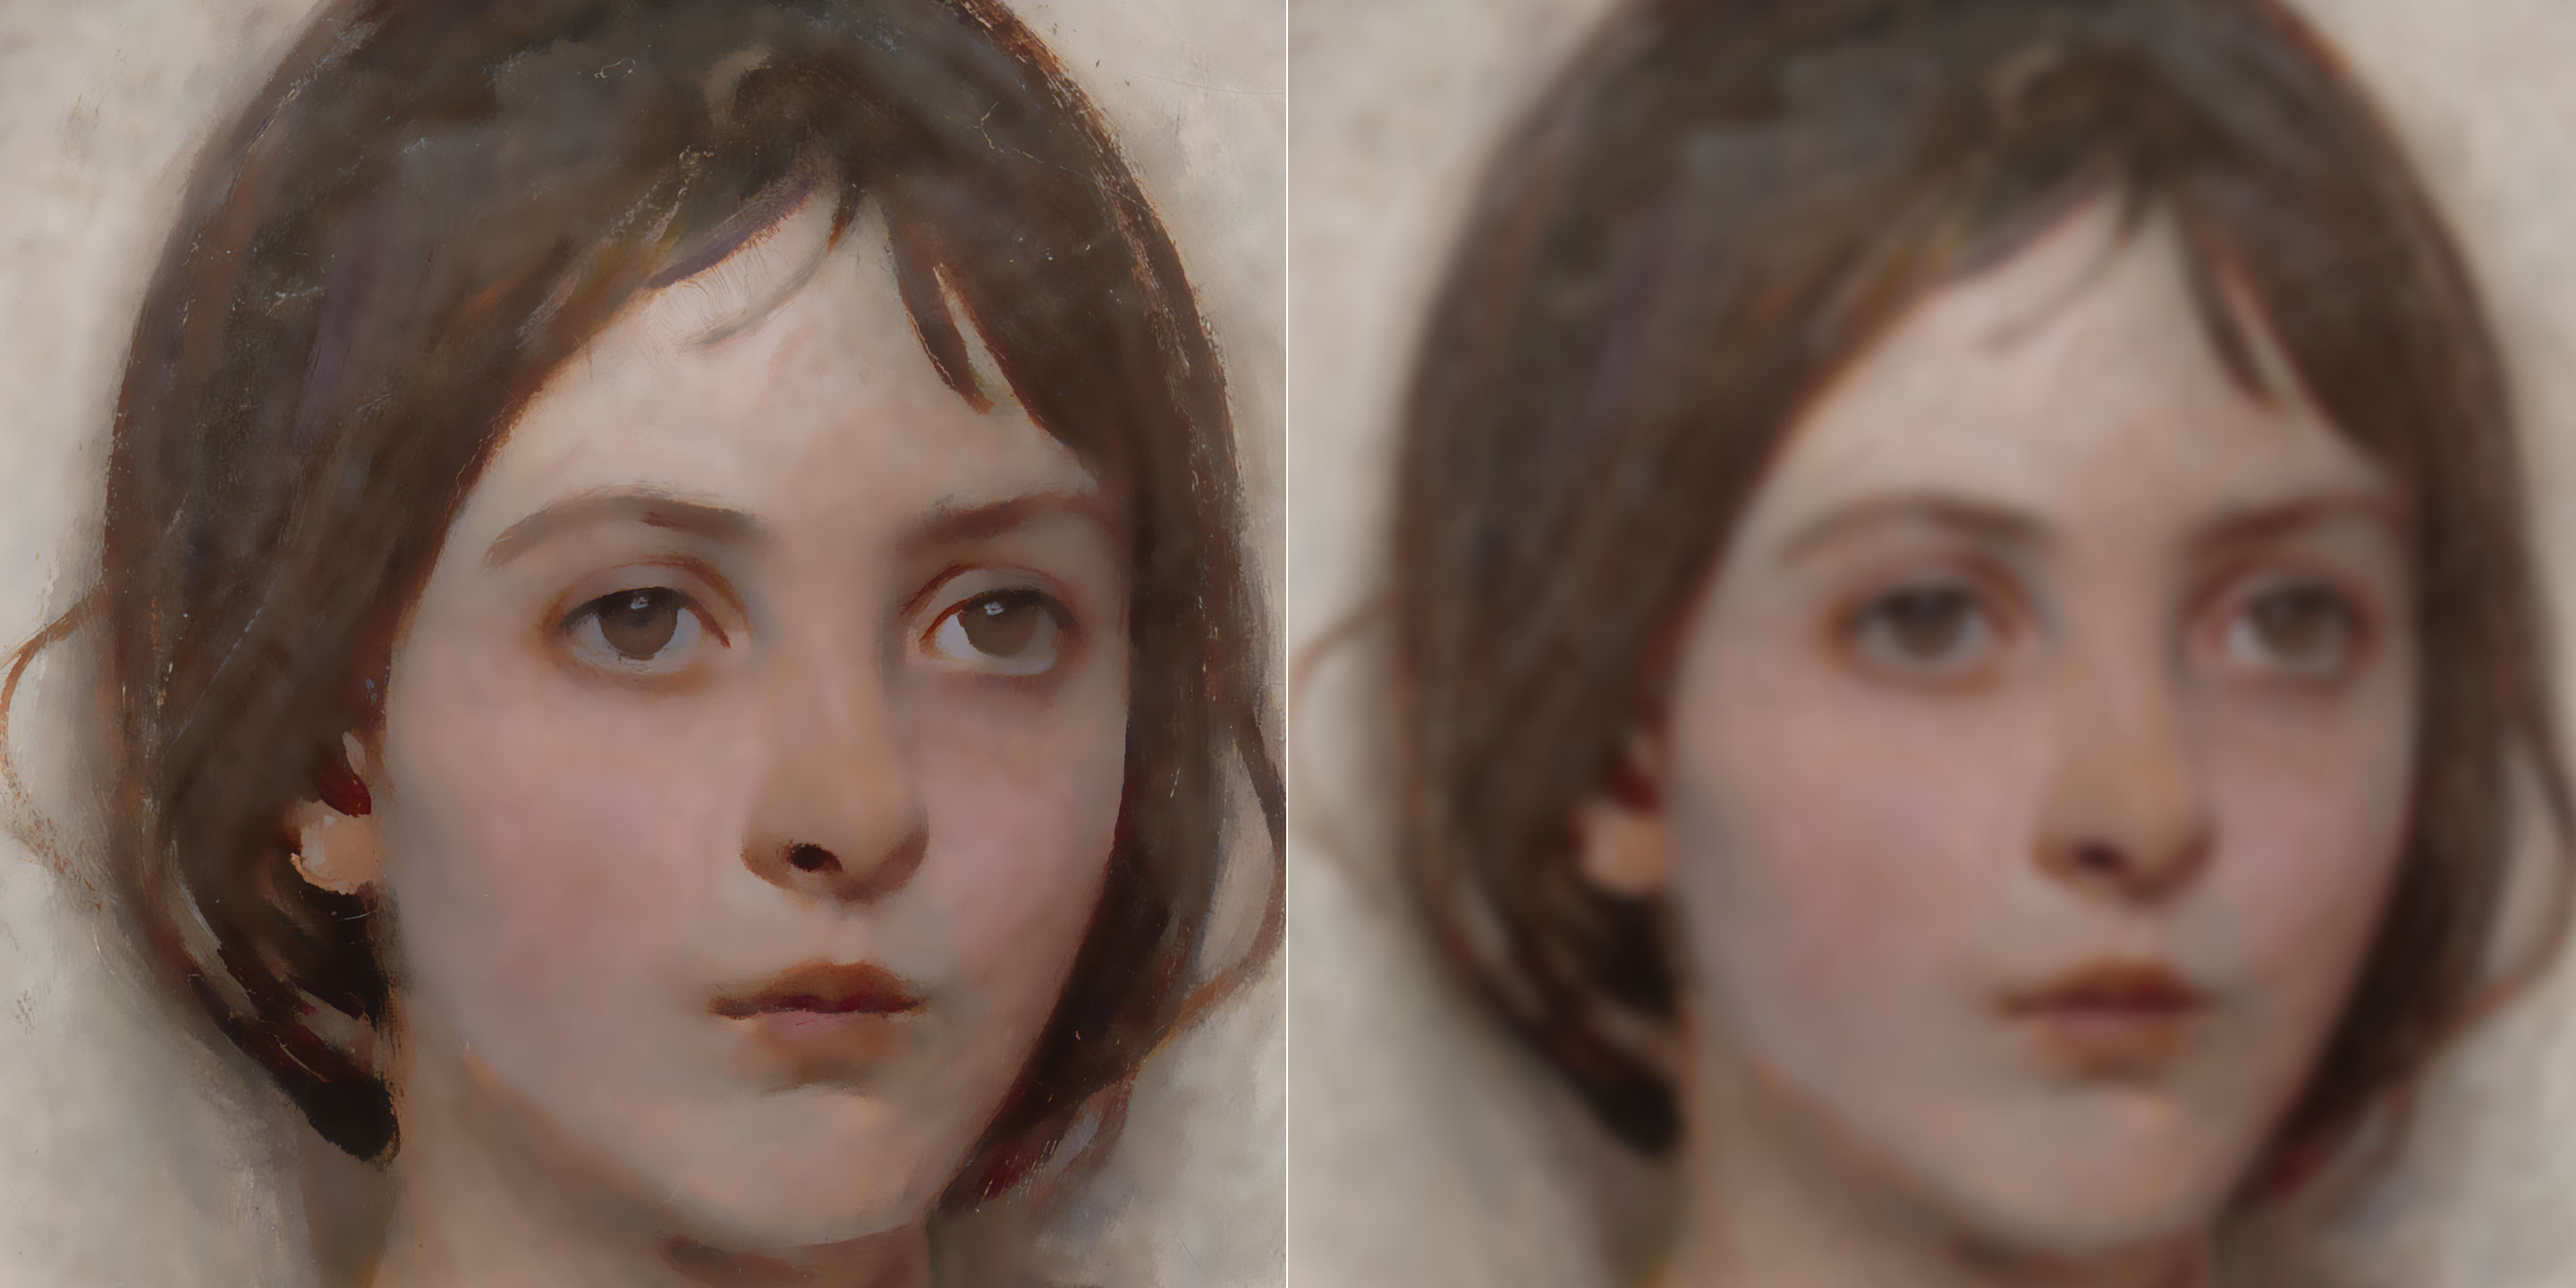
As soon as you’re able to separate frequency ranges into their own layers, they can be successfully used to enhance or dampen those features in the original image. Gaussian Sharpening is a classic example: without entering the details of the three parameters of the UnSharpMask filter here, conceptually it’s just a matter of creating a Gaussian separation and adding the frequencies back to the original – basically discarding the Blurred layer and using the Detail one only. Exaggerated radius (40px) demonstration as follows.

Several things to point out ASAP.

  • First, a “Gaussian separation” means a Frequency Separation that uses the Gaussian Blur filter. As we’ll see in a short while, we’re not limited to that at all.
  • Second, “adding back” is a loose term that means putting the Detail layer (the one that’s the result of the Apply Image step) into Linear Light blending mode directly on top of the Original, discarding the Base (blurred) layer.
  • Third, as soon as we enter the realm of contrast enhancement we can leave the rigorous math we needed for the decomposition behind. In the image above I’ve used Linear Light at full opacity. You can experiment lowering the opacity or using different contrast blending modes2.
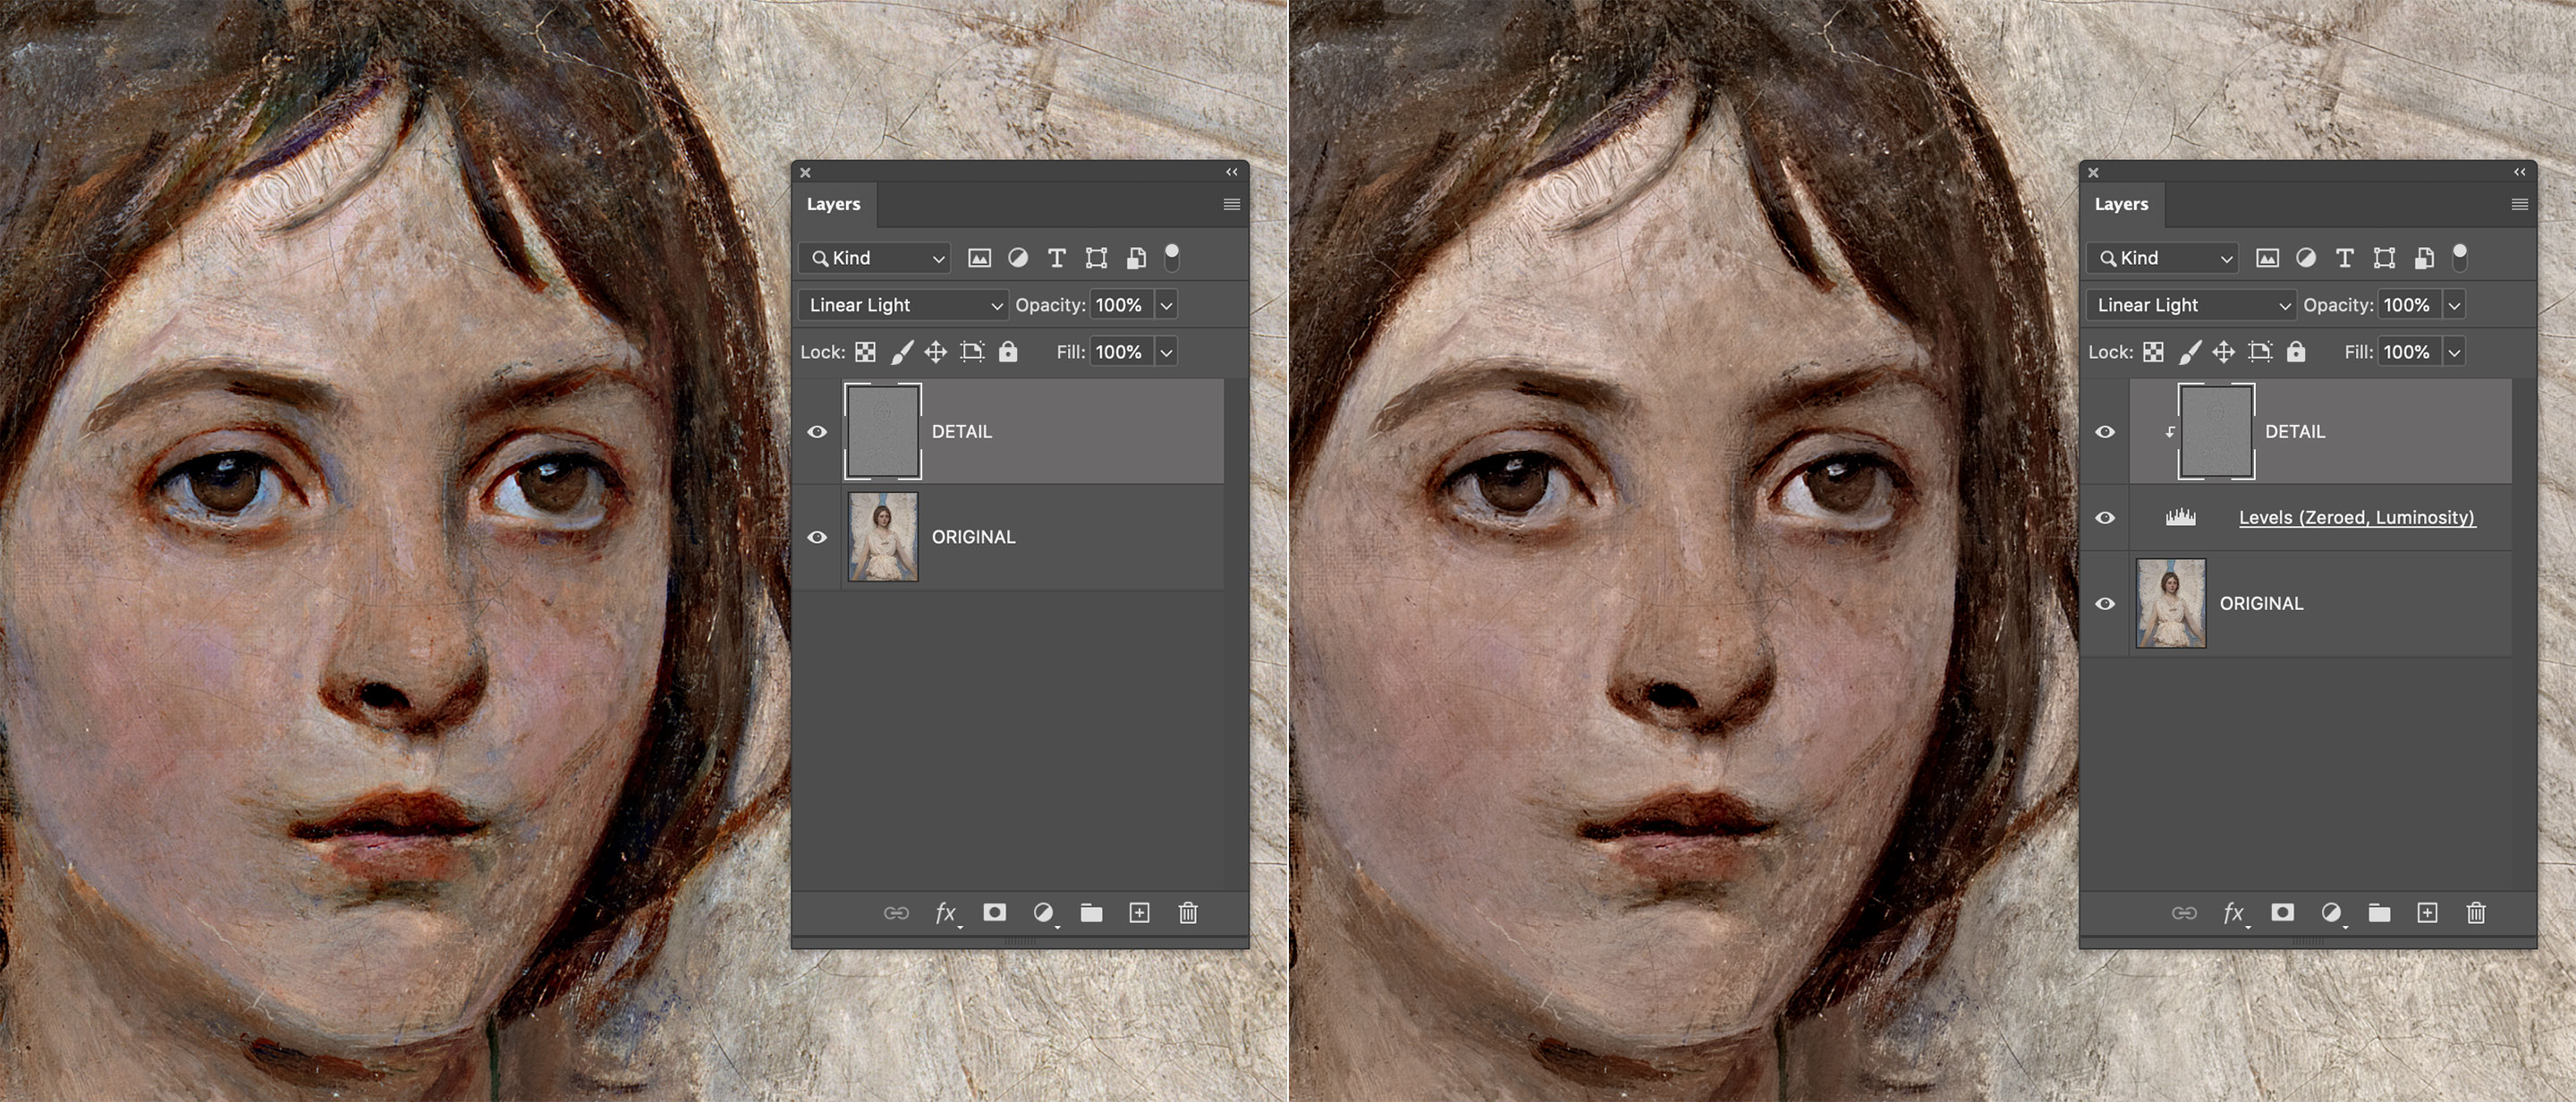
  • Fourth, due to the fact that Apply Image and the Linear Light blend work on a per channel basis, as a result the color is expected to be saturated and the hue sometimes shifted. The effect may be welcome or may be not. Without the need to bother with a Merge Layer on top switched then to Luminosity blending mode, you can force the Luminosity only by clipping the Detail layer to whatever blank/zeroed Adjustment Layer you want, provided that the latter (only) is set in Luminosity, while the Detail layer is whatever contrast blending mode you like.

This is a little known technique that lets you mix blending modes in a very fast and cheap (in terms of filesize) way.

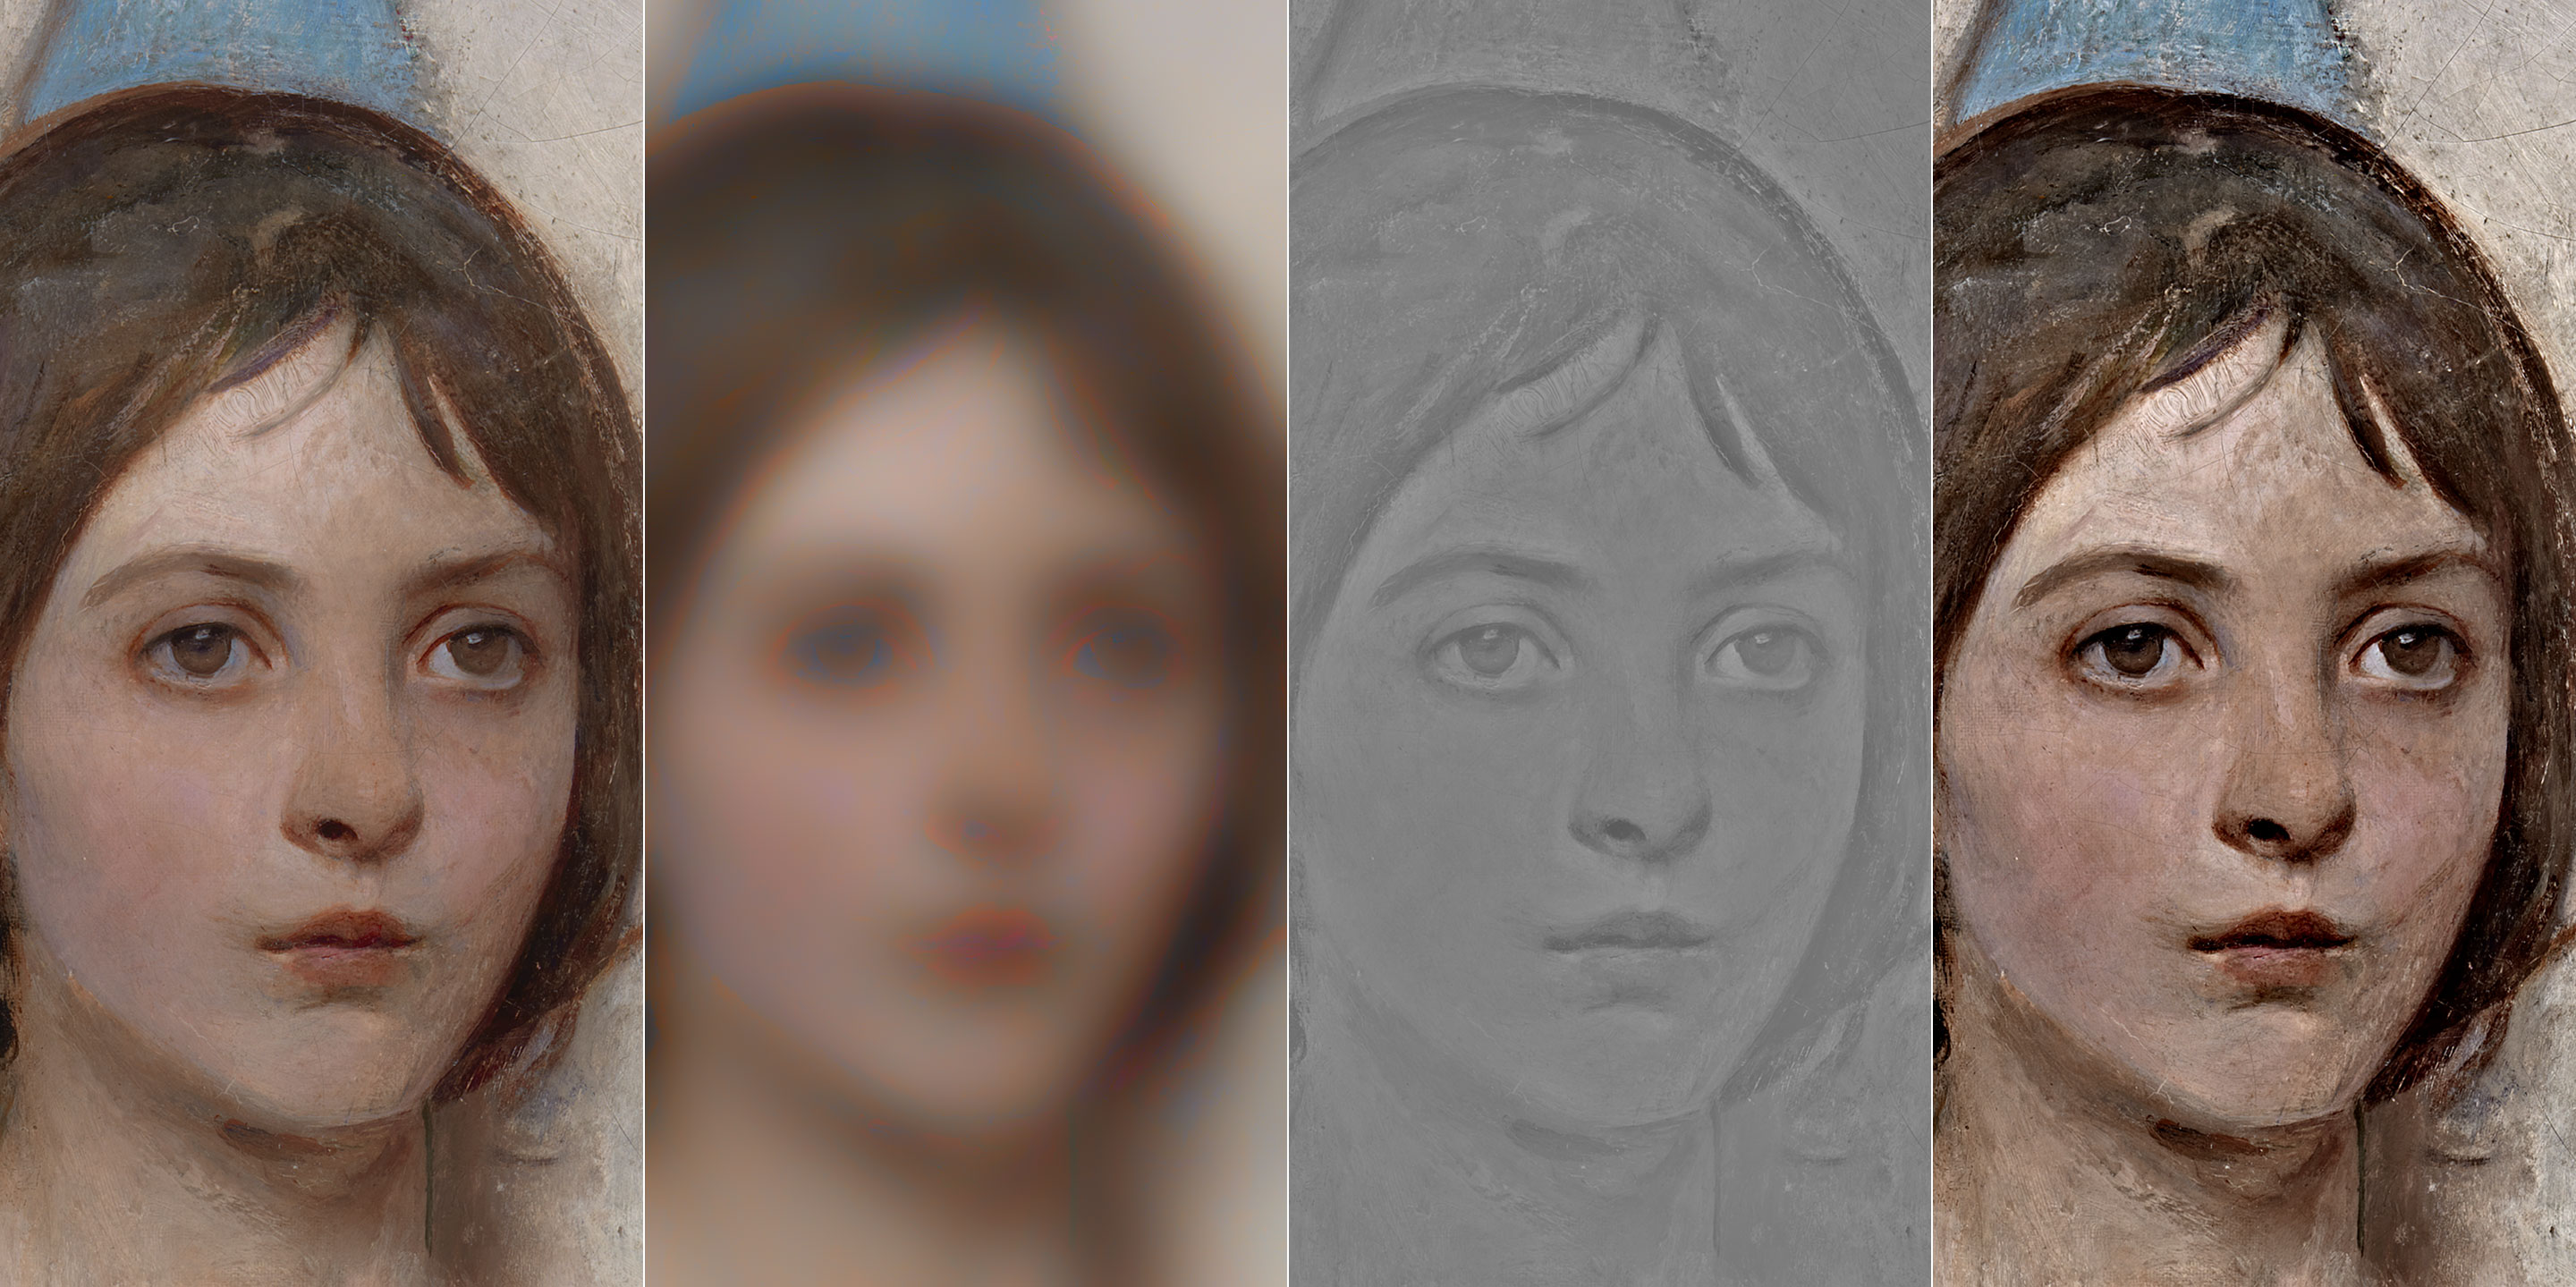
Alternatively, you can slightly tweak the procedure. If after the Gaussian Blur you Edit > Fade Gaussian Blur… and set it to “Luminosity” you end up with a weird looking blurred thing.

When using that one for the Image Apply step, then the resulting Detail layer is completely desaturated, hence the result when applying it back to the original has the same effect as retaining only the Luminosity part.

It’s quite important that you understand how the above works. We’ve subtracted a Blurred version from the Original, in order to get the gray-blob that I’ve called the Detail layer.D=O−GB

Where D is Detail, O is Original, and GB stands for Gaussian Blur (the blurred layer). If the GB is blurred in the Luminosity only, then:Dlum=O−GBlum

Finally, nothing prevents you to use the regular decomposition and retain the color only, in order to emphasize a more impressionistic effect – some sort of Michel Eugène Chevreul influenced simultaneous contrast boosted look.

Feel free to mix different amounts of Color and Luminosity for greater control. Also note that if you invert the Detail layer you get the opposite effect: dampening that frequency range rather than enhancing them. It’s of little use with a Gaussian kernel (a decomposition which is based on a Gaussian Blur filter) because it would just return a blurred version:

But with other kernels (especially mixed ones) and varying the opacity it can lead to very interesting results.

5.2 Non-Gaussian kernels

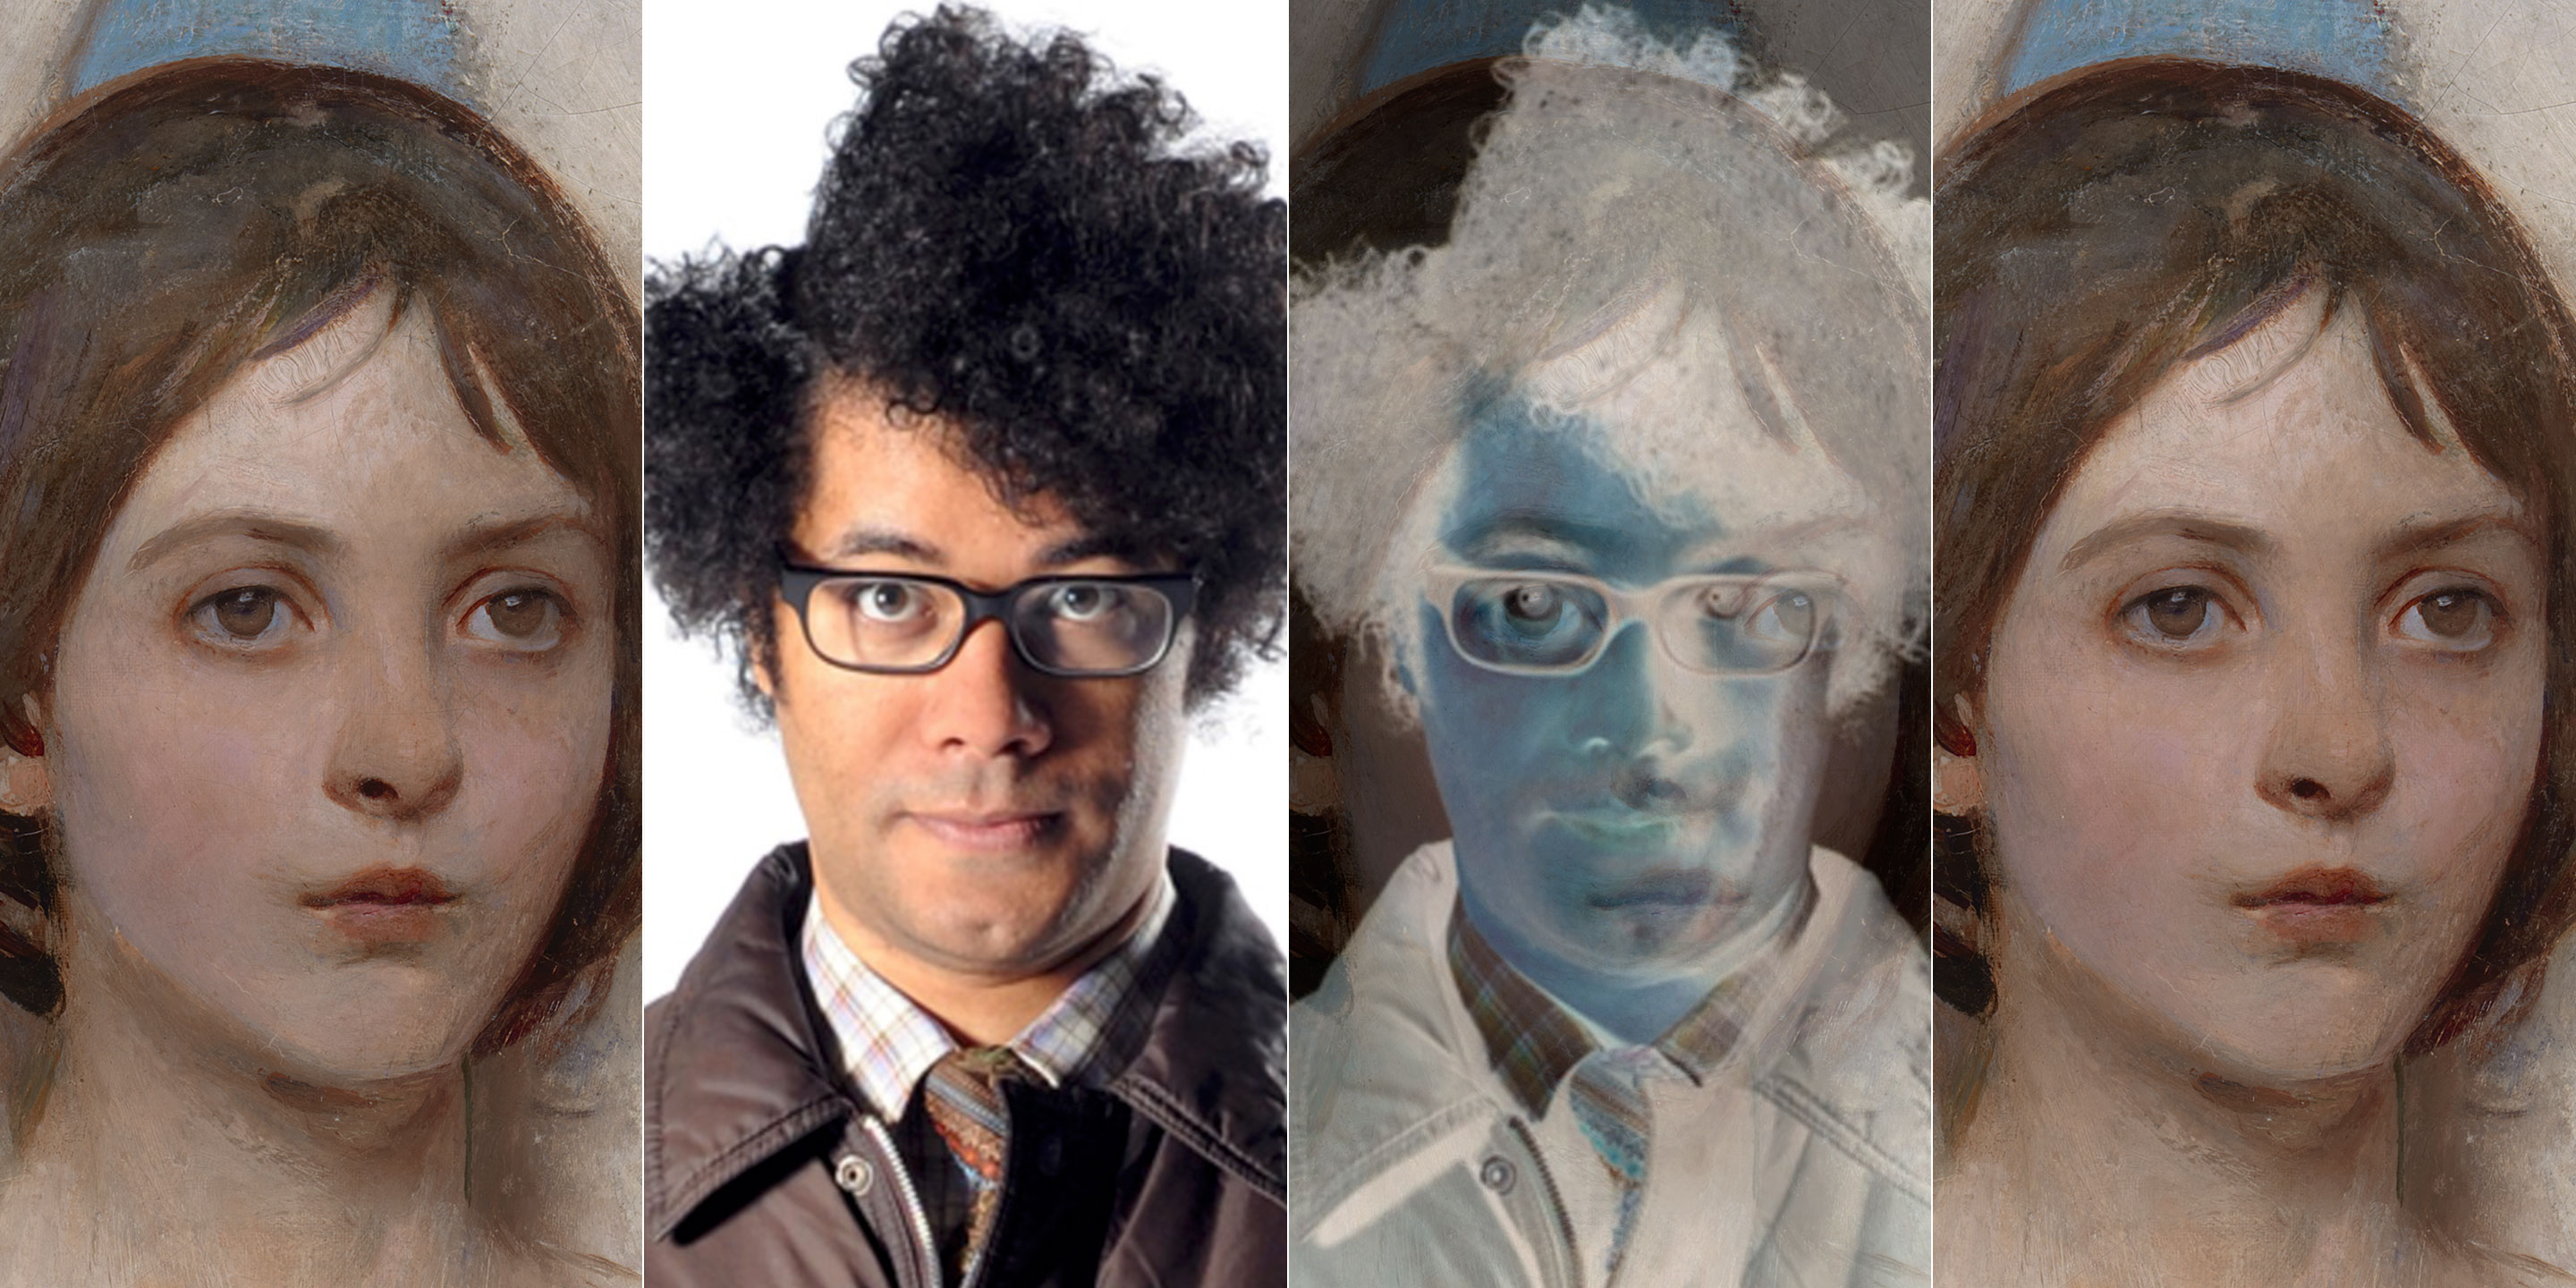
There’s nothing special in the Gaussian Blur filter when it comes to image decomposition as we’ve seen it so far. Provided that you subtract3 the Original with the “processed” version and you put the result on top of the filtered in Linear Light, you’re going to get the Original back. You can try silly filters if you want:

You can even throw in something totally unrelated and it’ll work all the same.

Think about the Apply Image step like noise cancelling headphones: you’re somehow factoring out the “interference” (the altered image) and find a signal that, combined with it, returns the frequencies you want to hear. All those weird filters have no use, but to help you get the point.

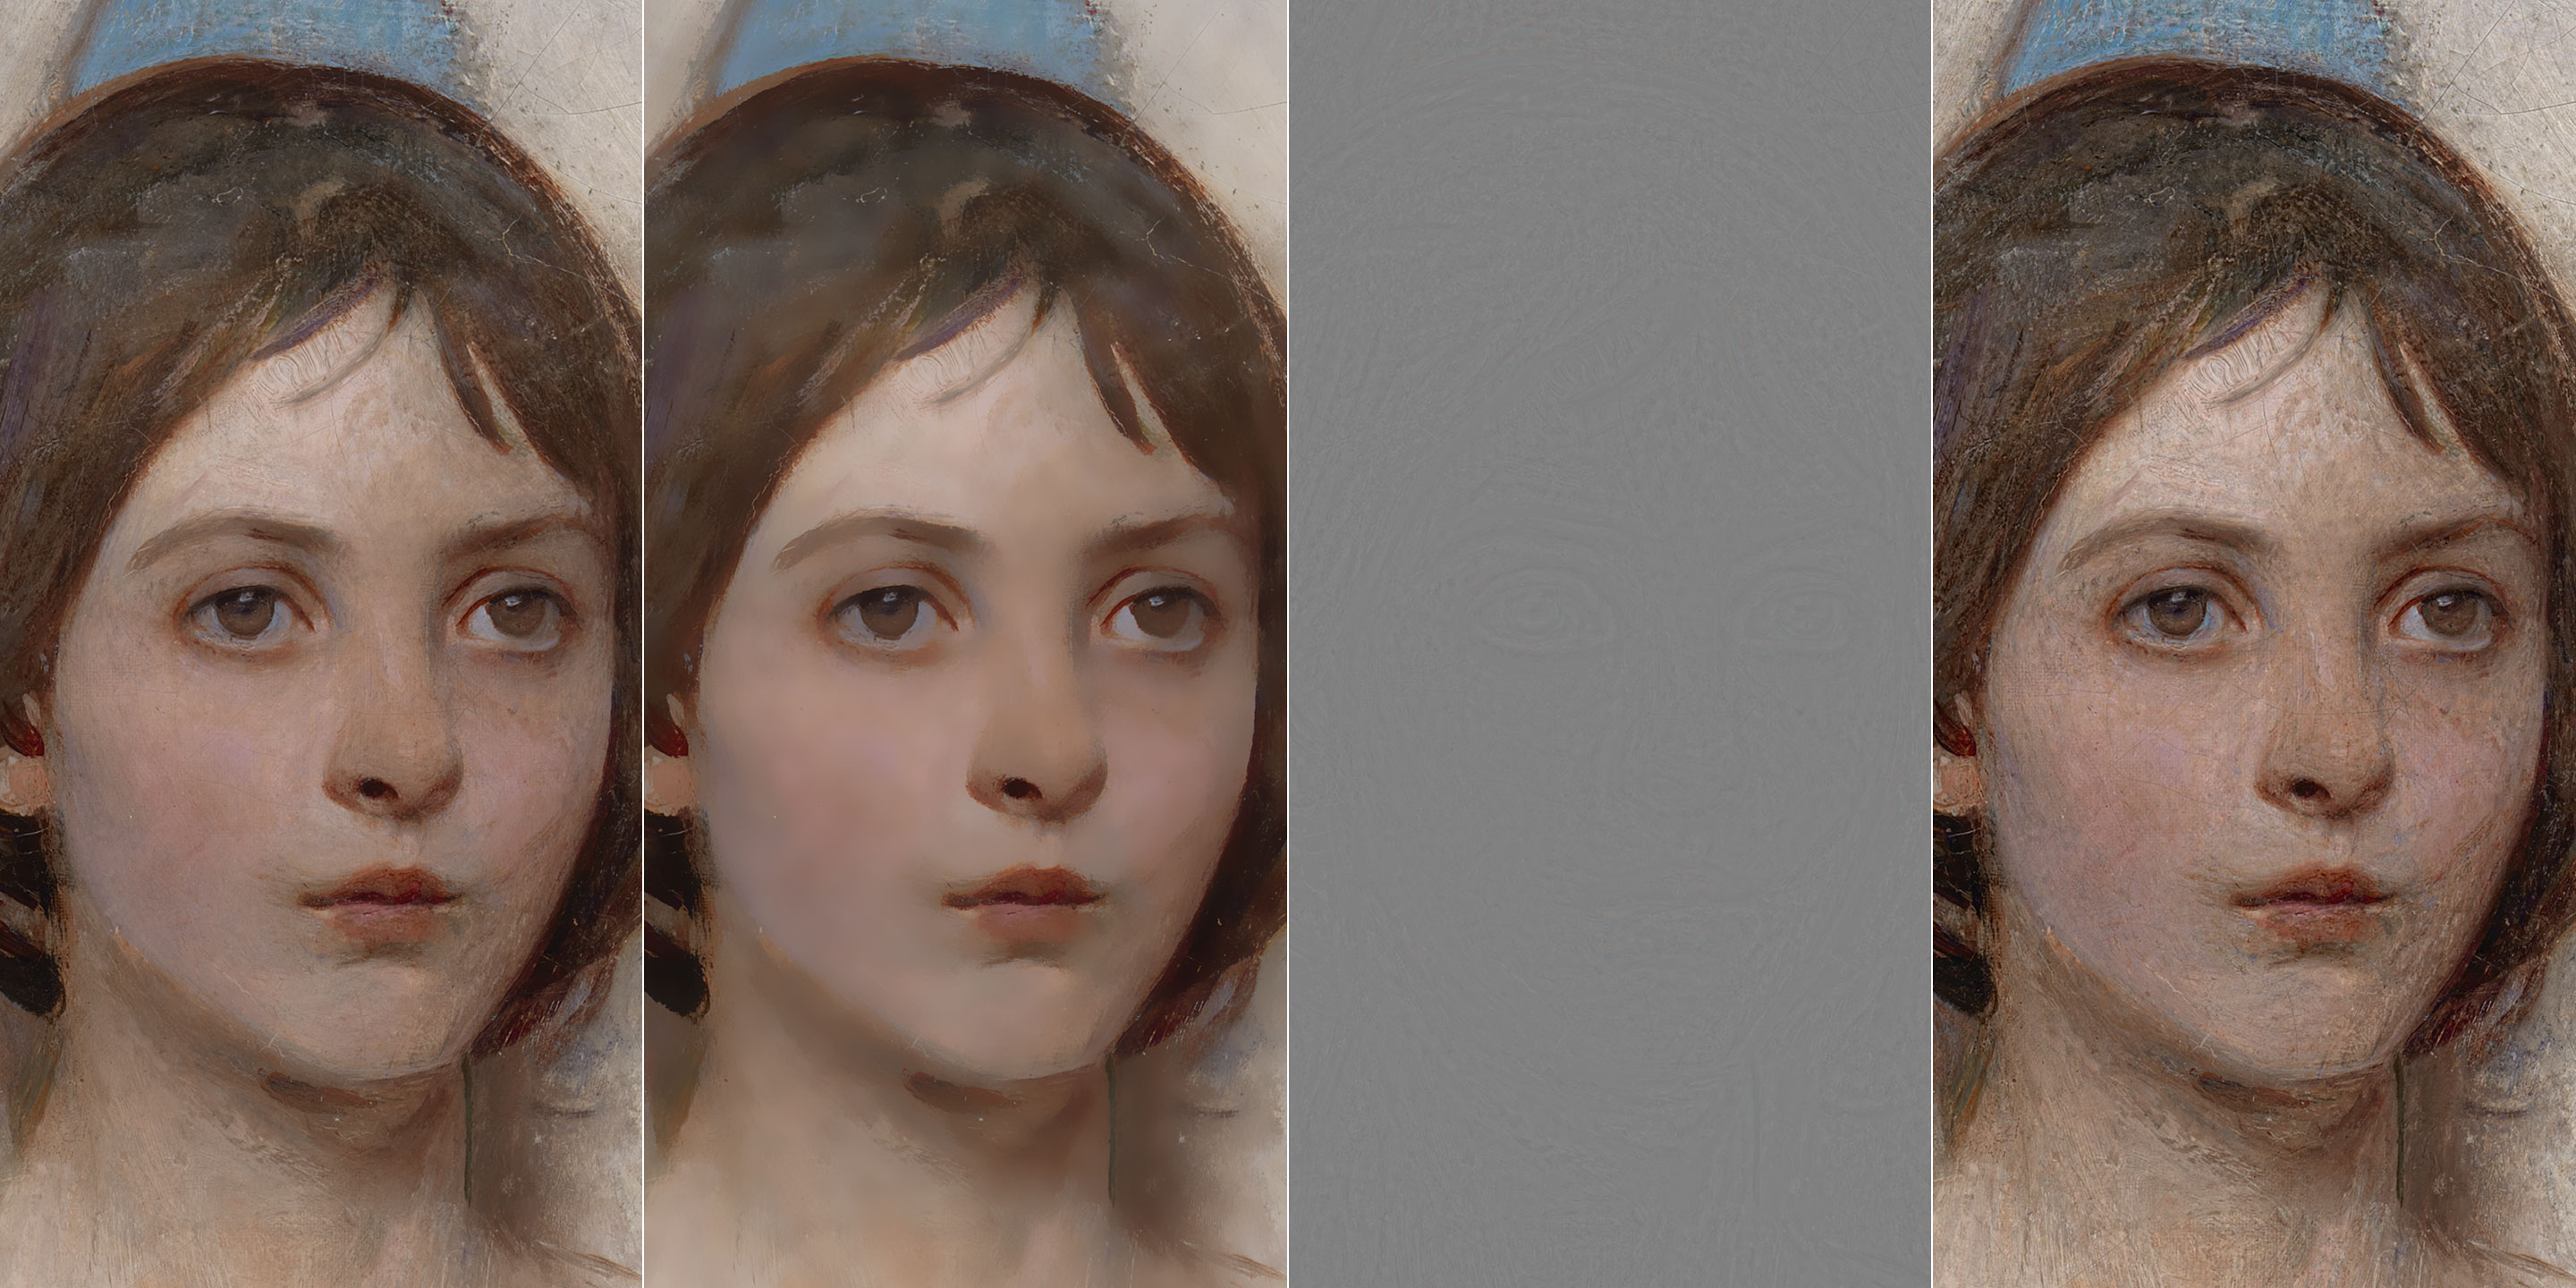
At this point you should have built the intuition that what the kind of detail that the kernel destroys, is the kind of stuff that migrates in the Detail layer and you’ll be able to enhance/retouch in the original image. One well-known kernel used in such decompositions is the Bilateral Filter, a.k.a. the Surface Blur. Killing (in theory) everything but edges, you can expect that it’s going to enhance Textures and leave Edges more or less alone.

The result is not meant to be pretty here: it illustrates the point, and it’s yet another item in your toolbox to grab when the right image comes along. Please remember that these two-layers decompositions can be used for retouching purposes with a Base (blurred) + Detail layer, so it can be interesting, depending on the image, to be able to target fine textures and leave edges alone.

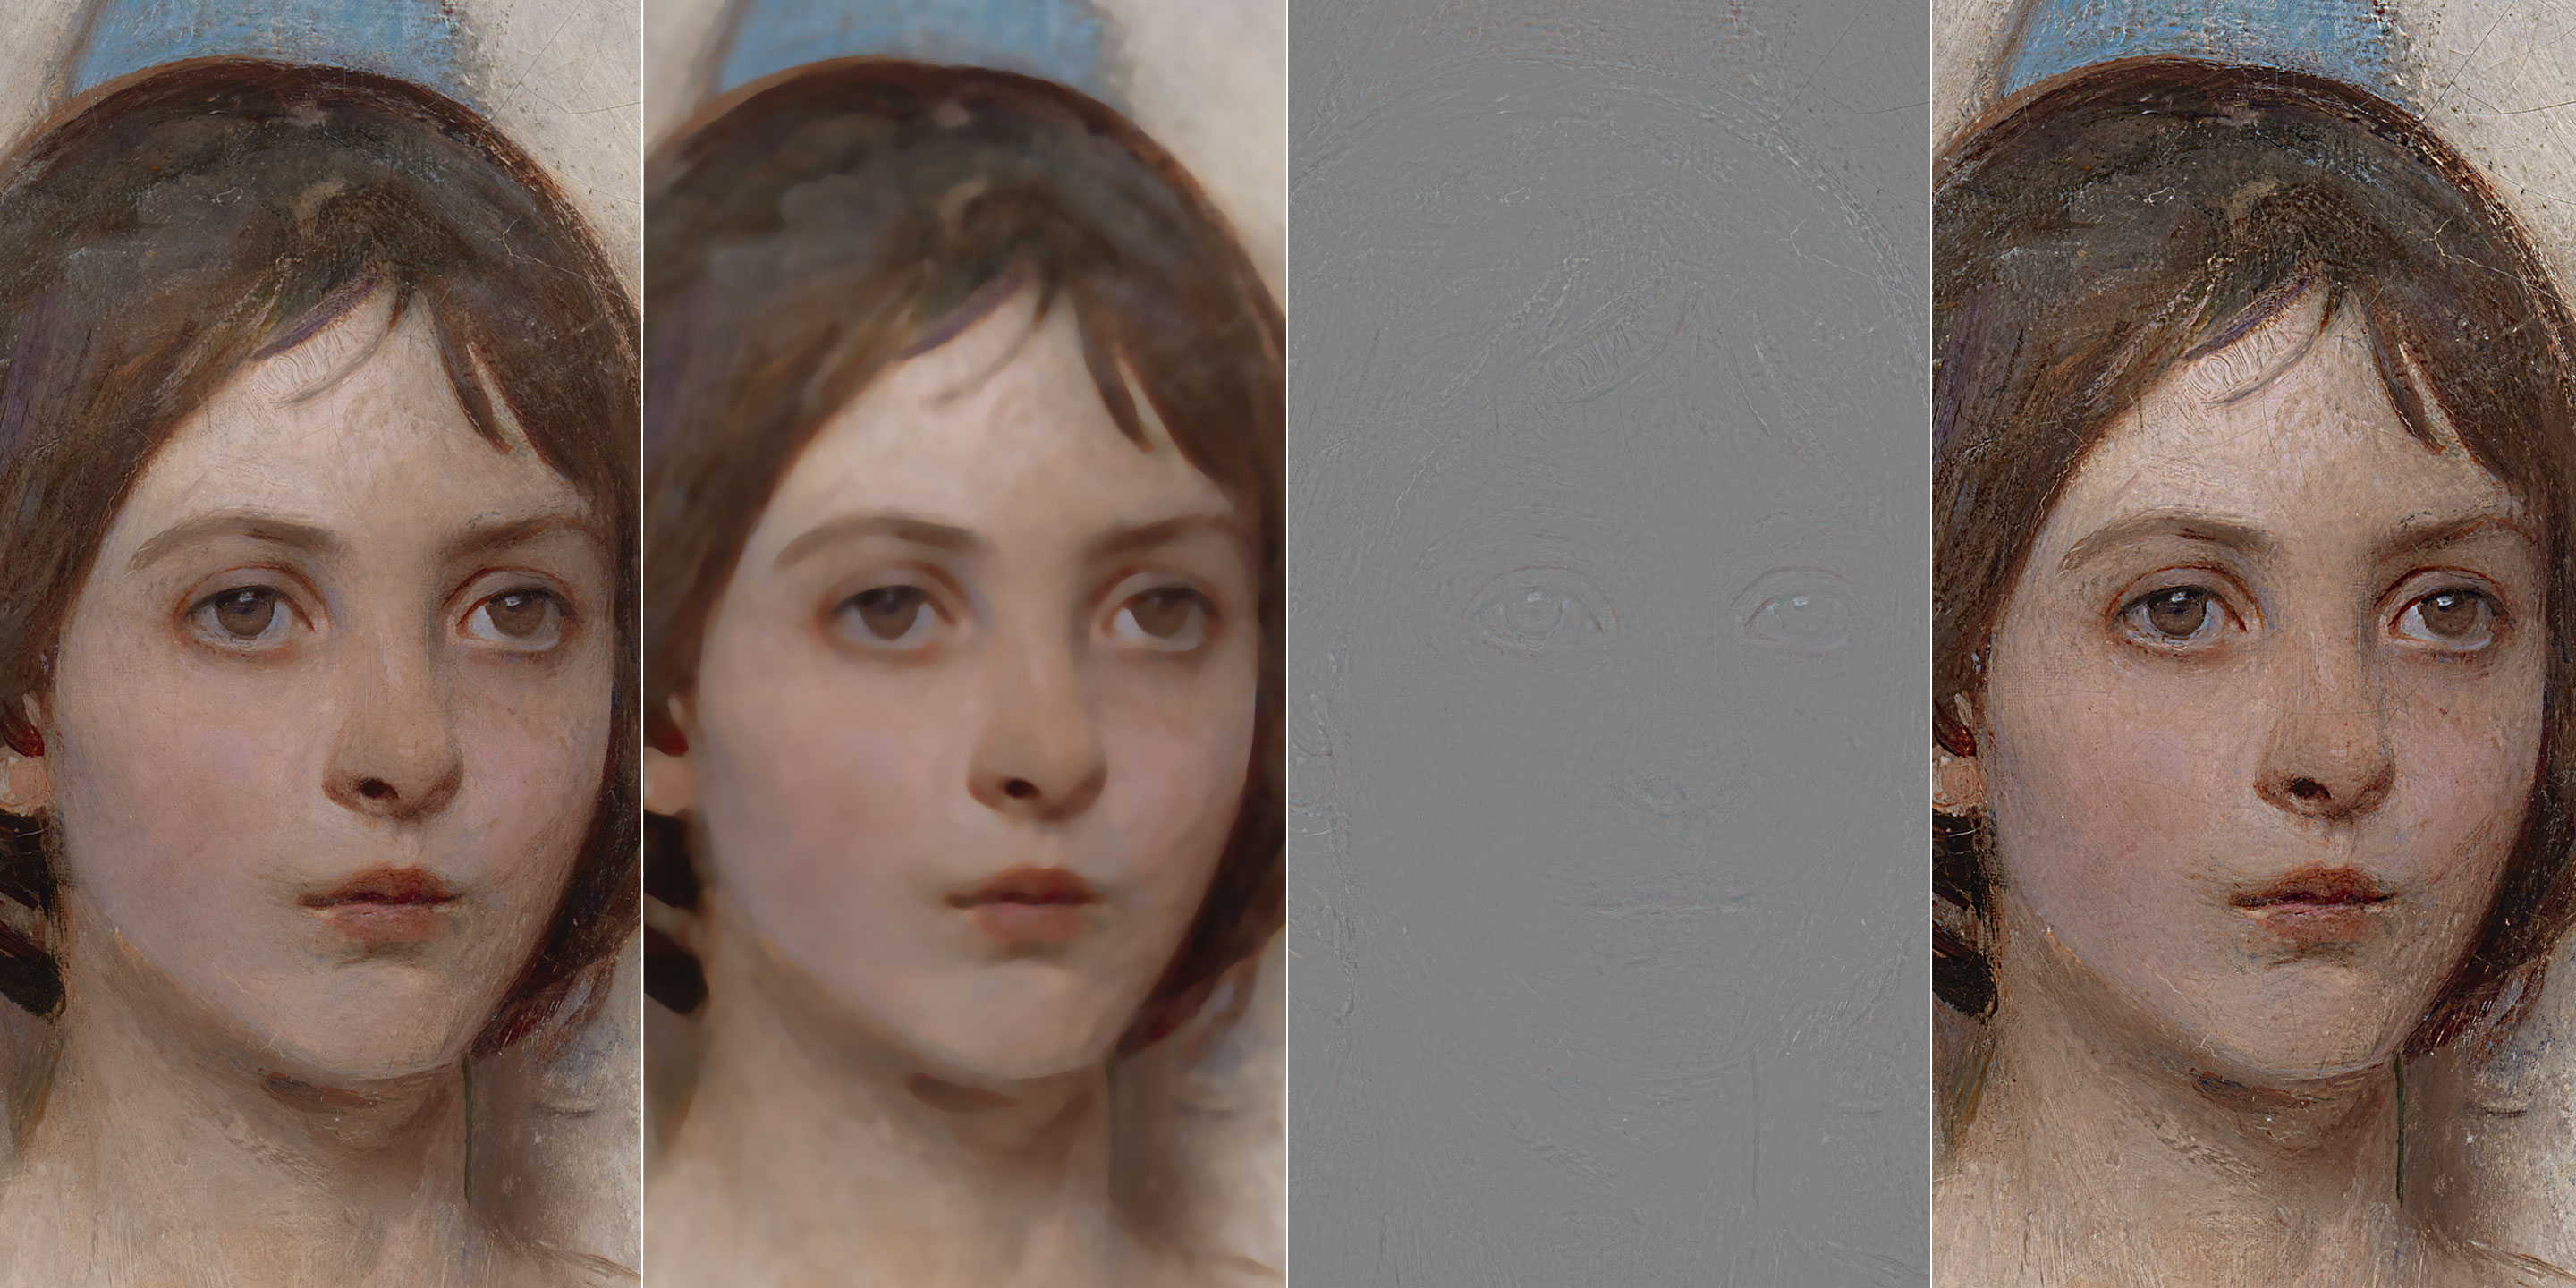
Another quite common kernel is the Median, mostly because it suits retouchers when they need to address the Detail layer:

But even weird kernels can lead to surprisingly interesting results. For instance Maximum (dilation filter) that expands the maximum values of a round (or square) region of pixels; resulting in a visually lighter image, we know that the result of the Detail layer application is the opposite: darkened. As follows a 2px radius, with the Detail in Linear Light 50% opacity.

Similarly, the Minimum (erosion) darkens the intermediate hence it’ll lighten the composite:

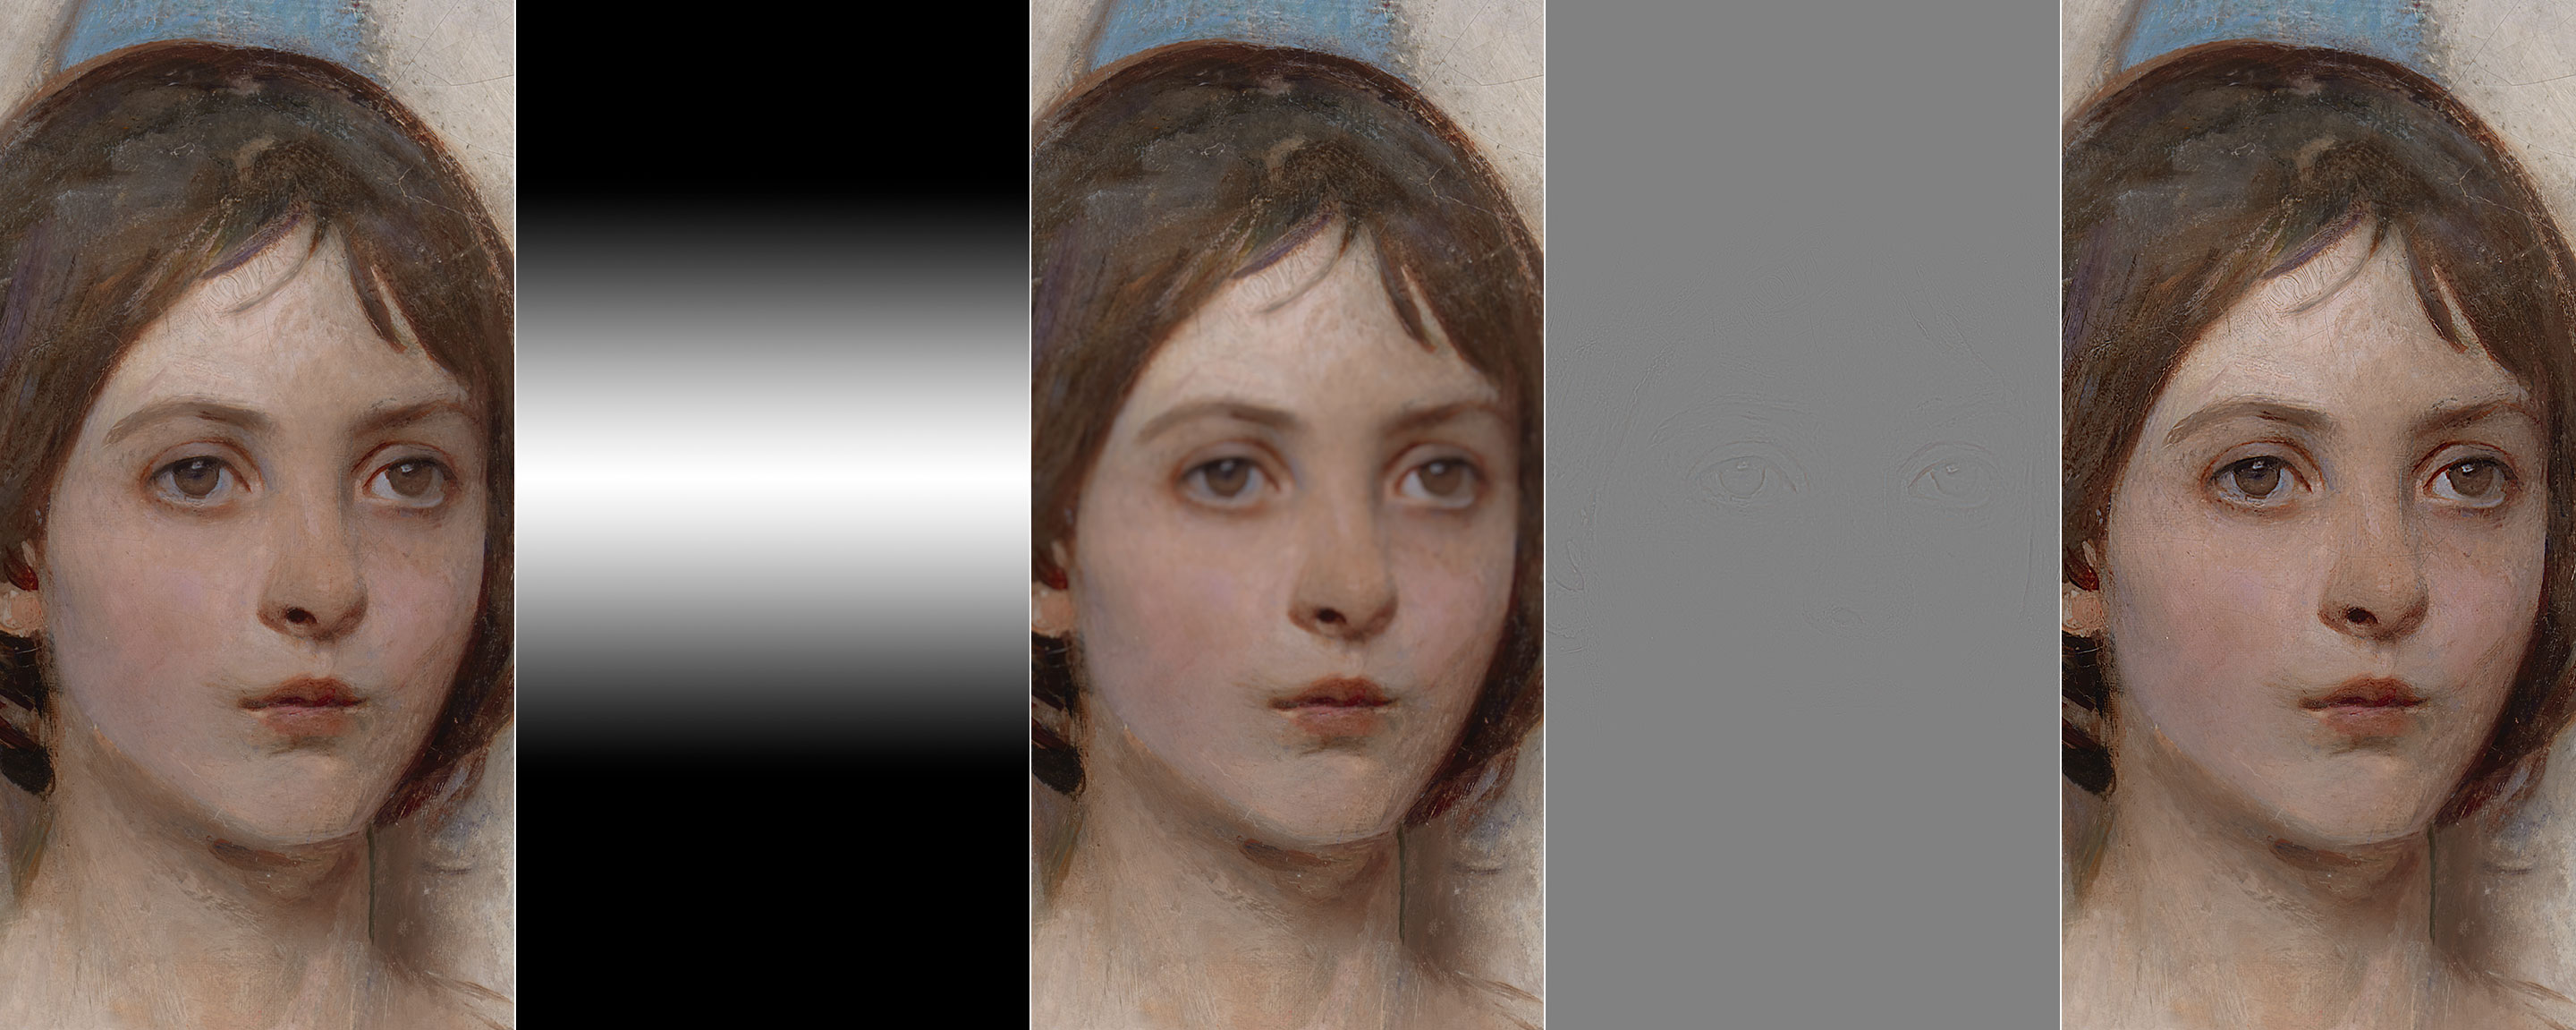
Speaking of Sharpening, you can get fancy with all sort of Blur kernels (e.g. the ones in the Filters’ Blur Gallery). In the following example I’ve created a new Channel with a gradient that it’s used to apply a Lens Blur filter nicely faded in around the eyes region only. The resulting Detail layer is able to apply a sharpening effect that fades in a way so natural that no layer mask would ever be able to replicate.

6. Multiple Kernels

6.1 Polyfiltered Detail layers

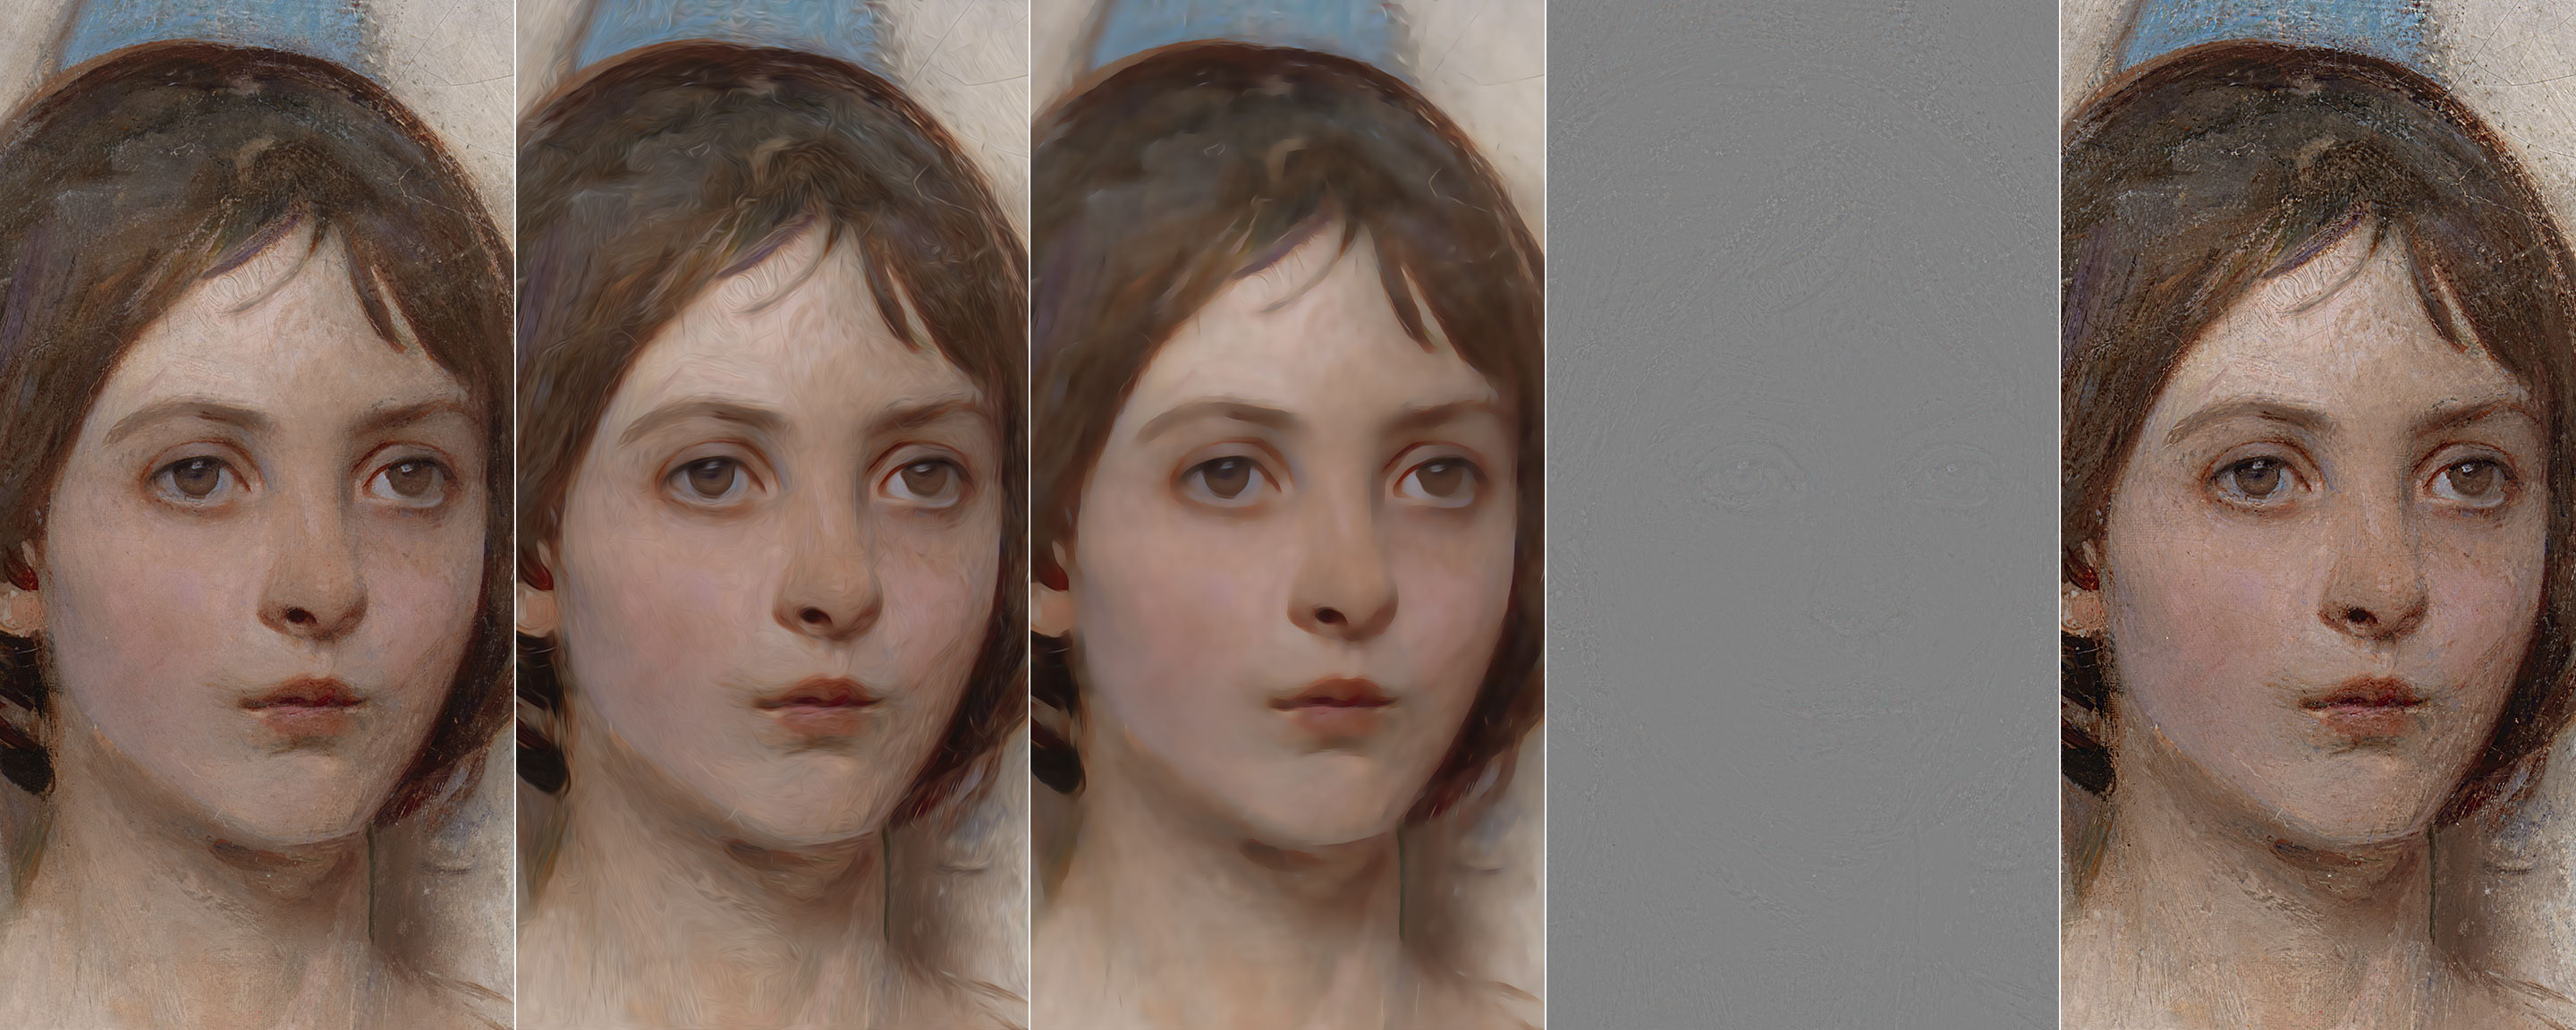
Nothing prevents you from using more than one filter (applied on top of the previous one) to build the layer that will be used to extract the Detail. In the following example I’ve used the Oil Paint filter plus a Smart Blur round.

That still makes a perfectly valid candidate for a two-layers frequency separation that can be used for both retouching or contrast enhancement. Possibilities are endless, provided that you’re able to invent ways to destroy the kind of detail that you want to migrate to a separate layer.

Leaving for the moment the field of perfect decomposition stacks of one base, filtered layer plus the Apply Image on top, there are ways to build interesting Detail layers for contrast enhancement purposes. Later on we’ll learn how to bring them back to decomposition stacks.

6.2 Difference of Gaussians

So far we’ve subtracted a Blurred version from the Original, in order to get the gray-blob that I’ve called the Detail layer. In the case of the Gaussian enhancement, we’ve added the Detail back to the Original (using your preferred blend mode/opacity).D=O−GBEnhanced=O+D

The enhancement targets the frequency range from whatever is the Gaussian Blur radius used (in my case 40px) down: so the (0,40)px range4. If you think about GB as a filter that wipes out the higher-than-the-radius frequencies:GB(40)=O(40→∞)

Then you can re-write the equation as:O(0→∞)−O(40→∞)=D(0→40)

That is to say, the Detail layer that contains the frequencies in the range (0,40)px is obtained subtracting an image with frequencies only in the (40→∞) pixels range from the original image that contains all the frequencies.

We’re not limited to use the Original for the subtraction. What if for instance we use two differently blurred images?GB(20)=O(20→∞)GB(40)=O(40→∞)O(20→∞)−O(40→∞)=D(20→40)

The result is as follows:

It’s a technique known as Difference of Gaussians, or DoG.

At the moment we’re not yet equipped to use this Detail layer for retouching purposes as well, but I’ll get to that in a short while. Meanwhile, feel free to experiment with different DoG values.

6.3 Edges layer

In the DoG example above we’ve combined two identical (Gaussian) kernels with different parameters. We may now try to combine two different kernels – it’s entirely within the realm of possibilities.

We’ve already met the candidates. Surface Blur (SB) is able to discern the image content, blurring “surfaces” and not “edges”; Gaussian Blur (GB), instead, wipes out everything that is within its frequency range. With a bold leap of faith you can consider the original image (O) to be made of “edges” (E) and “texture” (T): wildly unorthodox math ensues.O=OT+OESB=O−OTGB=O−(OT+OE)SB−GB=(O−OT)−(O−(OT+OE))=O−OT−O+OT+OE=OE

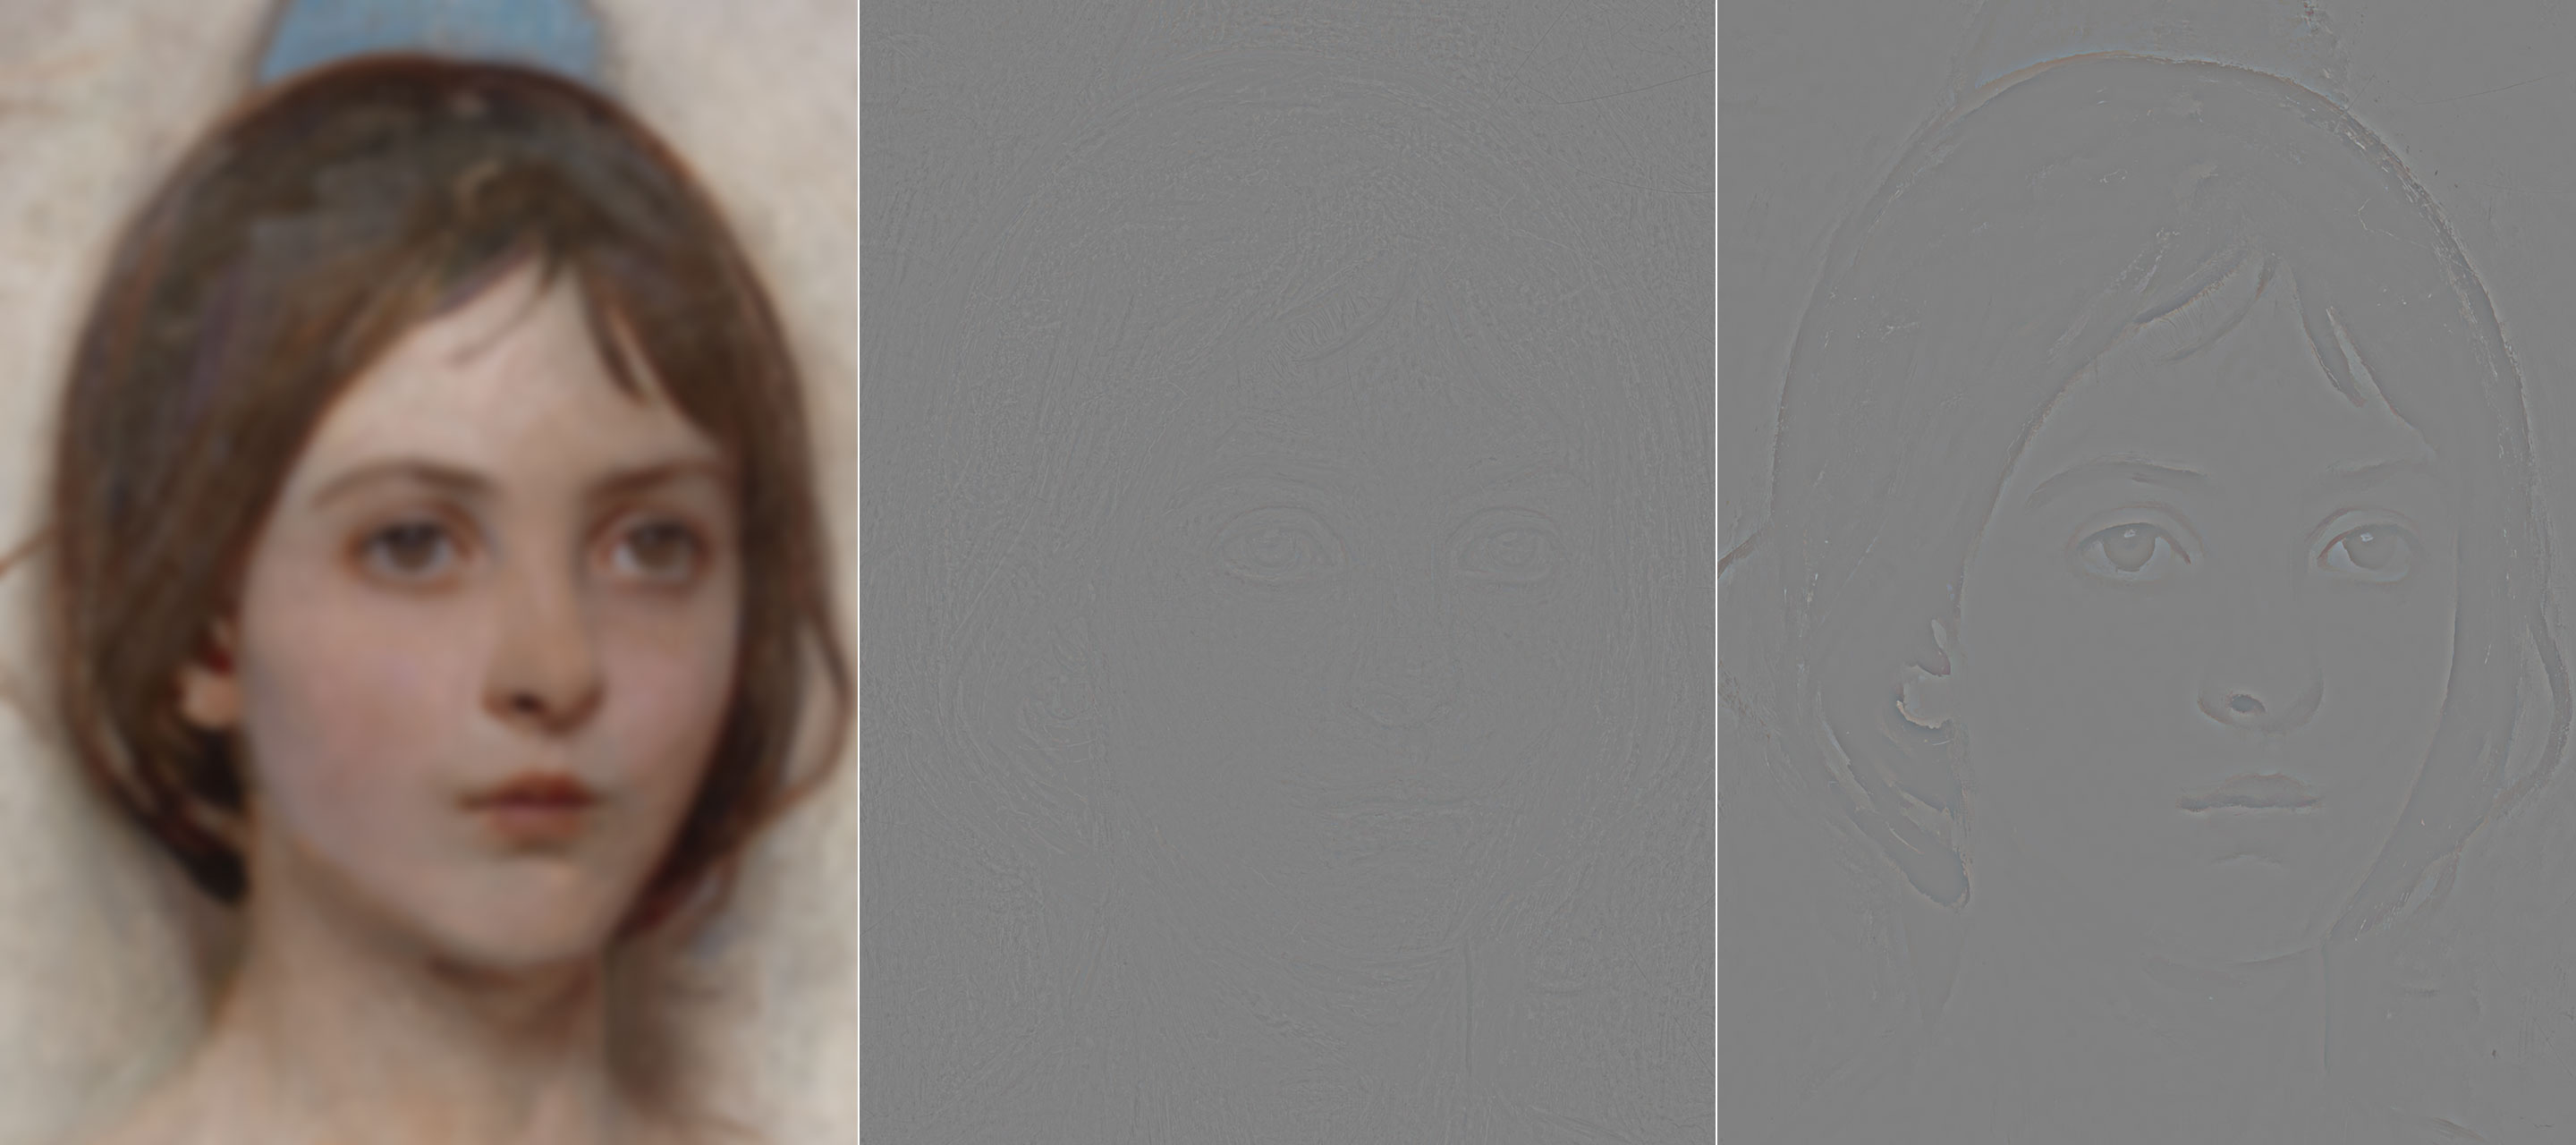
In other words: if GB subtracts both texture plus edges, and SF subtracts texture only, then if you subtract SB from GB you get a Detail layer that contains Edges only without texture. An image might help demonstrating the concept.

This Detail layer has been built with Surface Blur (Radius 12px, Threshold 15px) and Gaussian Blur (radius 10px). The intuition is always the same: how are the two operands different? That difference is what will be enhanced.

Here both textures are more or less blurred the same way: they aren’t different hence they’ll stay the same. Edges (the broad strokes that draw the main traits such as eyes, nose, mouth and hair) are instead dramatically different, hence they’ll get enhanced.

7. Image decomposition

So far we have either performed frequency separations to rebuild a clone of the original image split in two layers (a filtered one, e.g. blurred, plus a difference e.g. the detail in Linear Light blend mode) or we’ve create a variety of independent detail layers for contrast enhancing purposes. It’s time to join the two worlds.

7.1 Gaussian pyramid

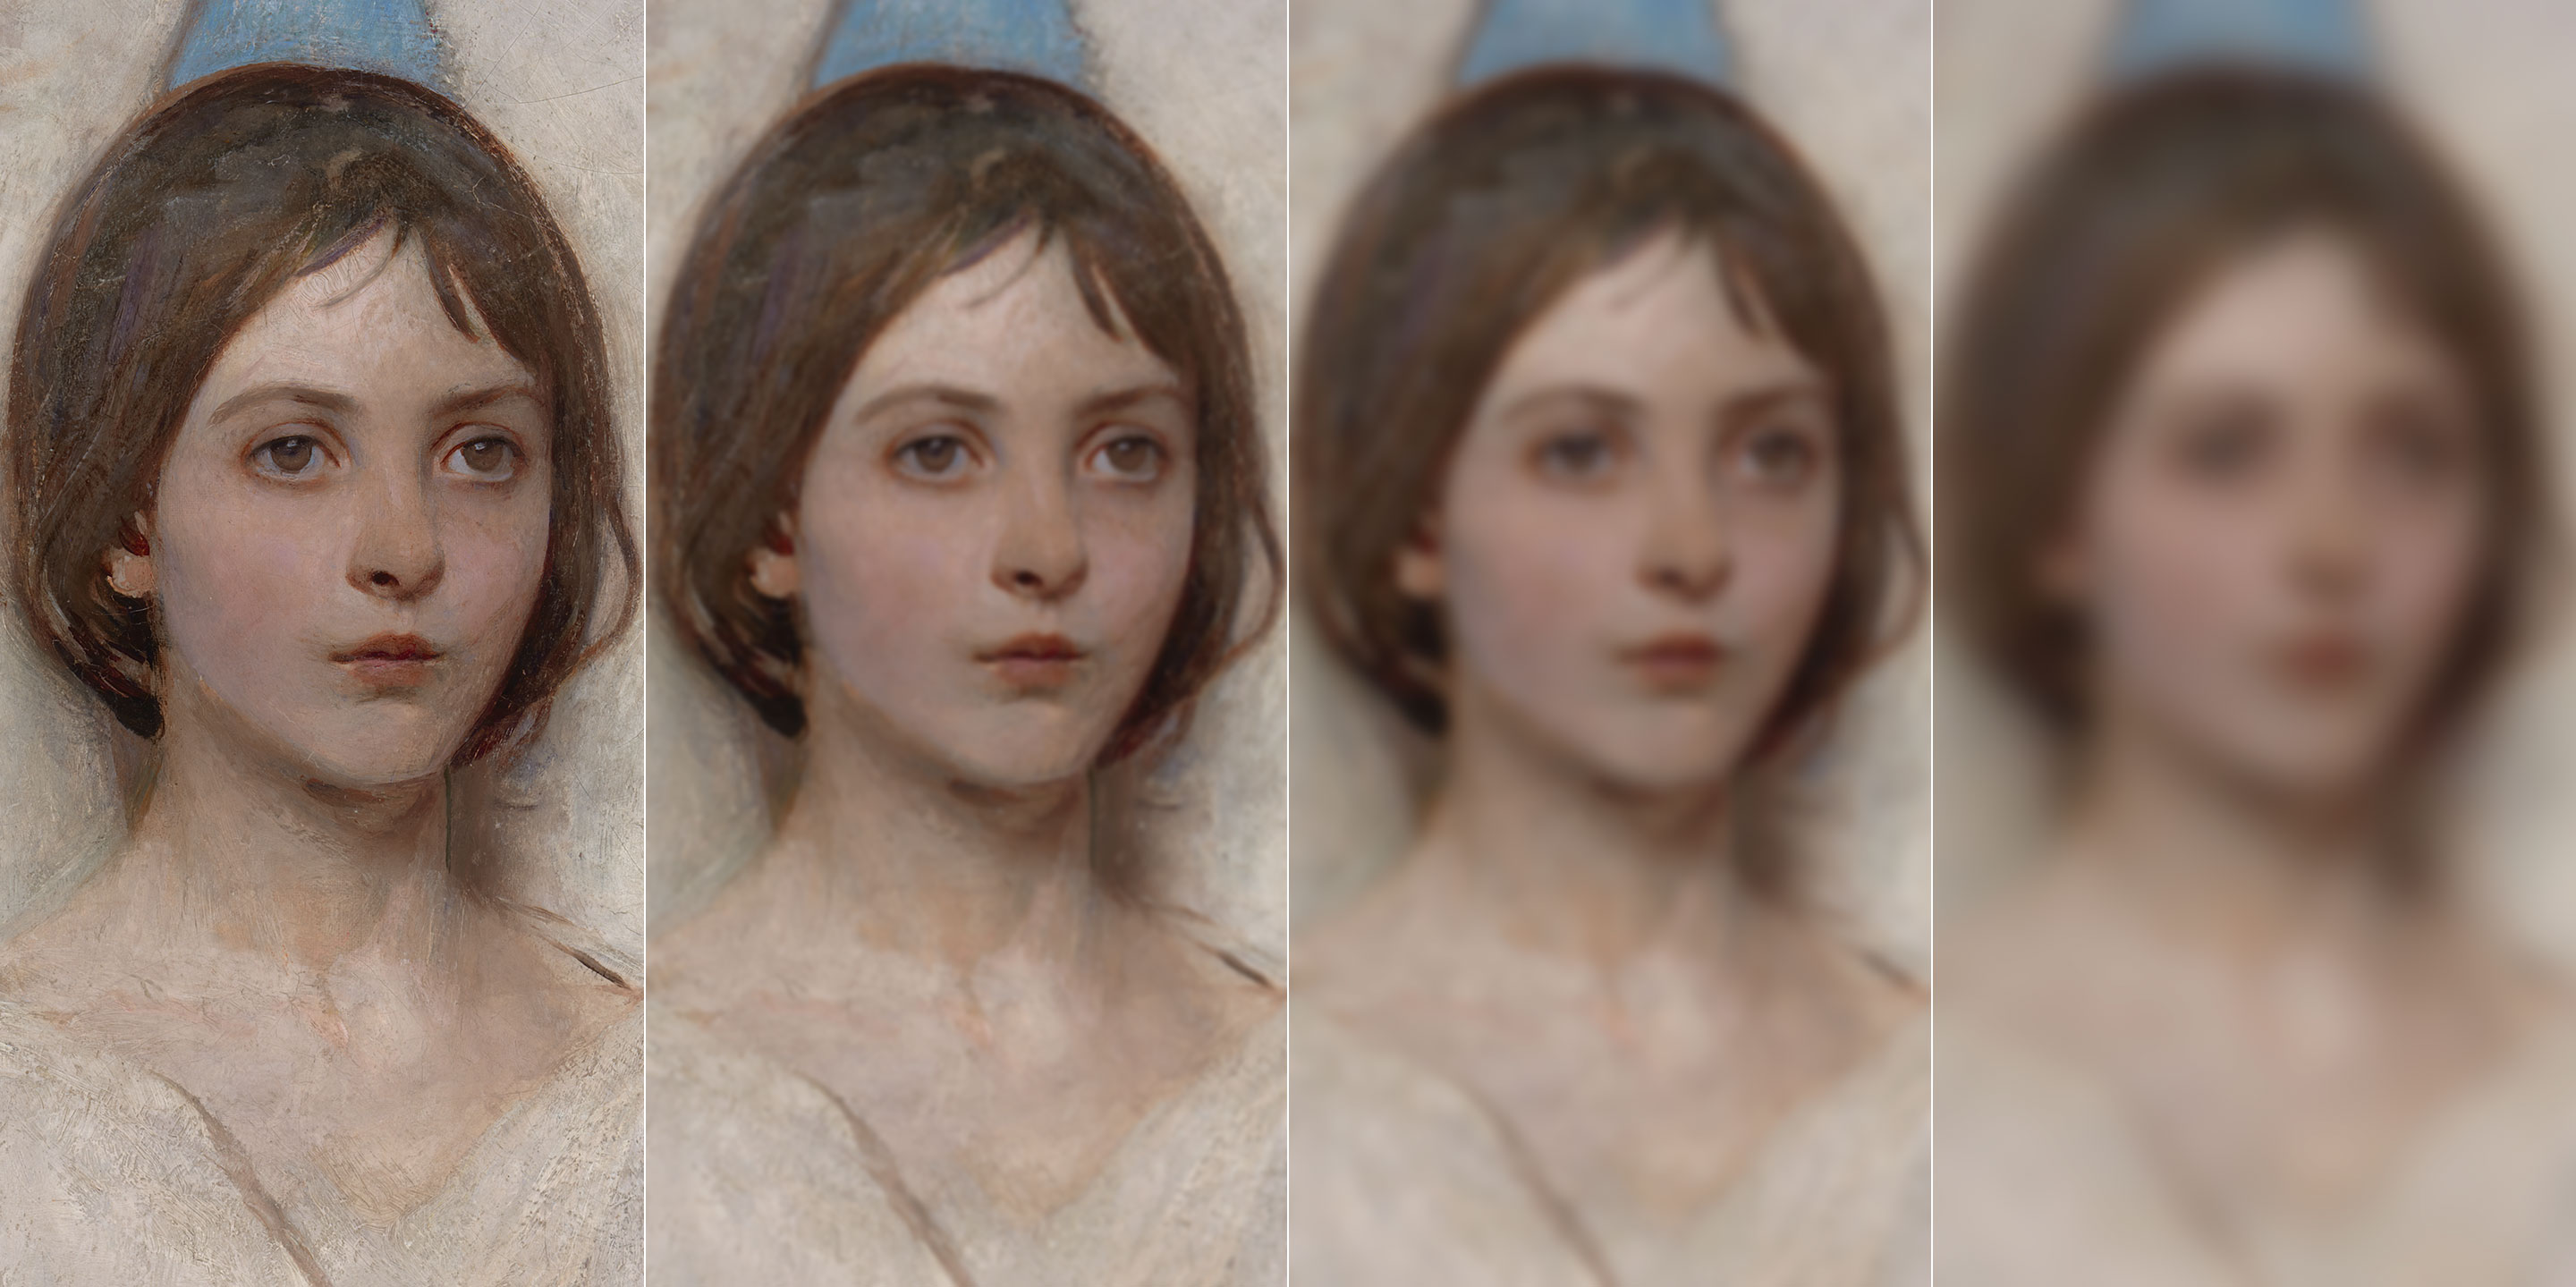
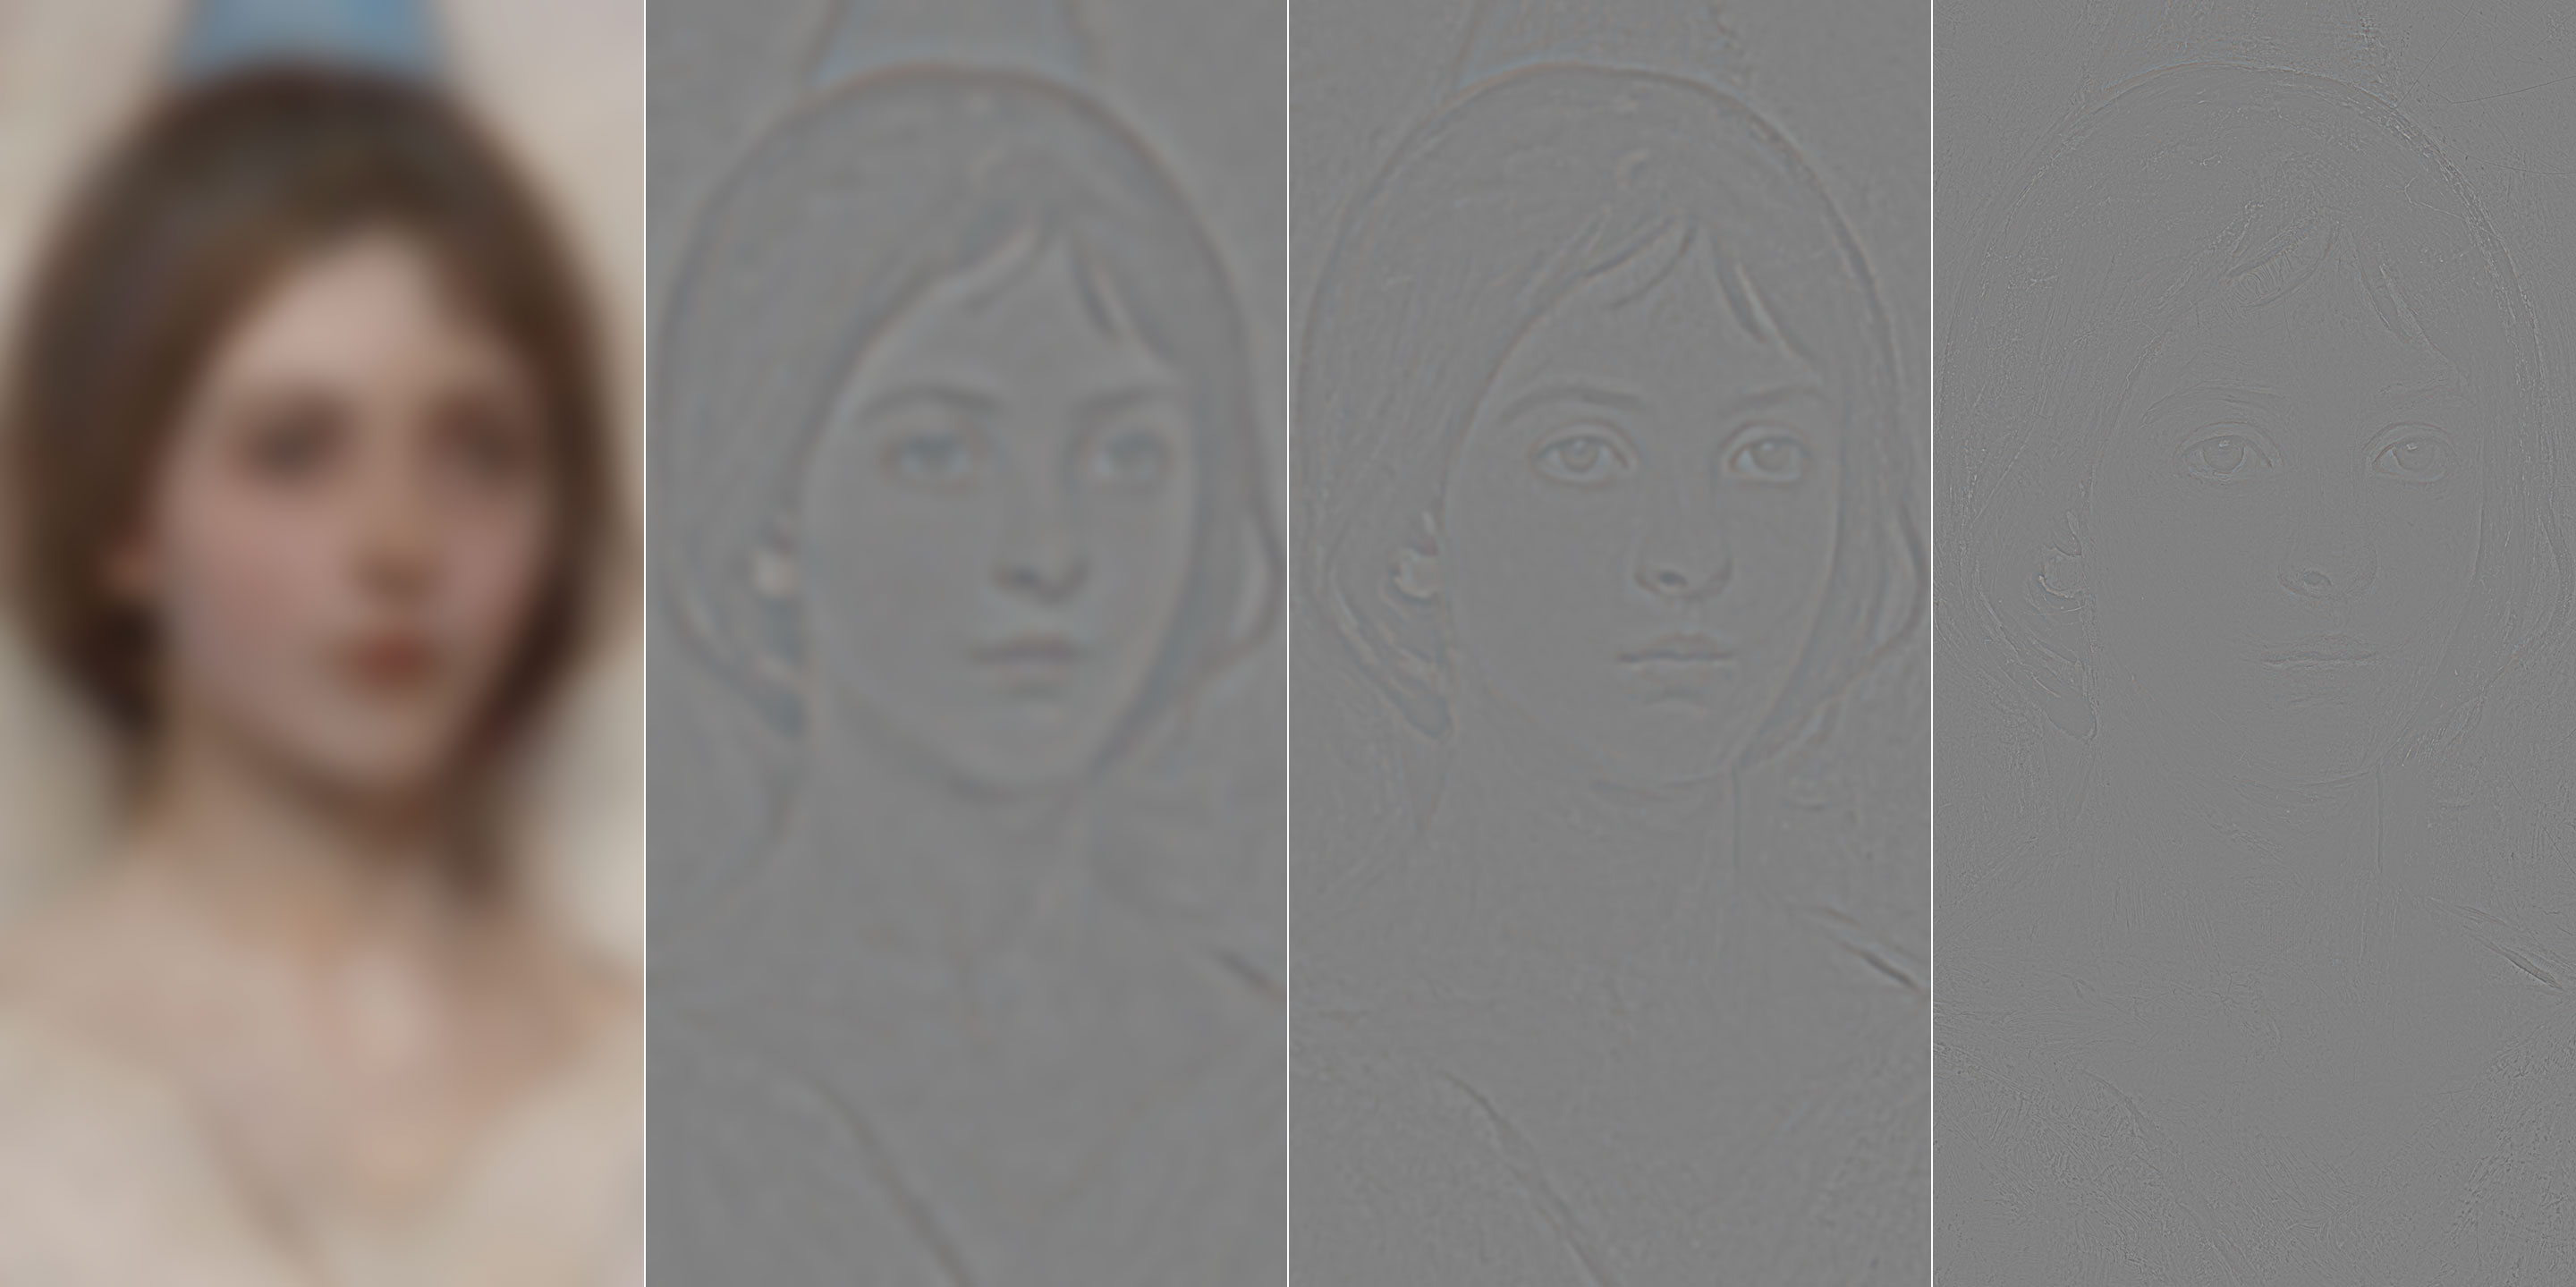
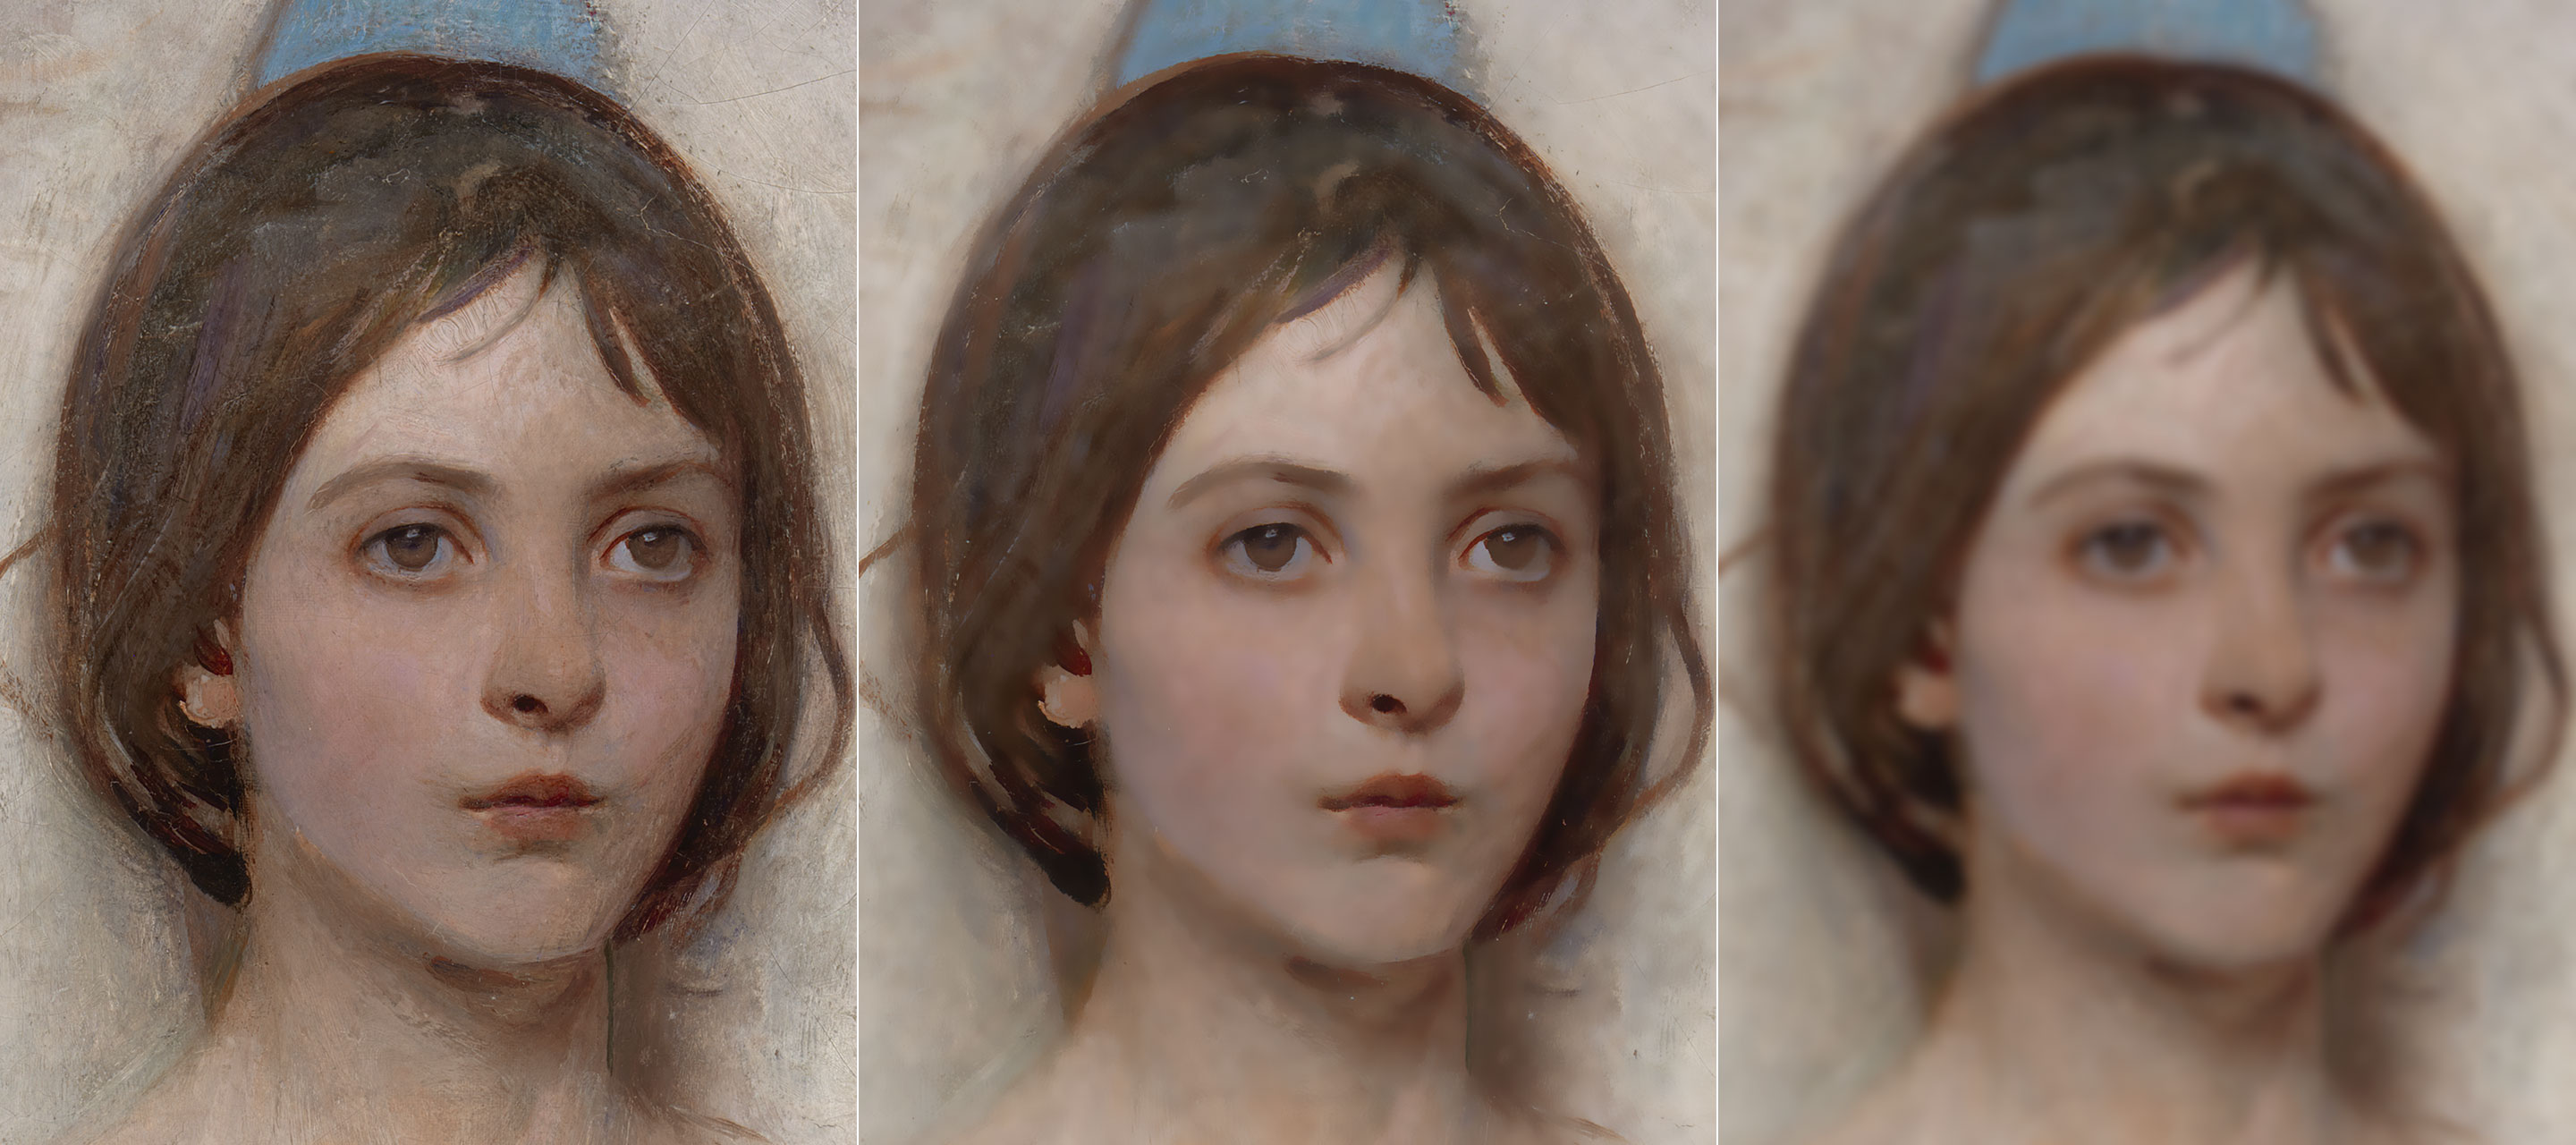
Let’s start with the familiar Gaussian kernel. If you recall, with the DoG we’ve targeted very specific frequency ranges, eg. from 40px to 20px. It’s possible to build a pyramid (i.e. a multi-frequency decomposition) splitting the image into more than two layers, e.g. four. These four layers will describe and represent the original image as a sum of four frequency ranges: from “infinity” to 40px; from 40px to 15px; from 15px to 5px; from 5px to zero.

The math is quite straightforward. Let’s call O the Original picture as usual, GB(n) the GB filter applied with radius n. We need four layers:O,GB(5),GB(15),GB(40)

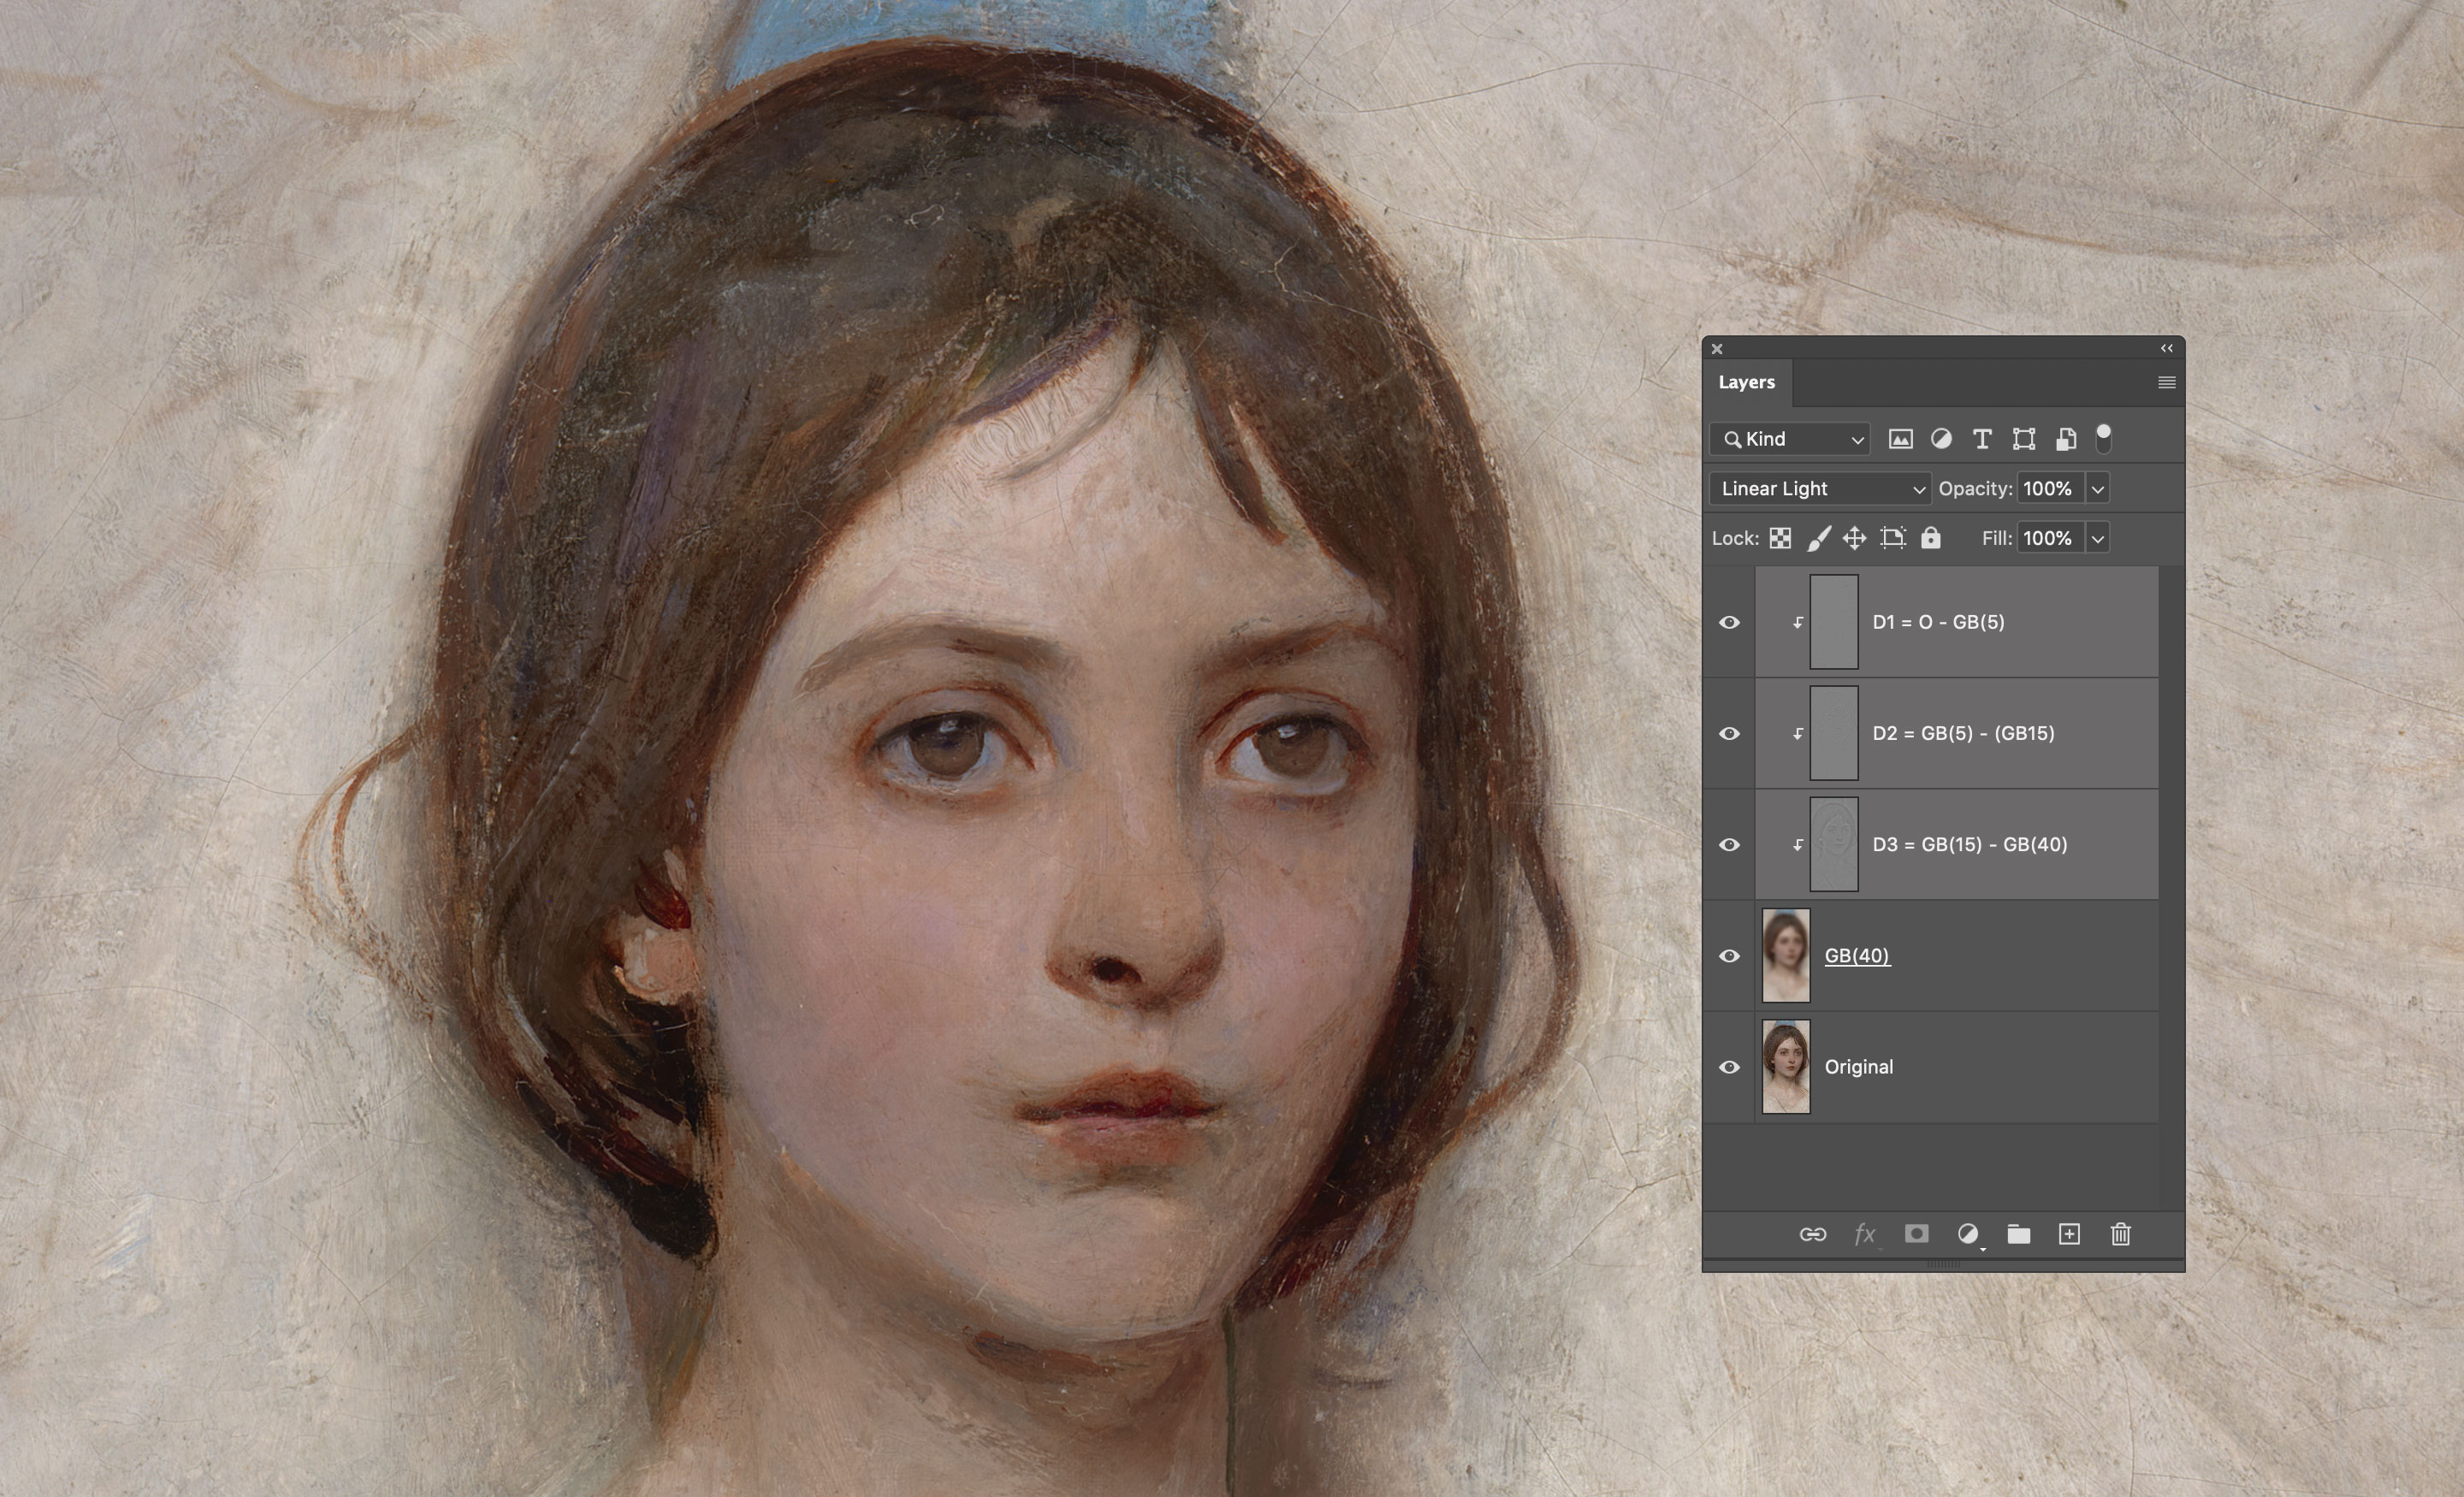
Let’s define differences Dn as follows:D1=O−GB(5)D2=GB(5)–GB(15)D3=GB(15)−GB(40)

So the image can be decomposed into:O=GB(40)+D1+D2+D3

In fact, substituting all the elements we get:O=GB(40)+O−GB(5)+GB(5)−GB(15)+GB(15)−GB(40)=O

Everything simplifies and we’re left with the same original image. Let’s switch to Photoshop and try to build this pyramid: first thing, we need the original plus three progressively more blurred layers.

Second, we need the GB(40) and D1,D2,D3. These are just Difference of Gaussians, the same DoG we’ve already encountered.

When you have all the ingredients, you can add them together via Linear Light blending.

The result is a pixel perfect copy of the original with all the three Detail ranges exposed: (40→15),(15→5),(5→0) pixels.

You can now either exploit this frequency separation for retouching purposes, or add each Detail layer back to the original (with various blending modes and/or opacities) for a frequency range targeted contrast boost.

Keep in mind that:

  • If instead of boost, you need to decrease the impact of a particular frequency range, do invert the Detail layer.
  • The order of the Detail layers in the stack doesn’t really matter, you can freely mix them.
  • There’s no limit to the amount of Detail layers you want to create.
  • You can always clip a Curves adjustment if you want to perform some peculiar edit to a Detail layer.

7.2 Mixed pyramids

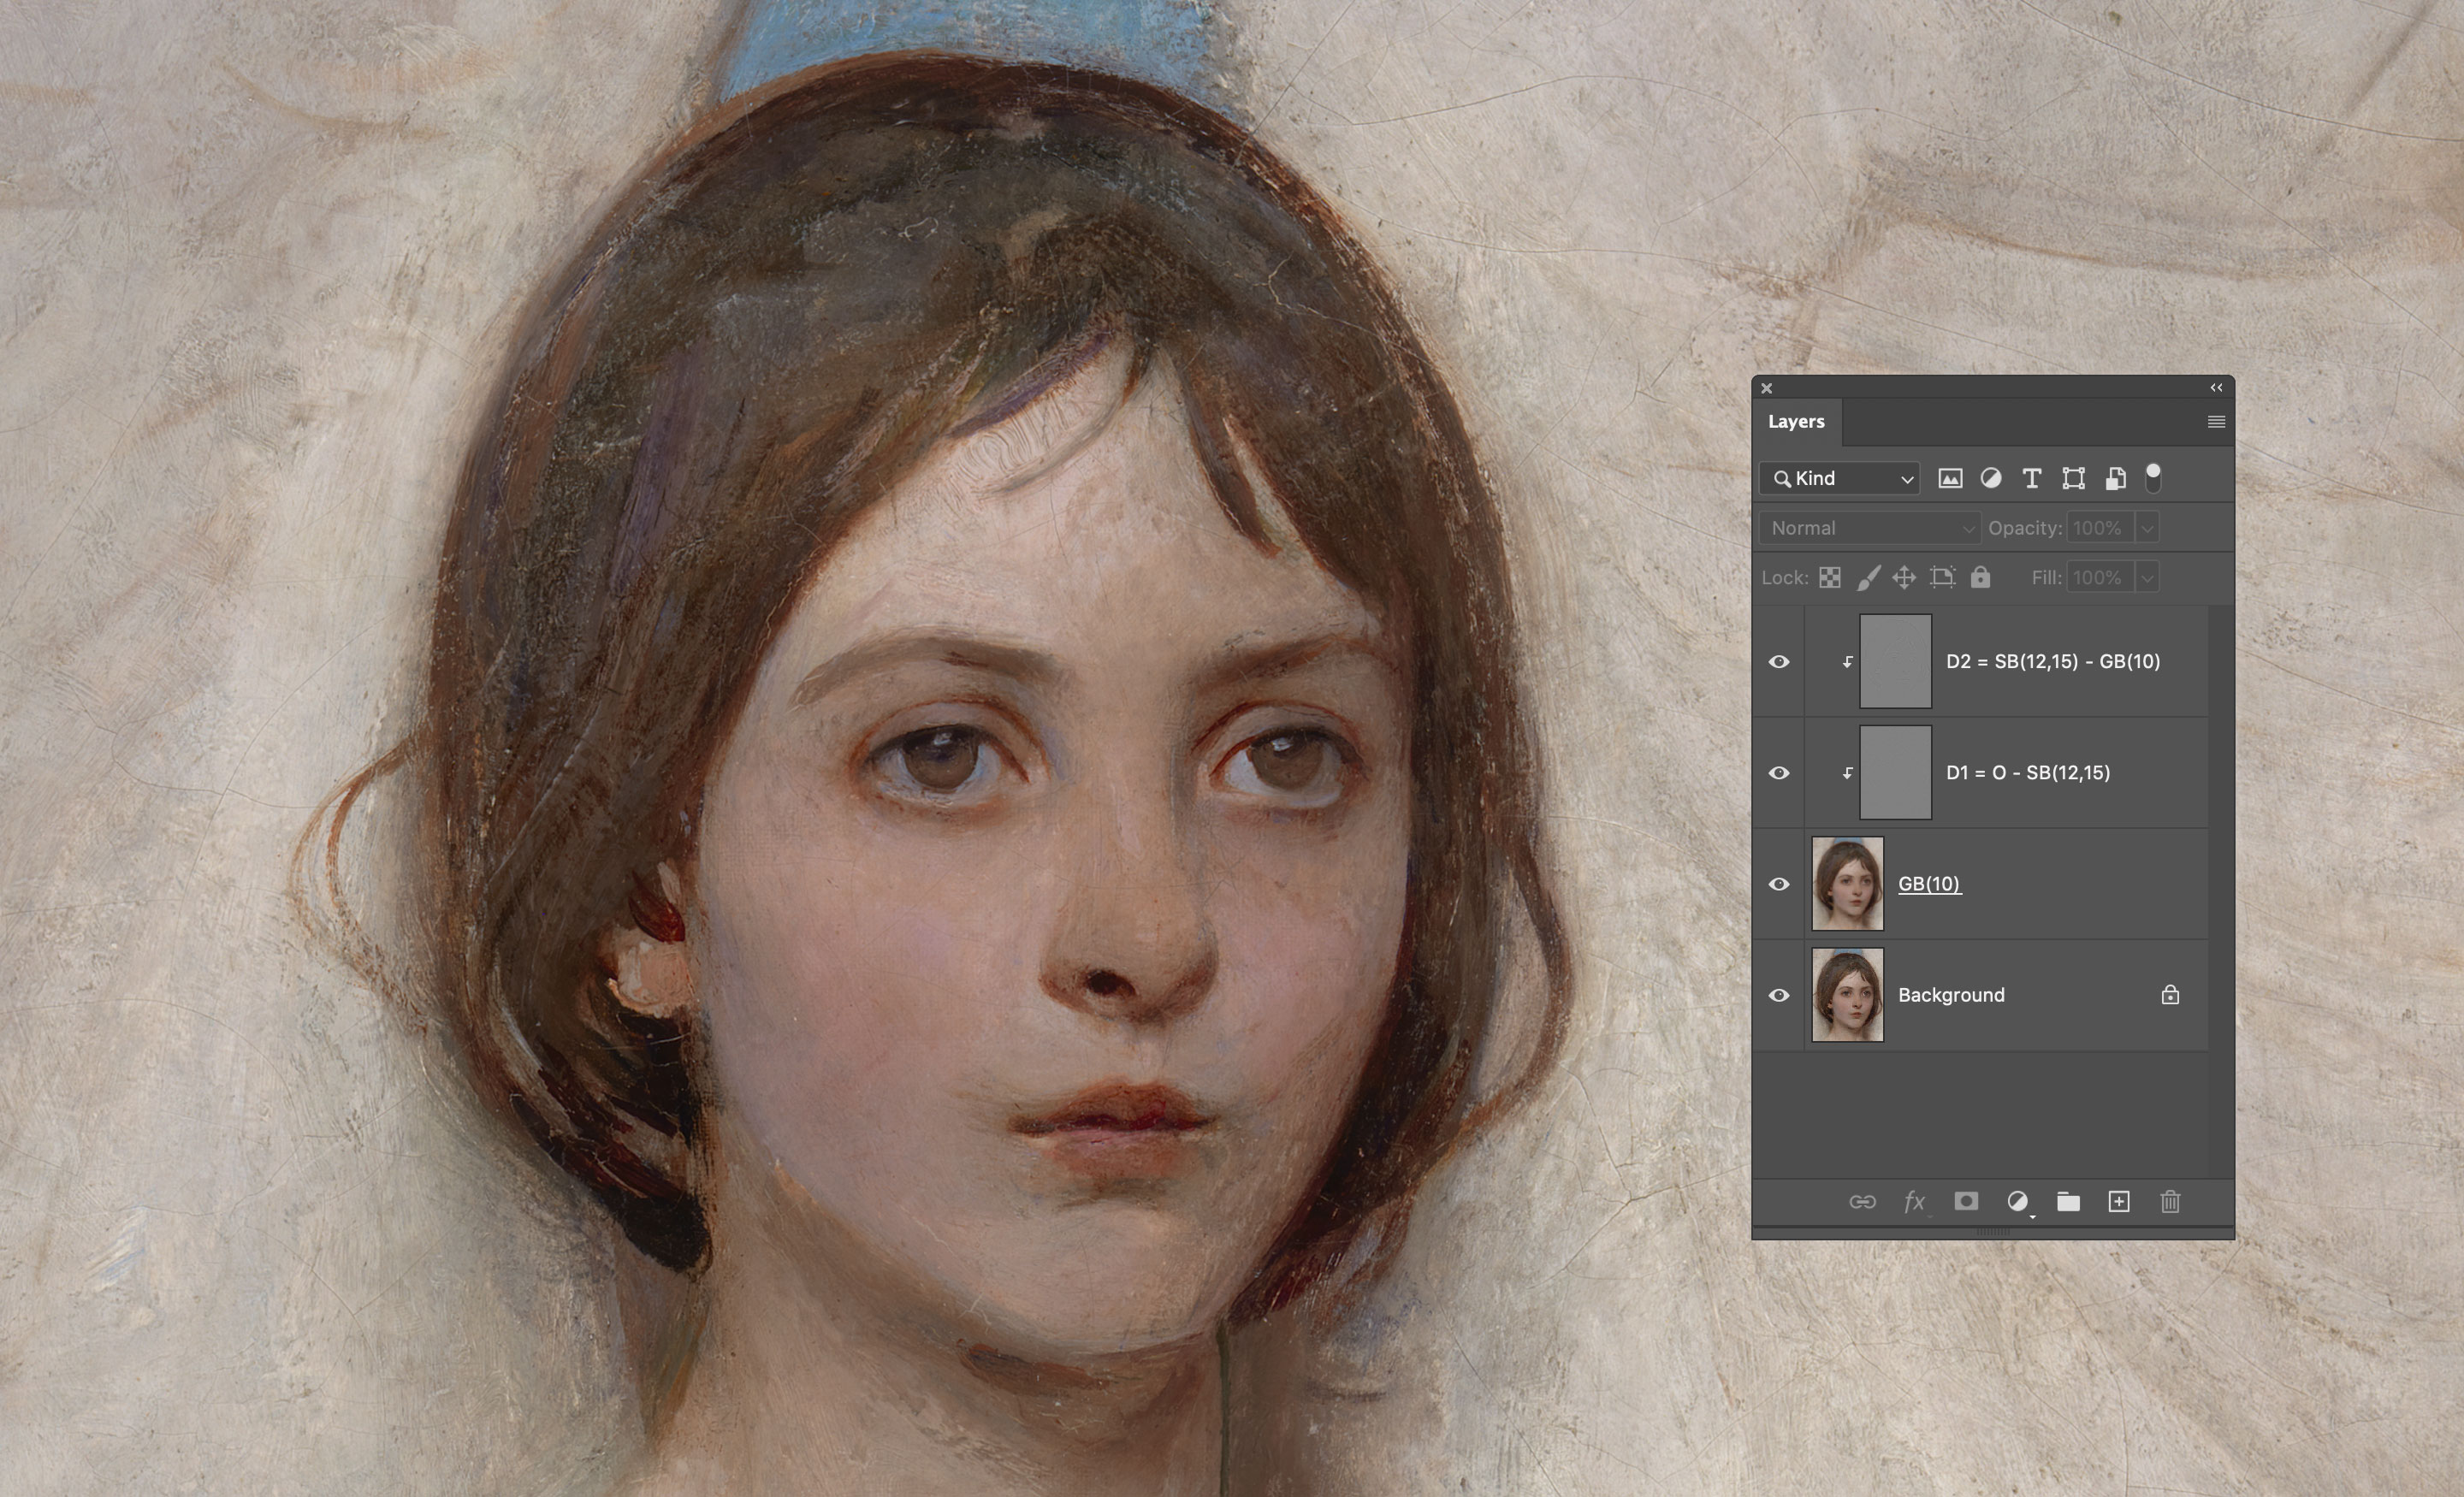
To properly conclude, there’s still one technique that needs to be revisited and incorporated into multi-layer frequency decompositions. If you remember, not long ago we’ve mixed Gaussian and Surface Blur to obtain an “Edges” Detail layer. It may surprise you (or it may not, at this point) to know that you’re not at all forced to use the same kernel in a decomposition: you’re free to use any kernel that make sense. Let’s try to build a GB/SB pyramid!

We need three layers:O,SB(12,15),GB(10)

Let’s define differences Dn as follows:D1=O−SB(12,15)D2=SB(12,15)–GB(10)

So the image can be decomposed into:O=GB(10)+D1+D2

In fact, substituting all the elements we get:O=GB(10)+O−SB(12,15)+SB(12,15)–GB(10)=O

The image can be then recomposed as usual.

The Detail layers can be used for either retouching purposed or contrast enhancement.

The general equations for the decomposition are:U0=OU1=Filter1(O)U2=Filter2(O)⋯Un−1=Filtern−1(O)Un=Filtern(O)D1=U0–U1D2=U1–U2⋯Dn−1=Un−2–Un−1Dn=Un−1–UnO=Un+D1+D2+⋯+Dn−1+Dn

At this point it’s up to you to decide which kernels to mix, and for which goal. Always remember to look for filters and filter combinations/subtractions that affects the feature you’re interested into – imagination can fly high!

References

  • Abbott Handerson Thayer, a portrait of his daughter from the Smithsonian Institute collection, 1887.
  • The Ultimate Guide To The Frequency Separation Technique by Julia Kuzmenko McKim is a nice introductory guide to simple 2-layers decompositions.
  • Former Adobe’s Imaging Senior Engineer Chris Cox about the decision to use 15bit + 1.
  • As for why Linear Light Blend uses 256 as a white point, see here.
  • Blend modes info are found everywhere but with various degree of precision. I’ve used
    Wikipedia of course, PhotoBlogStop, but the most interesting have been Murphy Chen (Chinese language) and Pegtop.
  • If you’re curious, my 2009 original article can still be found here.
  • All illustrations are mine. Blend mode graphs are plotted with p5.js.

  1. I take in consideration one channel only for simplicity’s sake. ↩
  2. HardLight has the same formula than Overlay, but it uses the upper layer to determine which formula to apply (Overlay uses the layer below instead). ↩
  3. I keep using “subtract” as a verb, but you should use the more appropriate Apply Image to the document’s bit depth. ↩
  4. It’s a bit counter-intuitive at first, because “down” in this case means to higher frequencies. ↩
27/04/2026 0 comments
0 FacebookTwitterPinterestEmail
Makeup cô dâu resort Cam Lâm

Hướng dẫn cài đặt Delicious Retouch Panel 4.1.0 Full bản quyền

by nhiepanhcamranh 26/04/2026
written by nhiepanhcamranh

Delicious Retouch Panel là một plugin photoshop giúp bạn dễ dàng chỉnh sửa chân dung với rất nhiều tính năng mạnh mẽ giúp cho việc chỉnh sửa chân dung nhanh hơn, tốt hơn và tiết kiệm thời gian.

Delicious Retouch một plugin mạnh mẽ không thể thiếu nếu như bạn thường làm việc để chỉnh sửa ảnh chân dung, tuy nhiên có nhiều bạn không cài đặt và kích hoạt bản quyền được nên bài viết hôm nay mình sẽ hướng dẫn các bạn cài đặt Delicious Retouch Panel 4.1.0 Full bản quyền.

Download Delicious Retouch Panel 4.1.0

Trước tiên các bạn cần tải về bản cài đặt Delicious Retouch Panel 4.1.0 ở link bên dưới đây:

Cài đặt Delicious Retouch Panel 4.1.0 như thế nào?

Cách này mình thực hiện trên Photoshop CC 2018 trên Mac OS, nếu các bạn dùng Windows thì cũng làm tương tự.

Bước 1: Giải nén file vừa tải về ở trên. Sau đó copy folder DeliciousRetouch4 theo đường dẫn:

  • Mac OS: /Library/ApplicationSupport/Adobe/CEP/extensions/
  • Windows x64: C:/Program Files(x86)/CommonFiles/Adobe/CEP/extensions/
  • Windows x32: C:/Program Files/CommonFiles/Adobe/CEP/extensions/

Bước 2: Chỉnh sửa file hosts theo đường dẫn:

Đối với Windows: C:\Windows\System32\Drivers\etc\hosts (các bạn chỉ cần copy file hosts ra ngoài Desktop sau đó thêm hai dòng bên dưới vào save lại và ghi đè lại vào đường dẫn lúc đầu là được.

Đối với Mac OS: Các bạn xem video hướng dẫn bên dưới:

Bước 3: Thêm 2 dòng này vào file hosts.

Hãy nhớ rằng việc chặn thông qua các máy chủ có các dòng dưới đây là rất quan trọng. Do đó các bạn bắt buộc phải thêm 2 dòng này vào file hosts thì mới kích hoạt được nhé.

127.0.0.1 www.checksite.us
127.0.0.1 photoshopchef.com

Bước 3: Mở Photoshop lên và mở Delicious Retouch: Windows > Extensions > Delicious Retouch 4.

Chọn Buy/Enter license key:

Sau đó nhập Product key sau: KG9999999999L8000000 và nhấn Submit.

Bước 4: Vậy là đã kích hoạt bản quyền thành công. Thưởng thức thôi.

Chúc các bạn thành công!

26/04/2026 0 comments
0 FacebookTwitterPinterestEmail

Recent Posts

  • Makeup Cô Dâu Tone Thái Sắc Sảo Tại Duyen Ha Resort Cam Ranh – Lộng LẫY Đêm Tiệc
  • Dịch Vụ Makeup Cô Dâu Tận Phòng Cao Cấp Tại Fusion Resort Cam Ranh
  • Top 5 Tiệm Makeup Phục Vụ Tận Phòng Uy Tín Nhất Tại Các Resort Cam Ranh
  • Bí Quyết Makeup Cô Dâu Tỏa Sáng Trong Đêm Tiệc Sang Chảnh Tại Khu Nghỉ Dưỡng Radisson Blu Cam Ranh
  • Dịch Vụ Makeup Tiệc, Chụp Ảnh & Cô Dâu Đẹp Tại Selectum Noa Resort Cam Ranh

VỀ CHÚNG TÔI

VỀ CHÚNG TÔI

Bắt đầu hành trình với nhiếp ảnh chuyên nghiệp từ năm 2022, tôi đã có cơ hội làm việc với hàng trăm khách hàng trong các mảng ảnh thẻ, profile, thôi nôi và đặc biệt là những bộ ảnh nghệ thuật tại các resort cao cấp. Với tư cách là người sáng lập hệ sinh thái nhiếp ảnh chuyên nghiệp (trong đó có Tiệm Ảnh Chú Hồng), tôi hiểu rằng mỗi bức ảnh không chỉ là kỹ thuật, mà là cảm xúc và câu chuyện của bạn.
Recent Posts

  • Makeup Cô Dâu Tone Thái Sắc Sảo Tại Duyen Ha Resort Cam Ranh – Lộng LẫY Đêm Tiệc

    23/07/2026
  • Dịch Vụ Makeup Cô Dâu Tận Phòng Cao Cấp Tại Fusion Resort Cam Ranh

    21/07/2026
  • Top 5 Tiệm Makeup Phục Vụ Tận Phòng Uy Tín Nhất Tại Các Resort Cam Ranh

    21/07/2026

Categories

  • Cẩm Nang & Kinh Nghiệm (4)
  • Chụp Ảnh Resort Cam Lâm (8)
  • Dịch vụ makeup Cam Ranh (9)
  • Dịch Vụ Nhiếp Ảnh Cam Ranh (3)
  • Makeup cô dâu resort Cam Lâm (8)
  • Review Địa Điểm Chụp Ảnh (1)

About Me

About Me

Bắt đầu hành trình với nhiếp ảnh chuyên nghiệp từ năm 2022, tôi đã có cơ hội làm việc với hàng trăm khách hàng trong các mảng ảnh thẻ, profile, thôi nôi và đặc biệt là những bộ ảnh nghệ thuật tại các resort cao cấp. Với tư cách là người sáng lập hệ sinh thái nhiếp ảnh chuyên nghiệp (trong đó có Tiệm Ảnh Chú Hồng), tôi hiểu rằng mỗi bức ảnh không chỉ là kỹ thuật, mà là cảm xúc và câu chuyện của bạn.
Categories

  • Cẩm Nang & Kinh Nghiệm (4)
  • Chụp Ảnh Resort Cam Lâm (8)
  • Dịch vụ makeup Cam Ranh (9)
  • Dịch Vụ Nhiếp Ảnh Cam Ranh (3)
  • Makeup cô dâu resort Cam Lâm (8)
  • Review Địa Điểm Chụp Ảnh (1)

Popular Posts

  • 1

    Top 5 Dịch Vụ Makeup Tận Nơi Tại Các Resort Cam Lâm, Bãi Dài Chuyên Nghiệp Nhất

    09/07/2017
  • 2

    Bảng Giá Gói Chụp Concept Phông Trơn Tại TP. Cam Ranh
    09/07/2017
  • 3

    BẢNG GIÁ DỊCH VỤ NHIẾP ẢNH TẠI RESORT (CAM RANH – CAM LÂM)

    09/07/2017

KEEP CONNECTED

  • Facebook
  • Twitter
  • Instagram
  • Pinterest
  • Flickr
  • Behance
  • Youtube
  • Snapchat

@2019 - All Right Reserved. Designed and Developed by PenciDesign

NHIẾP ẢNH CAM RANH
  • Trang Chủ
  • Chụp Ảnh Resort Cam Lâm
  • Makeup cô dâu resort Cam Lâm
  • Dịch vụ makeup Cam Ranh
  • Cẩm Nang & Kinh Nghiệm
  • Dịch Vụ Nhiếp Ảnh Cam Ranh
  • Review Địa Điểm Chụp Ảnh